For future reference, here are the momentum and braking settings I'm using on the locomotive fleet in order to use the ProtoThrottles:
Momentum (CV4) = 60, for Tsunami 1 and Tsunami 2, and CV4 = 215 for ESU (which LokProgrammer says is 53.75 seconds from full speed to stop)
Braking rate for Tsunami's is 41 + 128 = 169, which goes in CV 61 for Tsunami 1's and CV 117 and 118 for Tsunami 2's. For ESU's, CV 179 = 60 (which LokProgrammer says is a 15 second deceleration from full speed to stop).
(Also, I am using NCE advanced consists, programming the consists in the ops mode, which might be different from programming the consist address directly, but I'm not sure).
We had two successful op sessions recently with all three PT's working alongside NCE throttles and WiThrottles, with mixed consists of two or three diesels, and everyone seemed to like the braking, although some gave me feedback that the braking rate of 15 seconds wasn't quick enough. I had mapped all my locos to use F9 as the brake, so it was easily accessible to the regular NCE throttles as well as the PT's.
Monday, December 31, 2018
Sunday, November 11, 2018
the new ExactRail 53' bulkhead flats
One thing I remember for sure about railfanning in the 70's and 80's in the Seattle area was the high frequency of lumber loads in the PSC 53' bulkhead flats. Over the years I've built a few of the Walthers models of this car for my layout, but have eagerly awaited a more detailed alternative, which has now presented itself in the new ExactRail cars ( www.exactrail.com ). These cars are beautiful. Here are some shots of the first run of 5 of them (plus a Walthers model at the end, in case you're counting) taking their inaugural run, carrying lumber south from Vancouver BC to Seattle and beyond:


The end detail on these cars is excellent (even if my focus isn't!), and since the wood decking is actual laser-cut wood, you get to see the texture of wood grain on both sides of the bulkhead.

Here the cars are making their way south across the Stillaguamish River bridge north of Arlington. The BNSF loco belongs to Dave Enger, and I don't know how it got into a train which is supposed to represent 1973. The lumber loads, by the way, were made by Dave MacKinnon of www.detailnscale.com

South of Everett now, the cars are making their way along the bluff near Golden Gardens Park in Seattle. The track at the far left is the cutoff to the "Fremont Branch", which to this day serves customers in Ballard and Fremont.

After crossing the Ship Canal Bridge (#4), the cars have passed under the Nickerson St. overpass (upper left corner) and are moving through Interbay/Balmer yard. The double-stack cars also hadn't been invented yet in 1973, nor were they decorated with stickers by children, but there they are.

Our inaugural run is now approaching the North Portal in downtown Seattle, passing the Wall St. grade crossing. If anyone has a skyline photo taken in 1973 taken from the Pier 66 vicinity, let me know. I didn't think of taking this backdrop photo until the '90's, when the condo building boom had started and the Columbia Tower had been erected.
The inaugural run was a success, with no derailment or clearance issues, and these cars are now in service on the HO Burrlington Northern Seattle Region (in 1973).
Friday, October 19, 2018
Yard evolution
My HO scale Burrlington Northern, Seattle Region, layout is awash in yards. I'm not sure how this came about, except that it happened over time. I started out doing a lot of railfanning at the BN's Interbay/Balmer yard in between the Seattle neighborhoods of Queen Anne and Magnolia, which was a major terminal yard for GN operations before the BN merger in 1970. This yard would make a complete model railroad itself, what with major engine terminal and roundhouse, car repair shop with three working tracks, a single track main with several arrival/departure tracks and a major classification area including a hump yard, numerous industrial customers around the perimeter, auto-loading facilities for importing (and exporting) automobiles, a major military equipment depot, and a nearby major grain terminal. Oh, and don't forget the classic hinged lift Bridge #4 over the Lake Washington ship canal at the Ballard Locks, just to the north of the yard. And three highway/pedestrian bridge crossings to make it easy to watch the action. Here is an overview picture of what I ended up building, mainly in the 1980's, looking north. The main classification ladder in the left of this photo has been in continuous operation switching cars, in two different basements, ever since then:
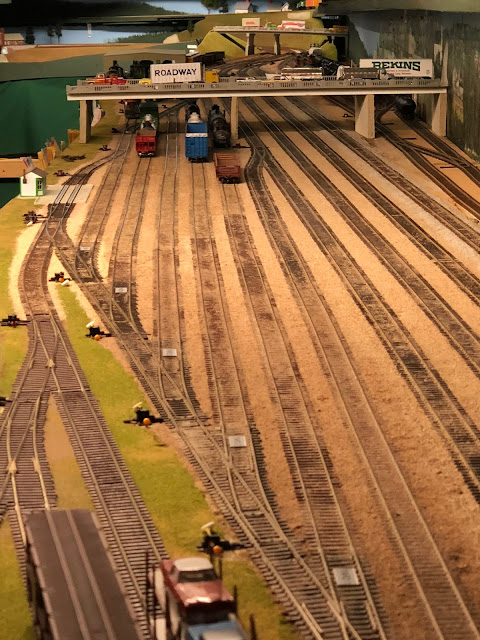 The overpasses in this view are Drevus St. and Nickerson St., both excellent railfanning locations at the prototype yard. In the distance to the left side is a model of the car repair shop, and on the right are three tracks representing the engine facilities and the Time Oil depot. A track runs behind that next to the backdrop to become the "Terry Ave. Line", which served customers in what is now the "South Lake Union" area.
It was easy to see that from this major yard, long distance trains ran north to Vancouver BC, east to Spokane, Chicago, etc. via Everett Jct. (also north of here), and south to Tacoma, Portland, Calif., etc. I set up a few staging tracks on either side of this yard to handle these moves "off the layout" and we were good to go. There were three arrival/departure (A/D) tracks available just to the left of the mainline to make up trains heading in each of these primary directions. It was a lot of fun switching. And it was all there was room for in the single-car garage.
But then we decided to move to a bigger house, with an 800 sq. ft. basement! It had become obvious that, in addition to the GN's main Balmer yard in Interbay, there also were prototype yards immediately south of downtown Seattle belonging to GN, NP, MILW and UP, including the MILW's famous car ferry to Pt. Townsend (not to mention Bellingham and Vashon Island!) which begged to be modeled. So, after several years off for basement demolition and preparation of walls, backdrops and ceiling, we started building the "Stacy St. yards" complex just south of Balmer, connecting it by a double-track main passing through the stairs to the basement, called "North Portal". Now Seattle was properly represented by a major yard north of downtown, and several major yards to the south. A seven-track staging yard was built further south of there along the wall to represent all destinations south of Tukwila. Here is a photo of the current Stacy St. complex, looking south:
 The foreground is the MILW car barge operation (missing the signature loading bridge structure overhead), with the MILW make-up tracks off the picture to the left. Above that is the "waterfront yard", and above that are the main classification tracks of Stacy St. yard. To the left in the dark are the A/D tracks for Stacy and the double-track mainline through this area, as well as the "mud track" for car storage east of the main and a Freight Terminal track (north of what is now the Starbucks corporate HQ buildings). There are a number of piers, industry tracks, and a scale track served by this yard complex. During operating sessions, there is quite a bit of local transfer traffic that moves back and forth between Stacy and Balmer, since the long distance trains are mainly made up in Balmer.
South of Stacy, across the 1st Ave. S bridge, is the UP's massive Argo yard complex. I originally used that area on the layout as a temporary "coach yard" to park the long "Empire Builder" and shorter "International" consists, but it became clear that we needed a place south of Stacy to take the interchange cars for the UP and the MILW. So, what choice did I have other than to build a 5 track double-ended "Argo" there? Here it is (in the dark), looking south:
 In the foreground is the crossing of Royal Brougham St., with the mainline tracks in light grey ballast and the "Colorado Main" track in a brown ballast color. Against the backdrop are some boxcars spotted at several of the freight forwarders in that area, and next to it is the consist for the "International" waiting to head to Vancouver BC. Following that are the three tracks used for interchange with UP and MILW. At left is a MILW pickup truck giving a hint that this isn't an all-BN plant. The double-track mainline curves around to the right into a hidden staging yard for all points south. We use two of the tracks for staging locals - the Renton Rocket and the Auburn-Everett Transfer. The rest are for long distance trains to Portland and Calif.
So now we have evolved from one to three yards, just to represent the Seattle terminal area. What about the north and east traffic? Where does it go? I wish I had never asked this question, because the answer(s) is complicated! After a beautiful ride along the shores of Puget Sound, trains reach Everett, containing two major yards and (at least) two wyes. One is along the west bank of Everett, at the Port of Everett, called "Bayside Yard", and the other is on the east side of Everett along the Snohomish River, called "Delta Yard", where there were a number of major sawmills. After much gnashing of teeth, I decided to simplify the prototype down to a single wye and smaller versions of each of these yards, with northbound traffic passing through Bayside yard and eastbound traffic passing through Delta yard. Here is a shot of Bayside, looking north:
 The good news is that this yard is a lot of fun to work, and it handles traffic to the Scott Paper Co. mill as well as the freight house, a lumber yard, Weyerhaeuser Mill A, and Port of Everett tracks to the left. The bad news is that it bears only slight resemblance to the prototype yard, and I'm thinking of completely remodeling it. Also, the switches leading off to the lower right of the photo lead to a turntable and roundhouse, which on the prototype was located in Delta Yard, not Bayside. The main track is at the left along the layout edge, and at the far end it goes through a tunnel to the Delta Wye, after which it proceeds north to Vancouver BC (via Burlington Yard, more on that later).
The other yard in Everett is the Delta Yard, reached by taking a right turn at "Everett Junction" at the south end of Everett. On my layout this yard is on the other side of the peninsula from Bayside Yard. Here is a photo of Delta, looking south (railroad west):
 In the foreground of this photo is the all-important Weyerhaeuser Mill B, which generated a lot of lumber traffic for both the BN and MILW. You can see I have it protected with an oversized "blue flag" man, a nifty track-powered LED light made by Seth Neumann. More on blue flags and red flags some other time. The mainline is the first track above that, and the next track is a long passing siding that also serves as a yard lead for the three yard tracks at Delta. There is also a narrow gage terminal yard in this location, where the Denver and Rio Grande Western finally got all the way West. Up the side of the backdrop we have narrow gage service to the "Cascade Copper Co." mine in the far distance, and we also interchange oil, cattle, merchandise, and 20' containers with the line in the yard here. During (standard gage) operating sessions we use this yard to organize traffic to and from the east, and it is becoming clear that we don't have enough capacity here to do it well. This is the tradeoff that was involved by wanting to include a narrow gage branch on the layout. More on this another time. So far, at least, this is the only "yard" on the narrow gage line. But the main point is that we have separated the handling of eastbound and northbound traffic between these two yards, greatly reducing congestion on the main track(s).
I thought I was done with yard evolution at this point, but have you ever been to the BN yard at Burlington, WA? I always knew that I liked the look of tank cars and wanted to run the "Oiler" and "Anacortes Local" jobs on the railroad, but as soon as I saw the prototype Burlington Yard I knew we had to include it on the layout. A switch crew was permanently stationed there to handle switching a variety of industries and branch lines, so it turns out to be one of the best jobs on the railroad. Here's a (tele)photo of the modeled yard, looking south, which is almost identical to the prototype yard, both in layout and function:
 The mainline is in the foreground, and appears to be lined for the siding. Farm equipment dealers and grain elevators are on the right, as well as a BN MOW track currently holding the weed sprayer train. The track on the far right is the Anacortes Branch, which is a staging track for the two refineries there and the Port of Anacortes, which handled wood chip traffic, among other things. In the distance on the left are the main classification tracks and against the backdrop in the distance is one of the area's many fruit packing plants, as well as a caboose and engine pocket for the resident train crew. The Concrete Branch, not visible in this photo, runs off to the lower left and generates logs, lumber, and locomotive quality sand needed at each of the previously mentioned engine servicing facilities (as well as many off-line).
This has been a quick tour of the evolution of the main yards on the Burrlington Northern Seattle Region (not including the three "staging yards"!). When I started designing and building the layout, I had no intention of having six major yards in operation at the same time. I thought it would be possible to run the layout with six or so people. Now, with the evolution of all these yards, we have had sessions with 15 operators, and we still didn't get all the work done. So the moral of the story is, take your pick, "model railroading is fun", or, "if you can bring yourself to stop building yards, by all means do so!"
In my case, I haven't been able to stop. Now we're building a version of the "West Seattle Yard", in order to serve a bunch of industries over there (see previous blog). As if there wasn't enough traffic in the Stacy St. yard complex already!

It was easy to see that from this major yard, long distance trains ran north to Vancouver BC, east to Spokane, Chicago, etc. via Everett Jct. (also north of here), and south to Tacoma, Portland, Calif., etc. I set up a few staging tracks on either side of this yard to handle these moves "off the layout" and we were good to go. There were three arrival/departure (A/D) tracks available just to the left of the mainline to make up trains heading in each of these primary directions. It was a lot of fun switching. And it was all there was room for in the single-car garage.
But then we decided to move to a bigger house, with an 800 sq. ft. basement! It had become obvious that, in addition to the GN's main Balmer yard in Interbay, there also were prototype yards immediately south of downtown Seattle belonging to GN, NP, MILW and UP, including the MILW's famous car ferry to Pt. Townsend (not to mention Bellingham and Vashon Island!) which begged to be modeled. So, after several years off for basement demolition and preparation of walls, backdrops and ceiling, we started building the "Stacy St. yards" complex just south of Balmer, connecting it by a double-track main passing through the stairs to the basement, called "North Portal". Now Seattle was properly represented by a major yard north of downtown, and several major yards to the south. A seven-track staging yard was built further south of there along the wall to represent all destinations south of Tukwila. Here is a photo of the current Stacy St. complex, looking south:

South of Stacy, across the 1st Ave. S bridge, is the UP's massive Argo yard complex. I originally used that area on the layout as a temporary "coach yard" to park the long "Empire Builder" and shorter "International" consists, but it became clear that we needed a place south of Stacy to take the interchange cars for the UP and the MILW. So, what choice did I have other than to build a 5 track double-ended "Argo" there? Here it is (in the dark), looking south:

So now we have evolved from one to three yards, just to represent the Seattle terminal area. What about the north and east traffic? Where does it go? I wish I had never asked this question, because the answer(s) is complicated! After a beautiful ride along the shores of Puget Sound, trains reach Everett, containing two major yards and (at least) two wyes. One is along the west bank of Everett, at the Port of Everett, called "Bayside Yard", and the other is on the east side of Everett along the Snohomish River, called "Delta Yard", where there were a number of major sawmills. After much gnashing of teeth, I decided to simplify the prototype down to a single wye and smaller versions of each of these yards, with northbound traffic passing through Bayside yard and eastbound traffic passing through Delta yard. Here is a shot of Bayside, looking north:

The other yard in Everett is the Delta Yard, reached by taking a right turn at "Everett Junction" at the south end of Everett. On my layout this yard is on the other side of the peninsula from Bayside Yard. Here is a photo of Delta, looking south (railroad west):

I thought I was done with yard evolution at this point, but have you ever been to the BN yard at Burlington, WA? I always knew that I liked the look of tank cars and wanted to run the "Oiler" and "Anacortes Local" jobs on the railroad, but as soon as I saw the prototype Burlington Yard I knew we had to include it on the layout. A switch crew was permanently stationed there to handle switching a variety of industries and branch lines, so it turns out to be one of the best jobs on the railroad. Here's a (tele)photo of the modeled yard, looking south, which is almost identical to the prototype yard, both in layout and function:

This has been a quick tour of the evolution of the main yards on the Burrlington Northern Seattle Region (not including the three "staging yards"!). When I started designing and building the layout, I had no intention of having six major yards in operation at the same time. I thought it would be possible to run the layout with six or so people. Now, with the evolution of all these yards, we have had sessions with 15 operators, and we still didn't get all the work done. So the moral of the story is, take your pick, "model railroading is fun", or, "if you can bring yourself to stop building yards, by all means do so!"
In my case, I haven't been able to stop. Now we're building a version of the "West Seattle Yard", in order to serve a bunch of industries over there (see previous blog). As if there wasn't enough traffic in the Stacy St. yard complex already!
Friday, October 12, 2018
BN SD40-2's

SD40-2's were a new addition to the BN fleet back in 1973, and I've always enjoyed the way they look. I took this photo in Balmer Yard sometime in the 80's. Ever since then, I have collected HO versions of the SD40-2's whenever a manufacturer would make them. Athearn, Kato, Genesis, you name it. But recently ScaleTrains released some, and they are truly amazing models. Partly because of all the gee whiz features in sound and light that they implemented with the ESU V4.0 decoder inside.
So, trying to restrain myself, I bought only two of them, pictured below. However, out of the box, their decoder settings just didn't work for me, especially when running them together in a consist. However, I am (relatively) happy to report that after all the work described in my previous blog to figure out how to use a PC emulator to drive ESU software and the ESU LokProgrammer, these babies are now reaching their full potential. Here's a list of some of the changes that I found needed to get them to "play well with others".
- The speed was set to max at 50 SMPH and midrange at 25 SMPH, similar to all my other locos.
- The "back EMF" was auto-calibrated on the test track (set CV54=0, turn on the DCC operations mode, and press F1).
- The front headlight was set up to activate on F0 in both directions, and the rear light on F4 in both directions.
- The dimmer function was moved from somewhere in the double digits to F7. I have a lot of legacy cabs that only go up to F9, so I have to prioritize which functions get the single digit numbers.
- The working marker lights (which, amazingly, can be set to white, green, red, or off!) were moved to F5.
- The rotating beacon was moved to F6, along with the working number board lights. This was needed because the factory setting was to turn on the number board lights at the same time as turning on the sound (F8). This makes no sense, because in a consist you don't want all the loco's marker lights on, only the lead loco's. I figured if a loco was functioning as a lead loco, you would want both the rotating beacon and the number board lights to be on.
- The "dynamic brake" was set to come on at F9, along with the "sound slot 13". I gave the braking rate for the dynamic brake a setting of 60 and the overall deceleration rate (CV4) a setting of 215. This means that the consist will coast when the throttle is turned off until the brake is applied on F9. The sound slot 13 gives an odd and continuous air whooshing sound which lets you know the brake is applied, although I would prefer to find out which sound slot gives the brake squeal sound, and use that. Let me know if you know. I put "dynamic brake" in quotes because I am using it as a train brake, and it works as such, as long as you deactivate the sound slot 6, which is the sound of dynamic brake fans whirring.
- F8 (engine sound startup) and F9 (brakes) were programmed so they would respond to consist commands. This means that they all brake together, and all the engines will start making noise together.
So, to summarize, "all" you have to do to start up a consist with one of these engines in the lead is: press F8 to get the sound turned on for all the units in the consist, F6 for the rotating beacon and number board lights (lead loco only), F0 to turn on the headlight, F5 to set the color of any marker lights needed for that train, F1 to start the bell ringing, F2 for a couple of horn blasts, and you are on your way!
Here are the locos ready to go in Evertt's Bayside Yard:


Thursday, October 11, 2018
electronic "Time-savers"
I'm always amused when I hear a fellow model railroader express the sentiment "I don't want to use computers in my hobby, I use them enough at work already." In theory, I agree with this statement. Let's just run trains and have fun, right?
In practice, though, I keep finding computer tools of various kinds more and more essential to the functioning of the Burrlington Northern. I normally use a Mac at home for normal things like email, photos, taxes and running my freelance business. But, only for the model railroad, I am forced to maintain a "PC emulator" running a Windows environment in order to use certain "time-savers", because the vendors of same haven't released Mac versions of their software (and don't seem to be planning to). Three that come to mind are CADRail (for layout design and drawings), Shenware (I use his "Waybills" program for designing and printing my 600+ waybills) and ESU LokProgrammer (which I just found out is essential to configuring and maintaining a fleet of partially ESU-equipped locos). I used to use the PC emulator for running JMRI (DecoderPro) too, but recently have converted to using the Mac version, and it seems to work fine.
Here are some photos of the various hardware setups involved"
 Here is my favorite free-standing battery-powered "time-saver", an electronic speedometer from Model Railroad Technologies. I use it to calibrate each loco to a top speed of 50 scale miles per hour (SMPH) and a mid-range speed of 25 SMPH. This way, in theory, all locos can be consisted together and will run without too much lurching. Of course, in practice there is more to it, such as acceleration and deceleration rates, braking rates, and which functions work when the locomotive is part of a consist. More on this later (when I figure out how to do it!).
 At the bottom left you can see the small ESU LokProgrammer that I recently purchased and got working. It turns out to be essential to programming ESU decoders, mainly because it explains the functions of many of the CV's, and has a built-in DCC command station so you can test out your settings on the loco while you are in the middle of programming it. You can see I have it connected to a section of flex-track with an ESU-powered SP&S F7-A being worked on. I have six feet of track on the desk there, which is long enough to conduct the "auto-calibrating" which the newer ESU decoders can do on each loco to set up the optimum values for "back EMF" operation. The LokProgrammer only works on ESU's (PC) software, which also downloads new versions of the firmware for the decoders, so in addition to setting CV's it will keep the loco's operating system current. I call this a time-saver, because it would take forever to set up ESU locos using ops mode programming of each CV on my NCE Procab, and I've read that JMRI Decoder Pro doesn't reach all of the ESU CV's. But don't get me started on why this would be so. One of the plastic bins above the LokProgrammer is full of large chocolate chips, for when I need to calm myself down...
 Finally, here is my "NCE/USB" setup with a NCE PowerCab and an NCE decoder tester, for connecting to and using Decoder Pro. I installed it all on one board so I could move it around the house (or world) as needed. I also have an RS232/USB cable on the main NCE PowerPro command station that powers the layout, but it is more convenient to have a test bench upstairs and not risk messing with the whole layout full of locos when testing a single one.
I used to do most of my loco programming by hand using the layout's throttles, until I started trying to get Tsunami and ESU locos to run in consists together, and also trying to get them to function with the new ProtoThrottles. This involves "function mapping", which is just complicated enough that these computer tools actually do become "time-savers", even though they do involve learning curves and overhead system maintenance time. The good news, though, is I'm getting some locos running that have been sidelined for a while, and eventually all this will lead to even better operating sessions.
In practice, though, I keep finding computer tools of various kinds more and more essential to the functioning of the Burrlington Northern. I normally use a Mac at home for normal things like email, photos, taxes and running my freelance business. But, only for the model railroad, I am forced to maintain a "PC emulator" running a Windows environment in order to use certain "time-savers", because the vendors of same haven't released Mac versions of their software (and don't seem to be planning to). Three that come to mind are CADRail (for layout design and drawings), Shenware (I use his "Waybills" program for designing and printing my 600+ waybills) and ESU LokProgrammer (which I just found out is essential to configuring and maintaining a fleet of partially ESU-equipped locos). I used to use the PC emulator for running JMRI (DecoderPro) too, but recently have converted to using the Mac version, and it seems to work fine.
Here are some photos of the various hardware setups involved"


I used to do most of my loco programming by hand using the layout's throttles, until I started trying to get Tsunami and ESU locos to run in consists together, and also trying to get them to function with the new ProtoThrottles. This involves "function mapping", which is just complicated enough that these computer tools actually do become "time-savers", even though they do involve learning curves and overhead system maintenance time. The good news, though, is I'm getting some locos running that have been sidelined for a while, and eventually all this will lead to even better operating sessions.
Friday, October 5, 2018
The longest train on record - 85 cars!
Last night we hosted the local NMRA monthly clinic for an open house at the layout. BobJ Berger brought over his stock of grain hoppers, which combined with mine to make an 85 car unit grain train. It was by far the longest train we'd ever run here, and it was fun to have NMRA members and friends present to witness (and help operate) it. Here are some photos:
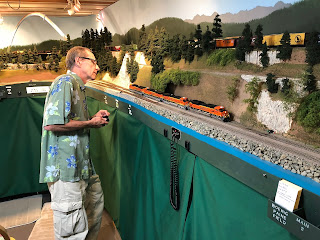
 The 85 car train was so long that it was difficult to photograph in the 800 sq.ft. basement. All I could think of was to take a "pano" shot. If you look closely, the front of the train is off in the distant at the far right (approaching Broad St. in Seattle) while the back end of the train is near the left side of the photo (passing by Carkeek Park). Co-conspirator BobJ is in the center, also trying to photograph (on video) our masterpiece.
 Before the "event," Dave Enger (left) and Tim Taylor came over and helped clear off the extra rolling stock and to run the track cleaning train (shown here on the mainline passing by the car repair shop at Interbay/Balmer yard).
 We needed some serious motive power for the experiment, so here is Tim bringing some modern steeds along the shoreline to pick up the unit train. Due to a coupler malfunction, we ended up pulling the whole train with only three of these four unit. Don't ask me what these locos are doing on a layout supposedly set in 1973!
 We ran a number of other trains people brought over for fun. Here an SP cab forward is racing the unit grain train along the double track part of the coast mainline.
 BobJ got to meet one of our friends from the dancing community, Phil, who, in addition to being a great dancer, formerly worked on the prototype railroad and enjoyed seeing his former workplaces represented on the layout.
 The narrow gage northwesterly expansion of the D&RGW also got a workout, with Tim and Michael on the job serving the fictitious "Cascade Copper Co." The junction next to the backdrop allows continuous running on the narrow gage, and is named "Vail Jct." to honor the famous HOn3 modeler Jim Vail who sadly passed away earlier this year, after many years of influencing and inspiring us.
So, the record for maximum train length on the Burrlington Northern now stands at 85 cars!


So, the record for maximum train length on the Burrlington Northern now stands at 85 cars!
Monday, October 1, 2018
Grade crossings - finally!!
It's fun to blow the horn for grade crossings, but it helps if there actually are some grade crossings on the layout! After remodeling the Everett Junction area last year I meant to put in the new road servicing the Mukilteo team track, but it's taken till now to work on it. Last week I finally got around to finishing the grade crossings in Bayside and Mukilteo. It's (at least) a two step process: cut and glue down timbers next to the rails to maintain an open flangeway, and glue down some dirt and/or gravel and/or spackle to make the road surface in between the timbers. I used Micro Engineering stained switch ties for the timbers, but in retrospect I should have shaved them down to less than .070" in height before glueing them down, since the track in that area is code 70. I had to go back with a file and lower them after the fact, which is inefficient and messed up the stained finish of the timbers. Oh, well. Here are some pictures of the Bayside road so far:


The far end of the road just ends, so I suppose the next step is to extend the dirt road into the lumberyard and freight house areas. Don't count on that happening soon, because those areas are still under design, and subject to change.
Swing Dancers at Bayside
For the last few years my wife and I have been enjoying learning some ballroom dancing moves, and to commemorate this I built a dance floor out of 1/32" plywood and mounted a number of musicians and dancers on it. I started out using Woodland Scenics "Accent Glue", but some of the one-legged posed dancers seem to be falling over, so I'm about to try some super glue to hold them up more reliably. For the moment the dance is being held at the (fictitious) depot located in Everett's Bayside yard, for easy viewing. Who knows where it will end up eventually. Here are some photos:


West Seattle Yard
Benchwork is underway to rebuild the south end of what was "Legotown" into a version of the West Seattle yard and vicinity, including Bethlehem Steel, Ideal Cement, Wycoff, Pier 5 (Sea-Land) and Pier 2 (Alaska Sea-Train). Let me know if you have information on any of these companies in the 1973 era that could be useful to the design and operations. Here are a couple of photos of the initial concept:


This yard will be operated from a rolling desk chair, in an area that is to the left of the operator congestion that occurs around the Interbay/Balmer yard on the deck above. It will be switched by a BN crew out of Stacy.


This yard will be operated from a rolling desk chair, in an area that is to the left of the operator congestion that occurs around the Interbay/Balmer yard on the deck above. It will be switched by a BN crew out of Stacy.
Subscribe to:
Posts (Atom)