Wednesday, December 9, 2020

Wrestling with a BLI locomotive


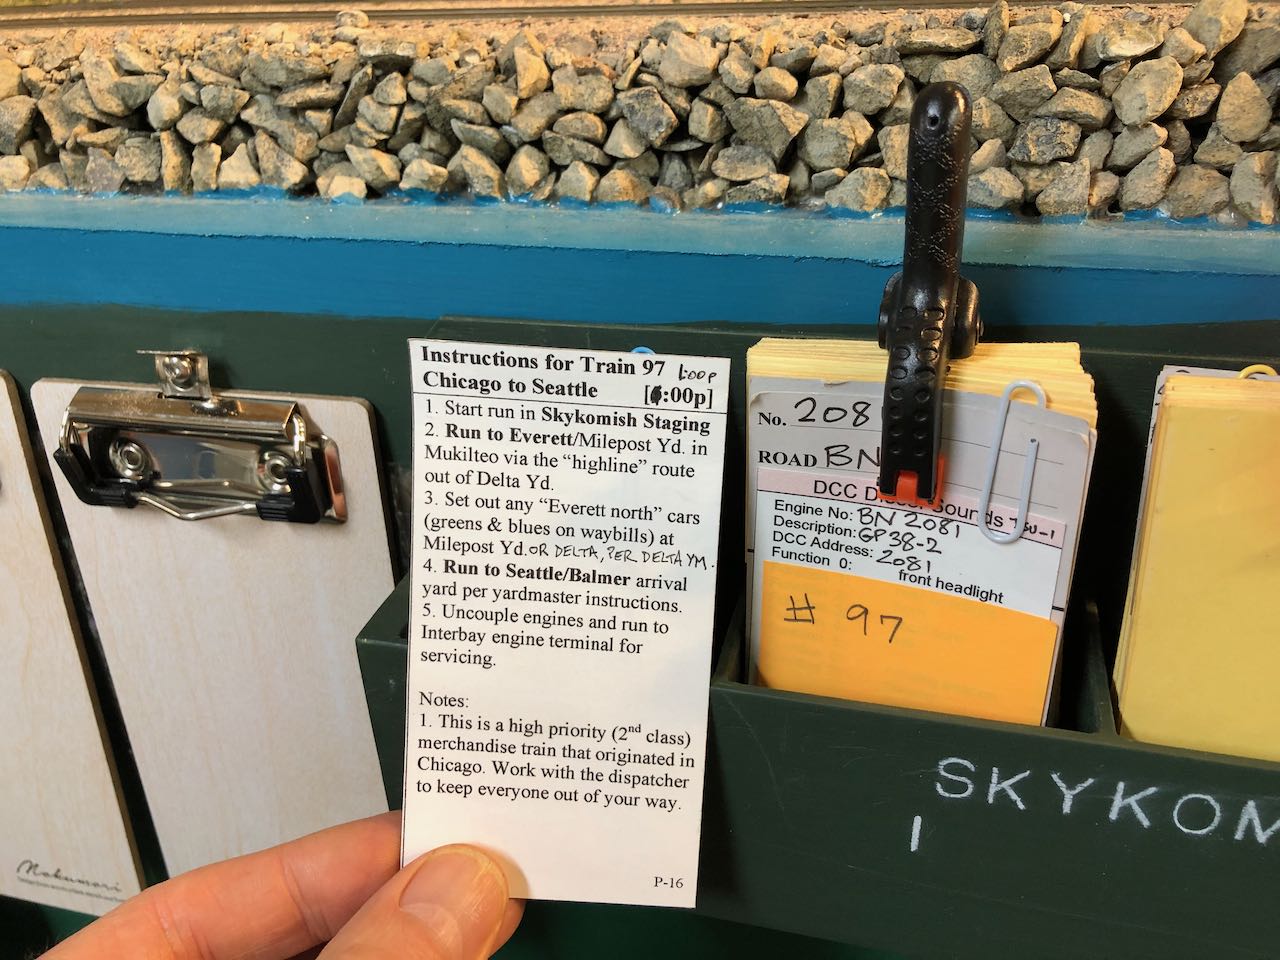
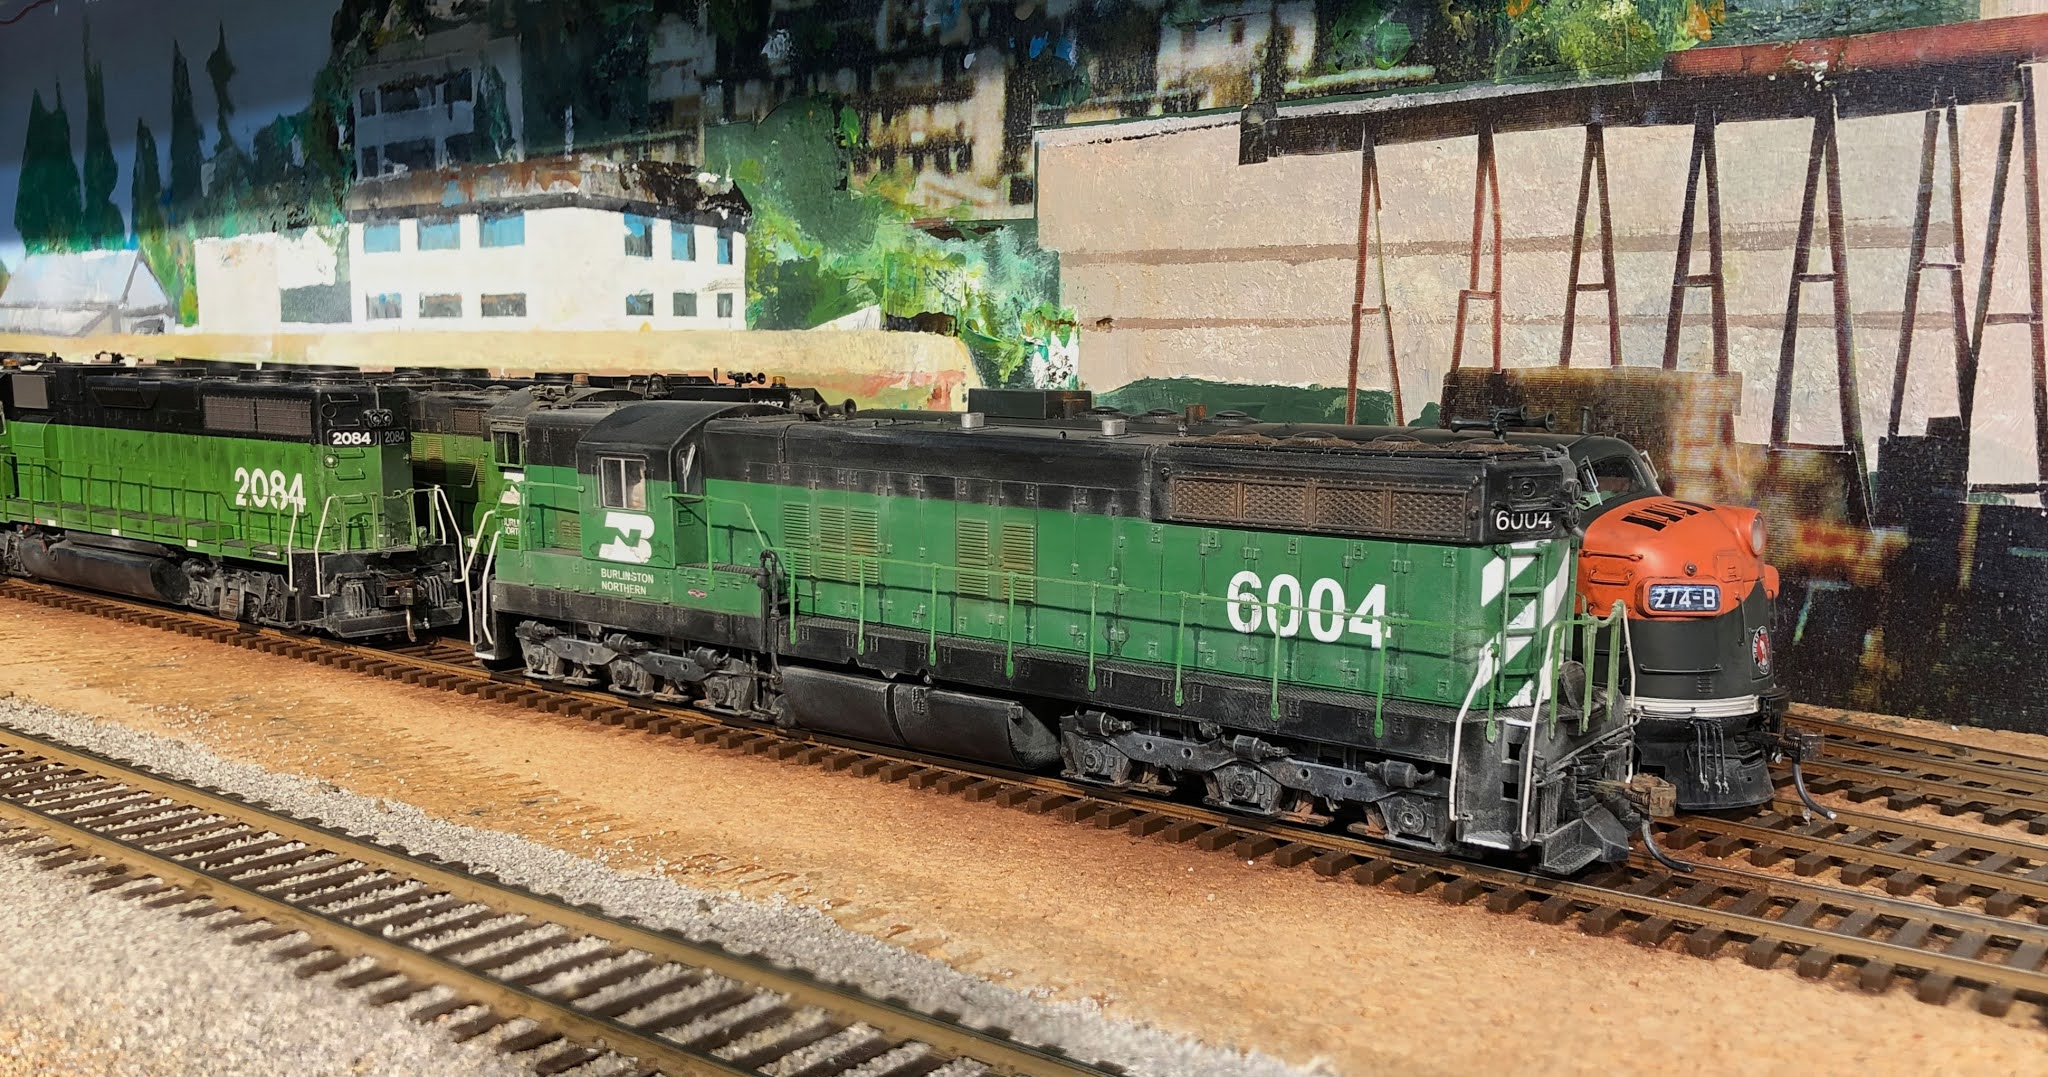
This is a fine looking SD7, sitting in Interbay, isn't it? Last week, Ray Wheeler, who used to work for the BN in the early '70's, told me SD 9 BN 6004 was often the locomotive used to switch grain covered hoppers in and out of the Cargill export grain terminal at Seattle's Pier 86. I was eager to use this information, because he (and others) had also told me that how I operated the arriving grain train on my recent YouTube video was, basically, incorrect. This was an opportunity to correct my mistakes, and improve the layout's operations to be more prototypical.

Hearing about the locomotive number BN 6004 "rang a bell," and I quickly found it in my active storage area of "excess locomotives." I had purchased it in 2016 from BLI, along with a "Rolling Thunder" sub-woofer system, to try out their innovative approach to making locomotive sounds more realistic on the low frequencies. The sub-woofer worked as advertised, amazing my friends by filling the entire house with a low-frequency rumble not unlike what you would experience standing next to an SD7, or in an earthquake. It drove my wife crazy, though, so I only use it on the rare occasions when visitors are curious and she isn't at home.

But there's another reason I had the locomotive stored off the layout ever since 2016. BLI, in what I understand was a derivative of the older QSI decoders (which I also had trouble with and eventually banned from my layout), flaunted the NMRA DCC standards and produced a DCC decoder that, in addition to transmitting low frequency sound information to the Rolling Thunder unit, has a number of divergences in its functions from what I was used to in the SoundTraxx and ESU decoders in the rest of my fleet. After I fiddled with standard CV's like 2, 3, 4, 5, and 6, it still came to a screeching stop instead of displaying momentum-like behavior, when I reduced the throttle setting quickly. There was nothing in the very sparse documentation that came with the locomotive to explain what to do, so I put it on an high shelf and never incorporated it into my operations, even though it was the perfect locomotive for my railroad and era. That was 2016. I swore to never purchase another BLI product again.

Between then and now, I invested a lot of time in learning how to set up braking functions in my Tsunami and ESU locomotives, even to the point of presenting clinics on it. This involved time spent looking up manuals online and playing with both JMRI DecoderPro and ESU LokProgrammer. I can't say I enjoyed it, but the end result is that all my (80) Tsunami and ESU locomotives are now speed matched, can be consisted together, and respond to the brake button (F9) with the same deceleration rate.

So last week, when Ray said BN 6004 was THE locomotive for switching strings of hoppers into the grain terminal at Pier 86 in Seattle, I thought I would try again to get it running better. With difficulty, I found that BLI has a couple of documents on their website for free download that list the various CV's and their nominal purpose (mostly without explanation). After trying a few things, I finally came across a CV185 called something like "brake sensitivity" (whatever that means) with a default setting of 20 and a range of 0 to 255. Using "programming on the main" (POM) with my NCE throttle, I randomly tried setting CV185 to 200 and, like magic, the problem of rapid deceleration vanished! With CV3 and 4 set to values of 12, and CV5 and 6 set to 80 and 40 respectively, the loco ran smoothly enough that I decided to call it good, slapped on some pan pastel weathering, and placed it in the engine terminal, as shown in the photo above. It will now be the main actor at Pier 86 on the Burrlington Northern.

If I wanted to spend another three (or more) hours on it (which I don't), I could probably try to study the BLI documents some more, and experiment some more, and figure out how to re-map functions so that when I pressed F9 I would get a braking deceleration different from the existing CV4 deceleration. But even then, the consisting features (like headlights and sounds) work so differently on BLI locomotives from the other locos that I wouldn't be able to use the loco in a consist anyway. So BN 6004 will remain dedicated to the grain terminal, solo, for the foreseeable future.

I have a lot of respect and gratitude for every company that invests in making products for model railroaders, and that includes BLI. My wife likes to say "people are just people." So I guess "companies are just companies." They have to decide what products will sell, at what price points, what they cost to make, whether to outsource their decoders, how much to invest in user manuals and support, and so forth. I simply get to benefit (or not) from their various decisions. There are probably modelers out there who have (doggedly) figured out how to get what they want from the BLI decoders, and don't want to deal with learning about the other brands. I'm just not one of them, that's all. I would pay more for a locomotive that I could easily then figure out how to use after I bought it. This blog is about my own personal experiences of this wonderful hobby of model railroading, not any sort of comprehensive or objective evaluation of anything. It pains me that I avoid BLI products just because I don't want to climb yet other learning curve, because they sometimes make products that would be perfect on my particular railroad (BN in the early '70's in Seattle). That's all.


Monday, November 16, 2020

The pros and cons of loose loads


The picture say it all - loose loads look great, until you accidentally knock a car off a cliff. Then you have a big mess to clean up. It will probably take me more time to clean up this mess than it would have taken me to make a simple balsa-wood insert for the car and glue some copper ore on top, years ago when putting the car in service. My train layouts are full of examples of "short cuts" that I took while constructing them, which I'm now paying for in unintended (or in this case, predictable) consequences.

Another issue with open loads is, if you put your finger(s) in them by accident, well, they look kind of weird. Here's an example, this time with a standard gage car in aggregate service:


I like the way the load exposes part of the rusty slope sheet, which would be harder to do realistically with a solid load. And, in a way, I like the "plot tension" associated with operators handling loose loads in their trains, making sure they don't have a derailment, or worse. But on the other hand, to empty them out involves picking them up, turning them upside down and re-railing them back in place on the layout. With a removable load insert you can usually take them out without having to pick up the car.

Yet another example of the many trade-offs involved in an operating model railroad!


Monday, November 2, 2020

Bayside Geeps


This is why I love modeling the BN in 1973 - all of these GP and SD locos in such a variety of paint schemes! Lately (thanks to encouragement and tutoring from friend Tim Taylor) I've been applying decals to re-number some of the models from their legacy road number to appropriate BN numbers, as was done after the merger in 1970 but before they were re-painted in BN green. It will take a while to get them all done, but the photo above is a sample of them that appeared parked one day at the "Bayside turntable". Of course, on the prototype BN the turntable was at Everett's Delta Yard, not at Bayside, but sometimes in model railroading you just have to make compromises. Also, I need to finish the track and scenery near the turntable. All in due time. The point is to just enjoy these stunning locomotives! 

By the way, notice the clear depth of field in the photo. This photo is a composite of 6 photos I took with my iPhone, focusing each one on a different part of the scene, and then processing all 6 photos together using a computer program called "Helicon Focus". I just learned about this recently, although it's been around for years, and it's really changing the way I take pictures on the railroad now.

The SD9 in the foreground - notice its coupler. This is a "long shank" version of the "scale head" Kadee coupler, and the long shank is needed to keep the pilot from fouling the uncoupling pins of any cars that it might try to hitch to. The alternative is to cut the uncoupling pins off all your cars. I decided to use the longer coupler instead, despite its slightly strange appearance.

Finally, I apologize for the brick building held together by a rubber band. I've been busy laying track for the past 25 years and just haven't gotten around to finishing up some of the buildings that are needed in some of the scenes. In this case, the brick building will be replaced with a version of the "Scott Paper Co." paper mill in Everett, so it will eventually look quite different, and hopefully more realistic than it does currently. You can see the MILW and SP&S wood chip cars there, in the process of being unloaded. No bad smells, though, so far - I don't plan to model those.


Saturday, October 17, 2020

the new Athearn Genesis F7's arrive

The best thing about modeling the 1973 era on the Burlington Northern is that it took them about seven years to repaint all the legacy locomotives into the BN Green paint scheme. This means that my locomotive roster is a rainbow of colors with interesting histories. In this case, Athearn recently released the F7's in the original NP diesel paint scheme lettered for #6015A and 6015B. All I did was to remove that lettering and the front NP herald on the A unit (using MicroSet and a sharpened toothpick) and apply Microscale decals to the sides and number boards per prototype photos. The most time-consuming part of the project was researching which locomotive numbers would be seen in the Seattle area in 1973, and hadn't been repainted to BN green yet. I ended up deciding on FA#720 and FB#753, which were both based in Auburn, WA and were repainted later than 1973.

The final part of the project was to apply pan pastel weathering to bring out the detail, and to adjust decoder settings to get the performance from the locos that match my existing fleet. This includes setting the maximum speed to 30 miles per hour and mapping the brake function to F9.

The photo above shows the units parked on the mainline in Bayside Yard in Everett, WA, waiting for their first assignment.

Friday, September 18, 2020

The profound difference between a Timetable and an Operating Plan


I just found out something truly profound from ex-BN employee Bob Stafford (and after digesting articles in the OPSIG magazine “the Dispatcher’s Office”). The official Timetables only contained the official “schedules” that could be used by dispatchers to reduce the number of train orders that needed to be written, to improve safety, in the days before radios were widely used. There weren’t very many schedules listed in the timetables, by my modeled era of the early 1970's. But there were lots of (extra) trains that ran at the same time, with the same purpose, each day. Each train had a “Train Brief (TB)” - a document that listed which blocks of cars would be switched in and/or out at each station along the route, and the estimated time at each station. This TB was followed every day that train was run, until it was changed. All of the TB’s together constituted the “Operating Plan” (OP), which was distributed to all stations in the district, and available to operators, yardmasters, etc. to know what to plan for all day. (on the Santa Fe the OP was called the Train Service Plan (TSP)). In my era, every 4 hours the dispatcher, after consulting with the train master, would issue updates to the OP to each station operator, who would make up, or revise, the “lineups” to give to the yardmasters, engine foremen, etc.


The reason this is profound, is because it makes clear that, for yardmasters at least, the “Timetable” is actually a document of secondary importance to the OP. What I call “train instruction cards” on my layout (see photo shown above) are actually summaries of a more detailed Train Brief, and what I call a “lineup of trains” is actually more of a sequential list of trains I would like to run, but mostly without meaningful departure or arrival times, or blocking information. I don’t even bother with a “Timetable”, because only the passenger trains used it, by 1973, so I just put their official times in their train instruction cards. But I am sadly missing the entire point, which is to have a master Operating Plan, which lists which trains are going to set out which blocks, where and when. Without this, it is basically chaos. It doesn’t matter if on a particular day the blocks themselves are 10 cars long or empty. The point is that everyone knows what time to expect what to happen, whether or not (mostly not) a train will use a particular "schedule" in the official "Timetable." If a train is “late”, it usually is in reference to the OP, not the Timetable, unless that train is using a schedule listed on the Timetable.

The larger context of Bob’s comments to me about my Interbay Switching video, is that in a real yard, the yardmaster can plan ahead for many hours which track he is going to use for which blocks. On a model yard, without an OP and/or lineup, along with copies of the Train Briefs, the yardmaster is just dealing with one emergency after another.

The following diagram is a graphic that the late Doug Walters designed for my layout to help yardmasters figure out which blocks could be placed on which trains. Now I can see that this information should also be part of my "train instruction form", and should be available to the dispatcher in some form as well, as part of a coherent "Operating Plan". Almost regardless of whatever schedules are shown on the official "Timetable".


Monday, September 14, 2020

More thoughts on car cards, switchlists, and computer-based car forwarding


Here's a summary of my current thinking about freight car routing on model railroads, in case it’s useful:

Using the 4 cycle waybills, as I do, I came to realize that there really are only two ways to use all 4 cycles that make sense: 

Variation one: Cycle 1 - car arrives from staging loaded for an online destination; Cycle 2 - unloaded mty car moves to a nearby yard’s “mty track”; Cycle 3 - mty car moves to an online shipper to be loaded, and; Cycle 4 - loaded car moves from online shipper to staging. In staging, flip the waybill back to Cycle 1 or remove it and replace with another waybill, and replace the open load if appropriate. 

Variation two: Cycle 1 - car arrives from staging mty and goes to an online shipper; Cycle 2 - car moves loaded to staging; Cycle 3 - mty car returns from staging to a different or same online shipper; Cycle 4 - loaded car moves from online shipper to staging. In other words, with outbound loads, you can have two per waybill card because the mty car processing is being done offline, but for inbound loads you can only get one trip to/from staging for each waybill card.

Another way to put this is, for outbound loads you can have two trips to staging per waybill card, but for inbound loads you are stuck messing around with the mty car, so you can get only one trip to staging per waybill card. On my layout I have a lot of 2 cycle waybill cards for “captive loads” such as specialized tank cars or cement hoppers, and also a number of 3 cycle waybill cards that just come in loaded to one shipper, go over mty to another shipper, and then out to staging loaded, skipping the mty track in the yard. That’s mainly because I don’t have much space in any of my yards for mty cars to sit around, but on a larger layout you can, of course, provide for that, as well as clean-out tracks.

But the next level down from the above, is what I have heard called “car card inserts” placed in front of the waybill. You could have a special insert for weighing the car. Another one for inspecting an mty that was just unloaded. Another one for holding on the mty track for an upcoming move. Another one for icing the reefer. Another one for deep cleaning a box or tank car. You could run around between sessions and randomly insert these cards into appropriate cars and then let the yardmasters deal with it.

The next level down is what Mark Dance does on his (amazing) N scale layout. He has some car tabs with numbers on them indicating which part of the hour the car can be released (actually, he uses them for locomotive servicing, but it’s the same idea for car cleaning, etc.) You put a car on the cleaning track, look at the clock, and then put a tab on the car indicating which part of the hour it will be when the cleaning is finished. (his tabs say :15, :30, :45, and :00, but you could use other divisions) This way the yardmaster has to wait a certain amount of time before moving the car, creating some additional play value.

I use a computer program called “Waybills” by Shenware to generate my 4 (or less) cycle waybills, which I like because (1) it has the OPSIG database of shippers built into it for picking offline origins/destinations, and (2) it can generate various reports so you can see how many waybills are going to which shippers with which loads on which cycles, for example. But the rest of it I’m keeping manual. If I want a switchlist, I would do like a conductor or clerk, and take my stack of car cards and write out a switchlist with that information. This is what Joe Green does in Sequim, and it works well.

I’ve been fooling around with JMRI ops on my N scale railroad, and have operated recently on layouts in this area that use the “RROPS” free switchlist generating program or JMRI ops, and, while they have some good features, I’m skeptical that they would be worth using for a large layout. You would spend all your time, as you said, reconciling actual car locations with what the computer thinks is going on. Using paper waybills and car card boxes (1) is something like how the real clerks did it, and (2) keeps everything visible on the layout in front of you, and not hidden somewhere in a computer chip. I may be wrong. It’s possible that graduating to a computer switchlist system is inevitable “progress”, but I’m not there yet. And at this point, based on what I’ve experienced elsewhere, I don’t want to go there. We’ll see what happens.

One last point. I’ve heard people say they “don’t like handling a stack of waybills” and would “rather run trains”. As is often said, we are cramming 5 or 10 employee jobs into a single model railroad “operator”. If they don’t like handling a stack of waybills, let them be the engineer of a two-person crew, working with someone like me who does enjoy handling a stack of waybills and figuring things out. There’s plenty of room on a large layout for differing operator job preferences.


Monday, August 31, 2020

How to avoid building a basement layout altogether

I recommend watching the YouTube video George Sinos' presentation to the OPSIG which he gave yesterday. The link to it is here. The short story is, he built a switching layout in N scale on a shelf in the family room that ended up about 11 feet long, and it is so fun to operate, taking 2 people about an hour, that he's seriously considering canceling his plans to build a large basement layout downstairs. Here is what his track plan looks like:


He has a collection of about 400 freight cars that he rotates on and off the layout between groups of four op sessions, and uses a 4:1 fast clock, so that in four op sessions he covers about 16 hours of switching jobs to the various factories on the layout. He uses two ProtoThrottles for realistic engine control and JMRI PanelPro for a touchscreen to control the turnouts. I won't go on - you can watch the video for yourself.

His presentation reminds me of something I've often said to visitors to my layout - after 20 years of effort building the mainline from Seattle to Bellingham, I finally got around to building the Burlington, WA yard, and found it so fun to operate that I wondered why I didn't just start with that and not build the previous 20 year's worth of layout! I say it as a joke, but every joke has some truth to it.


Monday, August 24, 2020

Victoria BC in N with colored and numbered dots


Never one to miss an opportunity to add complexity where none is needed, I tried dividing the three N scale industry tracks described in my previous post into two or three industry spots, and then put small numbers inside the colored dots. Then I set up the spots as separate "tracks" in JMRI ops, and added them in a "pool" for each track. Now, instead of getting a switchlist from JMRI ops with four different destinations for cars, there are now eight. Without making any changes to the track!


The diagram above shows the new named spots on each track, with the spot number in parentheses, and the dot colors for each track. I'm trying to represent downtown Victoria BC, based on an article in Layout Design Journal #62 (3rd Quarter 2018) by Cal Sexmith, so I picked industry names from the article and placed them on the three tracks in a quasi-logical order based on the order they might have been switched in real life. Then I placed colored 3x5 cards next to the track where the buildings might be, just to define the locations of the spots for now.

This photo shows the cars resting in their correct spots after the first (20 minute) operating session using the new scheme. It's amazing to me how fun it is to switch a small simple layout like this. I don't like the clunky layout of the JMRI ops switchlist, and haven't figured out how to improve it, so I spend a few minutes reading the switchlist and putting corresponding colored (and now numbered) dots on the cars. This is similar to a yard crew putting chalk marks on the side of cars. Then, I grab the throttle and enjoy about 20 minutes of switching fun.

The total investment in this particular N scale train layout so far: 30 min to paint the board, 30 minutes to prepare the switches and flextrack, 30 minutes to glue the track down to the board and connect wires to the NCE PowerCab, and 90 minutes to enter the track and cars into JMRI ops. - 3 hours total. $150 for the NCE DCC PowerCab, $50 for track, $300 for cars and locomotive - $500 total.

Sure, there's no backdrop, scenery or buildings, the rolling stock and track aren't weathered, etc. But the operation itself, switching cars around, is already very satisfying. That's all I'm sayin'.


Thursday, August 20, 2020

using colored dot (car tabs) to improve JMRI ops

If you've been struggling with using JMRI ops switchlists, try using color-coded stick-on "dots" stuck to the car tops to help you keep track of which car is supposed to end up on which track. It's not exactly prototypical to switch colored dots around, but it does make the whole thing easier and more fun. I've been experimenting with a Lance Mindheim style of "two turnout" switching layout, and the colored dots have really improved my enjoyment (and efficiency) of the switching moves.


In the past year, I've been learning how to use JMRI ops to generate switch lists for my N scale railroad, as a way to "dip my toe in the water" before trying to implement it on my basement HO layout, which currently uses car cards and waybills for car routing. The JMRI computer program has a lot of complexity to learn, but it doesn't take that much effort to enter in, say 100 cars and then have it generate switchlists. But there are two things about it that have been bothering me. One is that the moves are generated by random number generators, so unless you tweak the program a lot, you end up with illogical moves. The other thing is that it doesn't help the yardmaster block cars in the yard for the next train. Here's what a typical switchlist looks like:


I found out from Cal Sexsmith's article in the LDSIG Journal last year that Victoria had some interesting switching areas, and several car barge services to Seattle. So I decided to try doing some switching in Victoria. I put two turnouts on a plank (previously used only as a test track) with 5 pieces of N scale flex track and hooked it up to my NCE PowerCab and voila! Victoria!


Obviously the scenery leaves much to be desired, but it wasn't too hard to add these four tracks into JMRI ops, so I started generating switchlists and trying to use them. The switching was very tedious. Some of the cars needed to be moved, and some didn't. Some were moving offline, and some were moving between spurs. It was hard to remember what I was doing from one move to the next, and the N scale reporting marks are very small and it was hard to read them over and over again while constantly consulting the switchlist. The switchlist itself was formatted in a way that made it hard to keep track of the moves on. (I need to look into switchlist formatting options). Then I remembered I had seen a local N scale modular club using small colored dots as car tabs, so I pulled some out and tried using them to keep track of which cars were supposed to go where, according to the switchlist. It worked well! I could go through the switchlist only once, reading the reporting marks on each car and matching it to the switchlist, and placing the corresponding car tab on top of the car. That done, the actual switching was relatively easy, and fun! I've heard that some people "don't like switching colored dots around", but I'm wondering how different it is from switching cars based on chalk marks on the side of the car, like many prototype railroads would have used for switching. (Before computers, at least).

This operation, with only two turnouts and ten cars, is much more fun to operate than I was expecting! It takes me about 20 minutes to complete the work, long enough to make for an enjoyable break from routine daily activities without requiring a major time commitment. And if I want to make it more "meaningful," I could always generate a ferry run to Seattle and hand carry some of the cars back and forth to the main N scale layout. The only problem I see is that it is completely distracting me from all the other aspects of model railroading that I had been thinking were more important. Oh, well!

Monday, August 17, 2020

Progress towards remote ops


Above is a screen shot of a Zoom meeting set up with six live video views of the layout, suggesting that we are moving closer to being able to try doing a remote op session. I feel like I know just enough about all this to be dangerous, but not enough to make good decisions. Also, I keep thinking that if I can pull off a remote ops session in HO, so can you! :) 

Anyway, what I’ve done so far is to set up 5 older iPhones on tripods around the layout, and log them all into a Zoom meeting as if they were individual participants. I also bought a cheap ($28) wide-angle (90 degrees) webcam and mounted it on the ceiling and plugged it in to my laptop serving as the Zoom “host”. This means that my internet router is pumping all that video up to the cloud. I tried connecting them all up to Zoom last night and it seemed to work with all six channels active, but I need to try it again with JMRI running its web server and real people looking at it from outside. I also suppressed audio from these cameras, to reduce bandwidth load, but I don’t really like that, because it would be fun if people could hear the engine sounds as their train moves past an area.

One of the old iPhones is pointed at the TV monitor that displays a live video feed from my one camera train. Crude, but it works. The camera train video output is three RCA plugs - one for composite video and two for right and left audio. I would like to plug this into my computer but don’t know how of if it is possible with some sort of converter. I also have an old video camera that probably still works, and has a similar output to the camera train. It’s too big to put on a flatcar, but I could use it to show a portion of the railroad.

But now that brings up the issue of how to bring multiple video feeds into a single computer, and then have that composite video be displayed on Zoom. I’ve gotten the impression from OPSIG meetings that a program called OBS is the only way to do that, and I’ve also heard that only the PC version, not the Mac version, will work with Zoom. I’ve been doing everything lately from a Mac, but have some old PC’s sitting around, so I might update them and see if I could combine a couple of video feeds on OBS and have them join the Zoom meeting as well. I have a security camera from DLink looking at my Tacoma staging yard, and would like to make that visible to my dispatcher online as well. All this seems like a lot of work. It might be easier to just find another used iPhone and point it at the monitor that we already use to watch the staging yard:


But the best thing of all for remote ops would be to have more than one live camera train. Some of the OPSIG guys have been mounting Arduinos (or was it a Raspberry Pi) and corresponding tiny cameras in well cars, having the Arduino broadcast the video stream over wifi to a computer with OBS. A technically simpler approach might be to set up a couple of mirrors and set an old iPhone sideways in a well car with the mirrors pointing forward. I know I've seen pictures of somebody doing a 3D printed holder for the phone and mirrors, but don't remember where. Getting the optics right might be tricky.

But switching is what I really enjoy. Switching is going to be very limited in a remote ops session. I’m thinking of just having one or two block exchanges per train, and not even bothering with individual cars. That way, I can do whatever uncoupling is needed on the physical layout without getting overloaded with requests. The only good part of this is that I have a lot of unit trains and special trains that we never have time to run during regular op sessions, because we’re always so busy switching. The remote ops can exercise those trains instead.

Can a first try at a remote op session be far off? Stay tuned!


Wednesday, August 12, 2020

a master plan for holding virtual op sessions


How do you hold a virtual op session? Where people stay home and enjoy operating on your layout by running trains or dispatching from their home computers and/or cellphones? I've found the question complicated and confusing, and have watched a number of OPSIG layout tours that gave examples of people doing it. So I put together the above "mind map" to try to wrap my hands around the whole thing.

Like many things, it's good to take it in baby steps, so I now see that step one would be to simply provide some cameras for live coverage of the layout in action, and IP addresses to operators so they can log in to a WiThrottle and run a train, when and where instructed by me. The second step would be to provide a remote dispatcher with access to my JMRI computer and have the dispatcher issue the movement instructions and have control over key turnouts. Beyond that, we get into challenging areas like how to provide Zoom access to cameras riding on moving trains, etc.

Here's the complicated diagram with only the first level items shown. The green boxes are already in place. As of this writing I have set up 4 old cellphone cameras as Zoom attendees, and a fifth for broadcasting the camera train. Also, I learned how to help people use my IP address for getting into JMRI with their cellphone throttle apps, by doing "port forwarding" on my home router. All that's left now is to write up some instructions and a new schedule of trains that we might try to run in such a session. Clearly they would mostly be through freights and passenger trains, since I would be the only switchman in the room helping with pickups and setouts. 

Stay tuned! It doesn't look impossible...

Wednesday, August 5, 2020

Yard switching times vs. mainline running times


Here's the shocking fact: It takes at least 30 minutes of real time to break down a 15 car train in my HO layout's main yard, Interbay (Balmer). That's assuming there's only one person doing the switching. In theory, it would be faster if there were two people, one working each end of the yard. In practice, they would have to spend time coordinating their moves and keeping track of what goes where, so it's hard to say how much real time would be "saved." I put the word "saved" in quotes, to question whether saving time is the purpose of the "work," when model railroading is supposed to be about play, right?

I discovered this (obvious fact) accidentally by filming and editing a video on "how to break down an incoming train". I was thinking I could do it in 15 minutes, working by myself, but it took 30. If there had been another incoming train during that time, it would have taken much longer.

At one of my favorite op sessions in memory, everything was going great, and the yardmaster at Everett (the next town to the north of Interbay) asked me "is it true there is no train length limit on trains between Everett and Seattle?" To which I said "yes." So he sent a transfer run to Interbay with a cut of 40 (unblocked) cars. Since the longest siding in Interbay holds about 25 cars, this incoming monster filled the only remaining track in Interbay and blocked the north yard throat and both main tracks, preventing any further train moves out of Interbay to or from the north (which is most of the layout).

I don't remember what happened next. I think the Interbay yardmaster broke the train in two, but the only available track to put the second cut on was the mainline. Now both the yard and the mainline were plugged. There was still a lot of switching going on around the layout, so I think what happened is we ran down the clock and let the session come to an end, without unplugging the railroad. It took me hours of (very enjoyable) switching to get everything straightened out, during the following days. But I learned my lesson - maximum train length 25 cars. No exceptions, except for unit trains that don't require yard switching.

But today I'm thinking about another lesson. If it takes over 30 minutes to break down even a moderate length train, how many merchandise trains is it feasible to run in an entire op session? It only takes 2 to 5 minutes to run the 1 or 2 scale miles between my staging yards and the first yard they come to, or between yards. If we are going to have fun with a dispatcher and trains passing each other on the mainline, it's going to have to happen with unit trains and passenger trains.

My operating sessions are based on a condensed version of the actual prototype trains that ran during a typical day in 1973 in the greater Seattle region (BN, MILW & UP). I started out trying to do that in a single op session of about 7 hours. (3 hours before lunch, 4 hours after lunch). We never came close to finishing it, so I moved to having 14 hours of op session, over two days, with a 2:1 fast clock. And we never finish that either. What I'm thinking now is, forget the fast clock, just don't run more than one merchandise train in from staging in each direction (N, S & W) until the yardmasters are caught up. Regardless of how long that takes. There is plenty of work going on with all the locals and unit trains to keep everyone busy, without clogging up the yards too much by excessive adherence to prototype merchandise train schedules. 10 or 12 operators is not enough to simulate hundreds of prototype railroad employees.

Monday, July 27, 2020

Forms for "off-spot" vs. "constructive placement"

To simplify and recap a number of discussions that I've been having with railroaders and model railroaders, of various eras, there are basically two ways to make a mistake delivering a car - the railroad's fault or the customer's fault. Beyond that is a lot of detail about types of customers, prior agreements between the railroad and the customer, railroad specific practices, etc. But I wanted a simple and fun way to introduce this basic difference into my operating sessions (if they every happen again!). So I drafted these two colored inserts, to use whenever I become aware that a car is not where it's supposed to be, after (or perhaps during) an operating session. Here is a photo of my two forms:


I'm interested in any comments you might have about these forms, or suggestions for improvement. I printed the off-spot form on salmon stock to flag its urgency, and the constructive placement form on yellow to indicate caution but not as much as for off-spot.

If you want a refresher on this whole topic ("refresher" might not be the right word!), you can read my previous blog post that laid it bare ("bare" might not be the right word, either.). 

In the meantime, I finally finished re-staging the railroad from the previous op session, and caught myself admiring the lineup of westbound trains at Skykomish staging, ready to pounce. I can't seem to get tired of this particular view of the railroad. You're lookin at 20 or 30 thousand horsepower right there!


Thursday, July 16, 2020

Helicon Focus at last!


Lee Marsh tipped me off to how easy it is to use Helicon Focus, and I watched several NMRAx presentations on model railroad photography this week, so I finally bit the bullet and produced my first photo using Helicon Focus and Photoshop. This is the view from the Dravus Street bridge over Interbay Yard, looking south towards downtown Seattle. Classification tracks on the right, arrival/departure tracks on the left. Helicon Focus smashed about 10 photos together to get the whole shot in focus, and then I used Photoshop to erase the overhead deck (that you can see is still causing a shadow on the backdrop). The photos were taken with a Pentax K200D DSLR at f/13 and ISO 800, using layout halogen and florescent layout lights and one LED fill light to the right of the switch engine, so you could see its brakeman.

The chevy on the bridge is just like one my Uncle Fletcher drove (well into the '70's) (same color, even!), so I left it in the picture. The railroad cars in the yard are standing just as they were left after the last op session on 13 March 2020, just before the Covid lockdowns. All I did was add locomotives to the cut on the A track, and position that train to hide enough of the green BN center flow hopper car so you can't see the warped walkway on top. And I turned the DCC power on, for the headlight on the switch engine.

See if you can find (at least) one glaring mistake in the photo. I know I can! But, in my defense, I was in a big hurry to try testing my newfound software and skills, so I didn't take the time to set up the shot properly. For example, it's a shame to have the running gear on the F-units obscured by boxcar roofs.

Thanks to Lee for all his coaching, and to NMRAx. Now I'm sliding down yet another "slippery slope" in model railroading fun...

Wednesday, July 8, 2020

Which do you prefer - Switchlists or Waybills?


What does it take to make up a meaningful train?

(1) someplace to go (a layout)
(2) something that needs to go there (train cars)
(3) power (locomotives)
(4) crew (conductor, engineer, switchpersons, and cabooses)
(5) an operating plan (trainmaster, yardmasters, etc.)
(6) safety (dispatcher, schedules, permission to occupy track, rules, etc.)
(7) money to pay for it all (waybills, billing clerks, etc).

You knew all this. I've been thinking about the long-running feud in model railroading about which is better, switchlists or waybills (often handled as inserts into car cards, but not always). And I've decided that the reason it's hard to decide, is it depends on whose job you enjoy doing the most. If you enjoy getting out on the road and banging cars around, it's easier to have a switchlist tell you what goes where. (Assuming you can read and understand the switchlist, something I often have great trouble doing when I attend an op session)(See an example below). If you're a "why" person like me, you like to understand why you're moving those cars in that train, and you kind of enjoy the job the conductor has of trying to figure out which cars to deliver to which customers in which order. With a switchlist, you just get told what to do, and check things off with a pencil as you go. With car cards and waybills, you get to keep sorting them and organizing them and blocking your train accordingly as you go.


One of the frustrating things about computerized switchlist programs like JMRI ops is that they don't have the ability to block (order) cars in staging (as far as I know). They may give you the cars in the same order as they went in, or they may not, depending on how the previous crew blocked that train. But there you are, at the beginning of a run, with a train full of cars in a certain order accompanied by a switchlist with the cars in a different order. I don't find that fun to deal with. If I can sort the car cards in the same order as they are standing in the train, I find that fun.


When I re-stage the railroad between op sessions, I manually (by hand or with a locomotive, depending on how much time I have or fun I'm in the mood for) re-block the cars in the train (after flipping the waybills to their next destination) so that the operator of that train will receive it blocked like it would have been blocked by the yardmaster at the yard that train is coming from. (See an example of a blocked train in the photo above). I would be happy to have a computer do all that, but how is a computer going to pick up and re-order cars in my staging yards? Not to mention, what about the adding or removing of "live loads" such as lumber on flatcars, or ore in hopper cars?

So, I'm kind of stuck in my position on this question. As an operator of a train, I like to make my own decisions about how to prepare and execute my switching moves, like a conductor would do, not just have it handed to me on a switchlist. And as a layout owner, I like to give my operators trains that are set up in the right order, to make their (often quite complex) jobs as enjoyable as possible.

Another factor to consider is that railroad practices evolved from totally manual paperwork to computerized paperwork, during the 60's and 70's. So my glorified view of how fun the conductor's job was changing during the period I model, 1973. Therefore, if I have the conductor make up a switchlist based on car cards/waybills, or use a computer program like JMRI to generate switchlists and track cars, both would be "prototypical" in a sense.

I might be missing something. Maybe I haven't had enough experience operating with switchlists. What do you think about this long-standing debate?

Tuesday, June 30, 2020

Setting up the ESU-V decoders in the new Atlas RS-3's


The onboarding process with the third (renumbered) Atlas/ESU V BN RS-3 got a little involved, when I decided to try using some of the advanced features of their new LokSound ESU-V decoders. I had already standardized on using F9 for "brake", but the ESU-V's have three different braking rates, called, cleverly, "Brake 1", "Brake 2" and "Brake 3". After some experiments, I decided to go with Brake 1 (CV179=200) mapped to my usual F9, Brake 2 (CV180=220) mapped to F10, and Brake 3 (CV181=240) mapped to F11. While I was at it, just for kicks, I mapped "drive hold" to F12. All of this is "ok", but not ideal, because functions above F9 are only available by double clicks on most of my NCE throttles. I use F9 for the brake mainly because it is in the lower left-hand corner of the throttle face, and easy to find when you're in a hurry to apply brakes to a moving locomotive.


I mainly use the LokProgrammer to set the CV's in ESU LokSound decoders, but I've heard that the JMRI interface is getting good enough to do this without using the LokProgrammer. It would be more convenient to use JMRI, because then my locomotive roster would all be on one computer, and accessible during op sessions by WiThrottles, among other advantages. I got into this hobby to run trains, not to become an electronics and database technician.

Once I had the three locomotives programmed with the three braking rates, mapped to F9, 10 and 11, I took them down and tested them on the layout. At first it seemed ok, but then once in a while, each locomotive, for no obvious reason, would randomly (and independently) come to a stop and wait about 13 seconds before resuming speed. The sound continued to be on, so it didn't seem like it was related to dirty wheels or track (although I did clean the wheels again just to make sure).

I didn't know what to do. I poured over the LokProgrammer windows, looking for ideas. I made sure all the DC modes and functions were turned off (since this is a DCC layout), in case the decoders were getting erroneous voltage spikes. Suddenly, about two hours into the hunt, I came across a section at the bottom of the "function settings" window in the LokProgrammer, where there was a section on "random functions". It turns out that the ESU V decoders come from the factory with a default setting which, when you press F11, causes the locomotive to randomly come to a stop in the middle of running! Since I had remapped F11 to be "Brake 3", as soon as I tested Brake 3 by pressing F11, the locomotive would thereafter be subject to random stoppages!

Can you imagine such a thing?! Shipping a new decoder to customers with a function activated by default which would cause the locomotive to randomly stop?! Someone back in ESU headquarters apparently thinks they're very clever. I think they owe me two hours. This is what is meant by "the learning curve". Sure, I was messing with their plans by remapping F11 to Brake 3. I get that. I should have spent another two hours studying the manual before doing it.

That said, the three locomotives are now running beautifully together in a lash-up. First generation Alco's are still alive and well, here on the Burrlington Northern in 1973.


Thursday, June 25, 2020

renumbering a new Atlas BN RS-3

I obtained a second copy of the new Atlas RS-3 factory lettered as BN #1982, so I decided to renumber it to #4072. Mission accomplished, using Microscale 87-25 and 90051 decals from my decal box, Micro Set and Micro Sol solutions, water, a small #00 brush, Xacto knife, a shaved toothpick (to remove bits of the old numbers) and a piece of paper towel. Mission accomplished:


The good news is, this was a real BN loco number during the era I model (1973-76), and it ran long hood forward. The bad news is, I just looked online and discovered that they didn't repaint this from the original SP&S paint until the very end, if at all. So, I have a good loco number but the wrong paint scheme on the body. This is what comes of acting too fast without doing your research first. Of course, many of the details are wrong also, such as number boards, horns, lack of rotating beacon, etc. We will address that another time. For now, "all I have to do" is go through the "onboarding" process described in my last blog, on this loco. Cheers!

Thursday, June 18, 2020

onboarding the new Atlas HO RS-3's


This week, I "onboarded" two Atlas HO Alco RS-3 locomotives in BN paint. They are good looking and running additions to the roster for my layout's 1973-ish era. You can see them here in action on YouTube. The onboarding process for a "ready to run" locomotive involves these steps:

  1. Carefully taking it out of the box, which in this case involves unscrewing it from the bottom and replacing the screw holes under the loco fuel tank with special plugs provided in a plastic bag within the box. (which need to be cut from the sprue using an xacto knife or flush-cutting pliers) (5 min)
  2. Placing it on the track and seeing if, and how, it works. Sounds, lights, movement. (5 min)
  3. Put some alcohol (iso or eth) on a paper towel, and clean the wheels by running it at full speed while holding one of the trucks on top of the wet paper towel on the rails. This also confirms that both trucks are picking up power, which you want to know. (5 min)
  4. Run it at full throttle for about ten minutes in each direction, to "set the gears" (break it in). (20 min)
  5. (optional) Clean the wheels again, now that you've picked up whatever dirt was on the mainline track since you ran trains last. (3 min)
  6. Placing it in a cradle and replacing the couplers with KD #58 "scale head, center set, medium shank, whisker" couplers. (15 min)
  7. Putting it back on the track and checking if the coupler height is ok, and if the trip pin needs to be bent. (2 min)
  8. Opening a jar of "light india ink wash" (india ink diluted in lots of alcohol) and using a soft brush to cover the body and trucks with it. This somewhat dulls the sheen of new paint and brings out all the joints and details in the model, and dries quickly. (8 min)
  9. Taking it upstairs to my office and putting it on the test track, opening up the LokProgrammer app on my computer, and adjusting a variety of CV's in the LokSound ESU 5 decoder (which has 2000 user-adjustable CV's - don't get me started on that topic!) (10-60 min)
  10. Taking it back downstairs and testing to see if it still works ok. It may not, which may involve several more trips up and down stairs to get everything adjusted right. If I'm doing a lot of locomotives at one time I'll take the computer and test track downstairs to make the iterations easier. But climbing stairs is good exercise, too. (0-60 min)
  11. Getting out the pan pastels and dusting it all up with some off-white to bring out the handrails and truck side frames, followed by some rust applied to the couplers, truck springs, exhaust stacks and radiator and fan grilles. I try to do this weathering before the final speed-matching step, to make sure that I resolve any electrical pickup issues that all that chalk flying around might cause. (10 min)
  12. Getting out the speedometer and putting the loco back on the track. Setting the max and mid speed CV's 5 and 6 to give the same speed performance as your other locos. In my case, I'm using a top speed of 30 mph and a mid speed of 15 mph, which on these locos equates to CV5=88 and CV6=44. (It's good to do this later in the process, because you need to break the loco in at the higher speeds that it runs at, right out of the box.) (15 min)
  13. Getting out a different locomotive, and seeing if the braking rates match. They usually do, if you set them consistently, but in this case I found I had to increase the "brake 1" braking rate to CV179=200 in order to be consistent with my other locos. Most of my other locos are older SoundTraxx and LokSound decoders, so I'm still getting used to the new settings on the ESU 5. (5-30 min)
  14. Writing out a new "loco card" for each new loco you are onboarding. I usually put the manufacturer of the loco and the decoder on the back side in ink, and then some of the main CV values in pencil, so I can adjust them later on the fly if needed. (3 min)
  15. Going back upstairs and firing up my "Waybills" (Shenware Software) program on my Mac (using a PC emulator program called "Parallels", which I also used to run the PC-only LokProgrammer software) and printing out a "DCC functions" card to insert into the loco card. This tells an operator what will happen when they push each of the function buttons on the throttles. Since different decoders and locos (and layout owners) have different functions, this is necessary. In my case, I use F9 for brakes and F7 for dimming. (10 min)
  16. Going downstairs, inserting the DCC functions card in the loco card, and placing the loco card in the waybill box associated with the track that the loco is sitting on. We are now ready to run trains.

These two Alco's are very beautiful and smooth-running locomotives which I am very pleased to welcome to the fleet. #4082 is a duplicate (and significant upgrade) of the very first Atlas - Kato drive DC locomotive that I ever purchased, back in 1984, which was so smooth-running at the time that I re-discovered my love for switching cars, and decided to switch (no pun intended) back to HO from N scale, which I had been modeling in for about ten years before. That switch to HO in 1984, caused by this Atlas-Kato loco, was the start of a 35 year project to build the present Burrlington Northern layout that is the main subject of this blog. Here's a picture of that original loco, now displayed fondly in one of my display cases for "extra" equipment.


I never got around to weathering it, and you can see that the shade of paint is wrong. But it was probably cast in the same basic mold. I did put a basic NCE DASR decoder in it, so it did used to run on the layout, at least.

But, back to the subject at hand, onboarding a new locomotive is a complicated sub-hobby in itself. It took me about 4 hours to onboard these two RS-3's, which is typical. But much less than if I had to build the models from scratch, paint and decal them, etc! Still, however, there are a number of steps that I didn't do and would like to:

  1. In my era these locos should have yellow rotating beacons operating on top of their cabs. This would involve taking the shell off, finding the correct size yellow LED, soldering the correct resistor to one of the leads, drilling the correct size hole in the correct place, using the correct glue to put it at the correct height, adding some leads to the LED, soldering those leads to the correct pad on the decoder (if there is one!), programming the decoder to flash the rotating beacon at the correct rate, testing it, putting the shell back on, and testing it again. What am I waiting for? (60-120 min)
  2. You can see from the first picture above that the finish is still too shiny. Fixing this involves spray painting with a flat finish, which involves masking the windows. In future years I look forward to having the discipline to include this key step in my normal onboarding process. (30-60 min)
  3. Painting the wheels a rusty steel color. This involves either removing the truck side frames or applying paint in from the side while the loco is running. (20 min)
  4. Crew. There could be an engineer in the cab and a brakeman on one of the pilot decks. I do this as much as I can on switch engines, but it would look good on these locos too. Pre-painted figures wouldn't take long, but you could also custom-build people in certain poses and clothing and skin colors. (5-60 min)
  5. More weathering. Various vents, oil drippings, white fading below the lettering, rust spots on the fuel tank and elsewhere, wheel splash markings on both ends, etc. (30-60 min)
  6. Research and detailing. It would be fun to find pictures of these specific locomotives and to see what details are missing from the model that could be added. For example, BN 4082 was originally a Northern Pacific unit set up to run short hood forward, so the white reflector stripes should be on the opposite end. (10-200 min)
There you have it - what it takes to onboard a "ready to run" locomotive after you buy it. How you buy it is a whole different subject - the "purchasing department" of your railroad. That, too, has been changing over the years, and is both more complicated and easier than it used to be - a subject for another day.

Thursday, June 11, 2020

switching large vs. small customers


I just had a long and illuminating conversation with Joe Green about his operating scheme for the large plants on his layout, and learned so much from him that I had to write a post about it. The photo above, which shows (out of focus) the three tracks representing the Scott Paper Co (just above the Roadway trailer) on my HO layout, will be referred to as we move through the subject. The main ideas are: (1) "constructively placed" vs. "off-spot" cars, (2) "open-gate" vs. "closed-gate" customers, (3) car orders vs. waybills, (4) the (sometimes conflicting) purposes of yards, and (5) ways to apply all this to a layout's operating plan (or, how to compromise between prototype and model practices so everyone has fun). I am no expert on any of this - these are just musings from a conversation between two model railroaders striving for "continuous improvement."

(1) Constructively placed vs. off-spot: If a railroad owns a car, it wants to use it as many times per year as possible, to generate a return on its investment. If a shipper has an inbound or outbound commodity, it wants to minimize the carrying costs associated with it. "Demurrage charges" developed so that railroads could charge shippers a fee for the use of a delivered car as a storage container, beyond a certain reasonable amount of free time (grace period) for loading or unloading it. This is fine if you have a small factory with a loading dock - the clock starts running on your grace period the moment the car is spotted at your loading dock. If for some reason the crew is unable to spot the car where you can get at it, it hasn't arrived yet, for your purposes, and is considered "off-spot," if it is on a nearby track but you don't have access to it yet.

But what about a situation where you are a larger factory, and you absolutely must have a certain number of cars per day shipped in and out in order to maintain full production, which is vital to your profitability? Are you willing to pay demurrage fees on cars that remain on nearby tracks (or yards) staged and waiting for your factory's "just-in-time" need? If the answer is yes, then those nearby cars would be considered "constructively placed", and the clock starts ticking on your grace period and demurrage charges. When the factory calls the railroad and says "we're ready for that car, bring it in (or take it out)!" the switcher gets over there (within a negotiated period of time) and spots it at the right spot.

So, in summary, it seems that the costs of holding an "off-spot" car belong to the (a) railroad, whereas the costs of holding a "constructively placed" car belong to the shipper/receiver (consignee, but don't get me started on all those other confusing terms and issues about who is paying the shipping charges).

(2) Open-gate vs. closed-gate customers: As I understand it, these terms are (CSX) railroad shorthand for some of the long-winded discussion above. For an open-gate customer, as soon as you deliver a car to their factory, you are done and the clock starts ticking on demurrage charges. If you park it at the wrong door, or on the wrong track, you made a mistake and it is "off-spot". If you can't get it to the right spot, because the track is full (or some other reason), you park the car somewhere nearby and hope you can get it in there tomorrow. It is still "in transit" and the clock hasn't started on demurrage charges, even though the car is right across the street from the intended receiver. For a closed-gate customer, a car being held nearby is "constructively placed" anywhere it is handy enough to be delivered to the factory as soon as the railroad gets the call that it's needed. The factory is willingly paying the demurrage charges in return for the assurance that it has what it needs "almost" on hand.

But Joe points out that there are really two "railroads" involved here - the one doing the delivering and the one owning the car. The latter is receiving the demurrage charges, and the former, well that probably depends on the specific agreement between the railroad and the customer. I just don't know enough about all this yet, clearly.

(3) Car orders vs. waybills: You can probably see where this is going. For a closed-gate customer, you can't deliver a car to the factory until they ask for it (I'm calling that a car order, but maybe they would just call it a phone call). If you have cars in the local yard with waybills billed to that factory, you have to hold them in the yard until instructed to deliver them. Once they have arrived in your yard, they are "constructively placed" and you have no choice but to store them (but at least you are making money off them). For an open-gate customer, if the waybill says take it there, you take it there ASAP, and if you have to park it nearby, it is "off-spot" and you will keep trying to deliver it every chance you get.

(4) The conflicting purposes of yards: On the prototype, some yards are meant to break down, classify, and build trains as they come and go. Other yards are meant to support nearby industries, serving both to help the local switchers sort cars and as a place to store cars which are either constructively placed or off-spot. But in model railroad situations, things are rarely that clear-cut. We end up with yards that are doing some of both. We surround our main yards with industries. And we never have enough track, especially not for storing extra cars that are not in motion.

(5) Ways to apply this to model operations: The popularity of model railroad operations is growing and evolving with each year and each modeler that gets involved. In my case, I started out thinking that if I had a car card with a waybill saying take this car to that factory, it was straightforward: (1) put the car in a train going the right direction, (2) take it out of the train at the nearest yard and give it to a switcher to deliver to the customer, and (3) deliver the thing to the customer, placing the car card/waybill in the corresponding box for that track. Job well done (although it might take three (or more) operating sessions for it to finally get there). Same thing for the reverse situation. And if there is no room for it at the customer's track, park it somewhere nearby and call it "off-spot". Some layouts are handling this by having a divider in the waybill box for each track labeled "off-spot", so you can see right away which cars on that track are supposed to be there and which are just temporarily parked there. So far so good. But, what about larger industries, like paper mills?

Here's a specific example: In/near Everett's Bayside yard (shown at the top of this blog post) I have three tracks with a total capacity of about 12 cars representing the massive Scott Paper Co. factory on the waterfront there. One of the Bayside yardmaster's job during their shift is to pull all cars out of there, and replace them with whatever comes in billed to Scott Paper. Sometimes they are so busy they never get to it at all. Sometimes they pull everything right away, and nothing comes in, so at the end of the session the plant tracks are empty. And sometimes they stuff the plant to the gills and there are still 6 cars in the yard billed to Scott Paper with no place to put them (we now know these have been "constructively placed" in Bayside yard). In several of these scenarios the plant would have been forced to shut down (totally unacceptable customer service!) and in others the yard is plugged up and not functioning well:

It seems like what we need is some sort of instruction to the Bayside yardmaster saying that "whatever you do, make sure you deliver 5 loaded woodchip cars, 3 empty boxcars and 2 tank cars to the Scott Paper Co. by the end of the session. Store anything else that comes in for Scott on your spare tracks in the yard, for next time. This way, at the next session, the next yardmaster can deliver these "constructively placed" cars to Scott right away, clearing up his yard, and then hoping the rest dribbles in from incoming trains during the session. The same sort of thing could be done for other major shippers on the railroad, such as the planned Bethlehem Steel plant in West Seattle. Now we know we can call them "closed-gate" customers. The rest of the smaller shippers, we can keep just using waybills to deliver cars to them, setting the cars "off-spot" nearby as situations warrant.

I seem to remember operating sessions somewhere (was it Al Frasch's?) where, when you started working in a town, you would find specific instructions about how to switch a certain factory, right there in the waybill box. I'm used to the idea of a "train instruction card" and a "car card/waybill" to explain the work I'm supposed to be doing, but now we are talking about adding a "switching agreement card"  in the car card box (or on the fascia) that would make it clear how a specific shipper is expecting me to meet their needs. I'm going to go back and review past issues of the OPSIG's magazine "The Dispatcher's Office" and see if this has already been written up, and I just wasn't ready to understand it yet.

Finally, there's the question of how many times in an operating session do you need to switch a particular customer. If the plant is big enough, we could do like Joe Green does with his pulp and paper mill, and have two operating shifts work the mill switcher job during a single operating session, to make sure the customer's needs are met, and the mill stays in operation 24/7. On my layout's paper mill, my three tracks aren't big enough to justify that. On his layout, it makes sense:


After all, in all the fun of operating a model railroad, you wouldn't want to be responsible for shutting down the regional production of airplanes, lumber, steel rebar, or toilet paper, now, would you?