Thursday, January 26, 2023

Getting JMRI running again (YAY!)

It's hard to explain how difficult it is to install JMRI (https://jmri.org) and keep it running over an extended period of years. The good news is that it exists, is free, and keeps getting updated with data on all the new decoders that manufacturers produce, as well as many other amazing features and uses. For example, you can now use it to create a web-based throttle with a cab video image live, for someone to run your layout from anywhere in the world! (assuming you can master all of the technology involved, which I have yet to do!).

The bad news is that it takes a lot of overhead care and feeding just to keep all the "user files" connected to the "program files" as you and JMRI update your computers, operating systems and versions over time. A lot. I am always in a hurry to get things done, which makes things much worse, because one dumb mistake on my part and my JMRI is crashed for months.

It would be easy to say "get a spare computer, load JMRI on it, unplug it from the internet, and use it only on your railroad for the rest of your life." I know some people have done that. However, I like to keep buying locomotives and setting up their decoders consistently with the rest of my fleet, so I need to keep upgrading to the latest version of JMRI, which means keeping my computer's operating system up to date and whatever version of Java that the latest version needs. If I understood any of this, it would be one thing, but I don't.

A year ago, my beloved computer program for making car cards, "Waybills" by Shenware, which doesn't have a version for Mac iOS, crashed on my "PC emulator" that I was running on my Mac. Without going into details on the ensuing nightmare, I ended up buying both a new PC and a new Mac. Thinking that I would keep the PC in the basement with the train layout and the Mac in my office. In the end, I was only partly able to get Shenware running properly on the new PC, and the company is no longer supporting its product, so I'm not likely to ever get it fully functioning again. Very bad news. But then I turned to the idea of putting my "user files" from JMRI on Dropbox so that I could run JMRI both from the basement and from my upstairs Mac. I tried this, in a big hurry as usual, and the result was that both installations of JMRI crashed. So this left me without both my beloved car card program and Decoder Pro or any of my dispatcher panels on PanelPro or operations scenarios in OperationsPro (all very useful features of JMRI).

So I stopped having op sessions of any size and turned my time and attention to layout construction and making YouTube videos (which hopefully you are enjoying at https://Youtube.com/@muchfunwithtrains) , hoping that some day I would get JMRI working again.

Well, today it happened! I can't explain any of it, but I tried opening JMRI on my Mac and it worked! It found the latest version of Java that I had previously installed, and it was able, with a little prodding, to find my locomotive roster data. The following photo is proof. I just installed a new loco, SP&S RS-3 #90 in the JMRI for my HO layout. I haven't tried looking for the panels in PanelPro yet, and have no confidence at all that I will find them, but at least I can get back to working on locos using DecoderPro.


Just a note on Dropbox. After using it for a few years for various file transfers and such, I finally realized that I had not one, but three emails associated with Dropbox files that my computers were using. It is next to impossible to figure this out, or what to do about it. I haven't tackled that yet, but I'm only going to try sharing JMRI between my two computers after I somehow straighten that mess out. In the meantime, I'll probably just move my Mac downstairs and plug it in to the layout for operating sessions. A shame, but I don't want my hobby to become "computer technician" any more than it already has.

Monday, January 16, 2023

Experimenting with a better video camera


"Serious" model railroad operations are a lot of fun, but if you have a continuous loop option on a model railroad, you can have a different kind of fun, where trains chase each other around the mainline and the amount of effort to avoid collisions is less, although still non-zero, depending on the skill and attention span of those driving the trains. A few days ago some friends brought their new locos over for some testing, and yes, we ended up chasing trains around the room. Another friend brought a fancy video camera to try, so the result is now posted on Youtube as "Part 50" here: https://youtu.be/naOXc_DObGY 

I do have a more serious video in production, about how to turn the "Pacific Zip" intermodal train when it arrives in Seattle, but that will take some more editing time.

When I started making model railroad operations videos a few years ago, and then started numbering them in a series, I had no idea how quickly I would get up to having a part 50. Making videos has become another major sub-hobby, and I'll be giving a couple of clinics about it this spring, one at the NMRA Pacific Northwest Region (PNR) conference in Tacoma on May 11, and another at the Railway Modelers Meet of British Columbia on May 28. Except for the most recent one, they were all done with just an iPhone and sometimes a GoPro or cheap spycam.

Meanwhile, here's a photo of some switching action that took place even while the trains were chasing each other around the room on the mainline:


Friday, December 2, 2022

Demolishing a workbench to make three work stations


Sometimes you have to demolish before you can construct. When we moved into this house I needed to tear down three walls in the basement to clear the way for the model railroad to come. But I neglected to tear down an old bulky solid-as-a rock workbench/shelf unit that the previous owner had built there. After thirty years of thinking about it, last week we got out the hammers and other deconstruction tools and tore the thing apart. There was no way to imagine hauling it up the basement stairs, even though some other homeowner might have found it useful.

What I realized in the intervening thirty years is that model railroading is both an art and a manufacturing plant. We need a work station for electronics like DCC decoders, servos and LCC setups. We need a work station for building kits for cars, bridges and structures. And we need a paint shop next to the spray booth for managing the various finishes for all of the above. Not to mention applying decals and building open loads. So we took the plunge and demolished the old workbench. 

Here it is in pieces,


And here is the space it left behind:


To the right and left of the space are old surplus kitchen cabinets from previous remodel jobs, that also are sub-optimal storage solutions at best, and will probably go too. And I don't know what to do with the pile of scraps on the floor. A lot of brainstorming is going on right now. But with nine to twelve or even fifteen linear feet to work with, and a depth of just over two feet, we should be able to come up with some specialized workstations to make the railroad a lot easier to build and maintain. We'll keep you posted, and let us know if you have any good ideas for how juggle work space, tools and supplies for specialized tasks like we model railroaders engage in....

Wednesday, November 23, 2022

Paperwork for activating the new staging yard BRJ

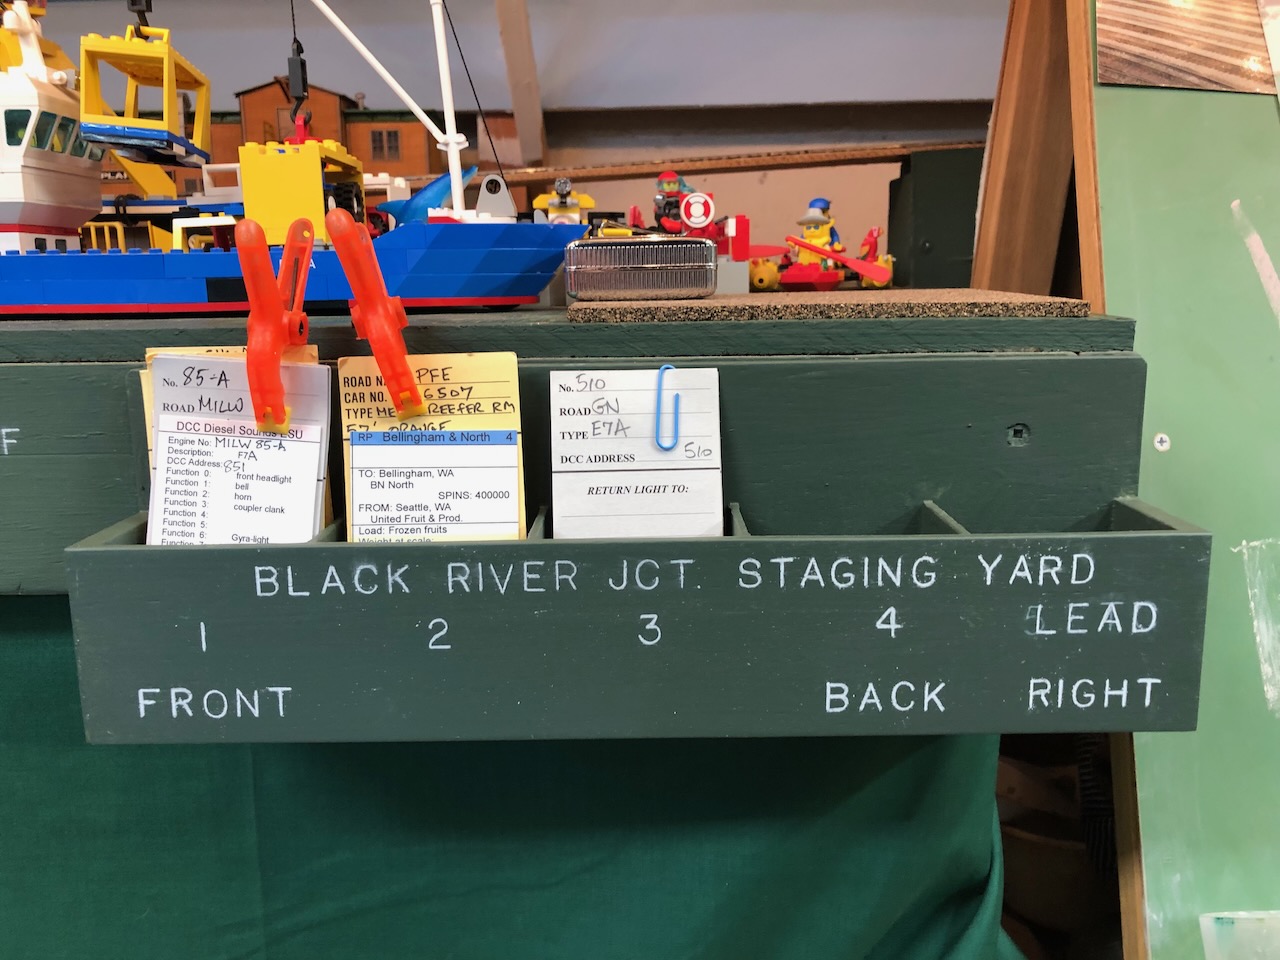
 "BRJ" stands for Black River Junction, the name I'm giving to the new staging yard we just installed in the space between Interbay yard and Harbor Island/Legotown. It's main role is to store the UP & MILW transfer freights and BN passenger trains off the layout to allow the Argo yard to be more useful to operators. The yard is physically complete, but for it to truly be in operation, it needed a diagram showing which tracks are where and called what, and some car card boxes conveniently located for storing the car and loco cards accompanying the stored trains.

Here's the track diagram I came up with. Its somewhat antiquated layout style is based on the BN SPINS diagrams of the era, so it will fit in to the SPINS booklet that operators can use to navigate the layout. I also will post the map next to the car card boxes to allow quick reference.


You can see at the top of the diagram a short spur labeled "MILW LOCOS", which will be a small engine servicing facility for MILW and UP loco storage to also get those locos off the active part of the layout. This will free up space at both Stacy and Argo yards, and it is under construction.

The other "accessory" the yard needed was some car card boxes labeled for the various tracks. Here's what I came up with for that:


Here's a cropped version of the map, rotated so you can compare the box labels to the maps. As you can see, we already have some of the tracks filled with their intended subjects.


I'll post a picture of the new MILW engine terminal as soon as we get it built. All in good time...

Thursday, October 27, 2022

Mocking up another narrow gauge extention

There's a ravine in the scenery above Mukilteo on my Burrlington Northern HO/HOn3 layout just the right size for a small mine, and at just the right height for being reached by an extension of the narrow gauge line to the existing "Cascade Copper Company" mine. The only thing better than one mine is two mines, right? I've been thinking about installing this line for some time now, but Robin Peel brought over a piece of foam-core and is determined to make it happen. Here is an overall photo of his mock-up of where the line could go:


As you can see, a lot of bridges and trestles are going to be needed, and we're already committed to the project, as you can see by the bare pink foam where there used to be rocks. The existing Cascade Copper Co. mine is in the very lower right corner, and the new mine site is off the photo to the upper right. Here's a photo of the right side where the ravine is that will be excavated for the new mine (after we get the track in, which could be a while...):


It's going to be fun designing and building all those bridges and trestle. I'm looking forward to it, and glad that Robin got the project started with this template made of foam-core from an old poster.

Monday, October 3, 2022

What? Another staging yard??

It's just that we've been running into problems operating the Argo Yard, south of Stacy St., because it does triple duty as the Amtrak Coach yard, UP interchange and MILW interchange. So it tends to be all plugged up, almost all the time. I got to thinking (never a good thing!), what about the unused space behind the angle braces holding up Interbay yard, which could be accessed by a switch off the downhill grade to Harbor Island (formerly Legotown) below it? Here's a picture of the target area:


And here's the view of all that wasted space underneath Interbay yard behind the angle support beams. There's room in there for at least three tracks - enough to offload Argo just fine:


It just so happens that when I was helping Al Frasch dismantle his huge N scale layout on Whidbey Island a few years ago (before he moved to Tucson and built another one) I salvaged a plywood shelf 6" wide and about 18' long - perfect to slap into this space. So, after months of dithering on this and that (like hosting the National Narrow Gauge Convention over Labor Day weekend), I got started on the project. Here are two shots of the first (of 3) six foot long sections of the new staging yard. Since it's pretty hard to reach in there, I'm finishing it on the workbench as far as I possibly can, so all I'll have to do in that confined space is screw in the three sections to the wall studs and slide the rail joiners to connect the sections.


In the second photo, you can see I've glued the track down and put weights on it while it dries overnight. I like to glue my track down with liquid latex diluted about 3:1 with water, so if I ever need to make changes it's not too hard to pull up the track. I'm afraid to use more permanent bonds like caulks or white glue, although it's true that you can just wet down the white glue if you want to make a change. I'm just used to using liquid latex, so I keep using it.

Anyway, that's one of the current projects going on around here. Soon I'll report on another - an extension of the narrow gauge mine branch to a secondary mine shaft. The fun never stops!


Sunday, July 3, 2022

Developing the "South Seattle Intermodal Terminal"

As you know if you're a model railroader, it takes a lot of space to model just a small portion of any sort of intermodal terminal. In my case, modeling the BN in 1973, I am fortunate that the intermodal line of business was in its early stages, so I can get by with less space for this than modelers of later eras. But there is no doubt that most manifest trains carried at least a car or two of "trailer on flat car (TOFC)" by 1973, and in the BN's case, they started a dedicated intermodal service between Seattle and Chicago, called the "Pacific Zip" (train #3) in the westbound direction and the return trip named "Train #4", both at passenger train speeds or better. It was a very overpowered and short train at first, while the business grew, which is very fortunate for me, since (1) I have an awfully lot of locomotives, and (2) it takes less space to credibly build a shorter train.

So, what I did was to install a six-foot long section of track in between the South Seattle mainlines and the Lonestar Cement complex at the end of the aisle to the right of the Argo Yard, with just enough space between them to park a row of trailers or containers next to the track. Not enough space for the lifting equipment, but at least enough to call it the "South Seattle Intermodal Terminal" and to park 4 long TOFC flatcars on it, enough to make a short, but convincing, Pacific Zip #3 or #4.

It goes without saying that just staging the Pacific Zip #3 or #4 in "Tacoma Staging" just off the layout from there would work too, without taking any real estate at all (other than taking up a staging track). But, the prototype trains were broken down and made up in Stacy St. Yard, not in the Intermodal Terminal, and this was done by a special switch job called "Crew 6". What fun to terminate the westbound Zip in Stacy St and have a switch crew quickly remove the express boxcars off the back end and then shove the intermodal cars down to the Intermodal Terminal, as the prototype did. Also, since my south staging yard is hidden beyond the ladder (don't do this if you have a choice!), it is easier to change out the trailers and containers if I have the cars parked on a track I can see and reach.

All of this is to say that Magnus Christerson has recently been adding some "craft foam" pavement and a guard shack to the scene approaching the South Seattle Intermodal Terminal. Here's what it looks like so far. We plan to apply striping and grey pan pastels to the black surface to match the sanded grout paving behind that area, so we're not finished. But it's progress, and that's what this blog is all about! Enjoy!