Sunday, March 29, 2020

N scale demolition

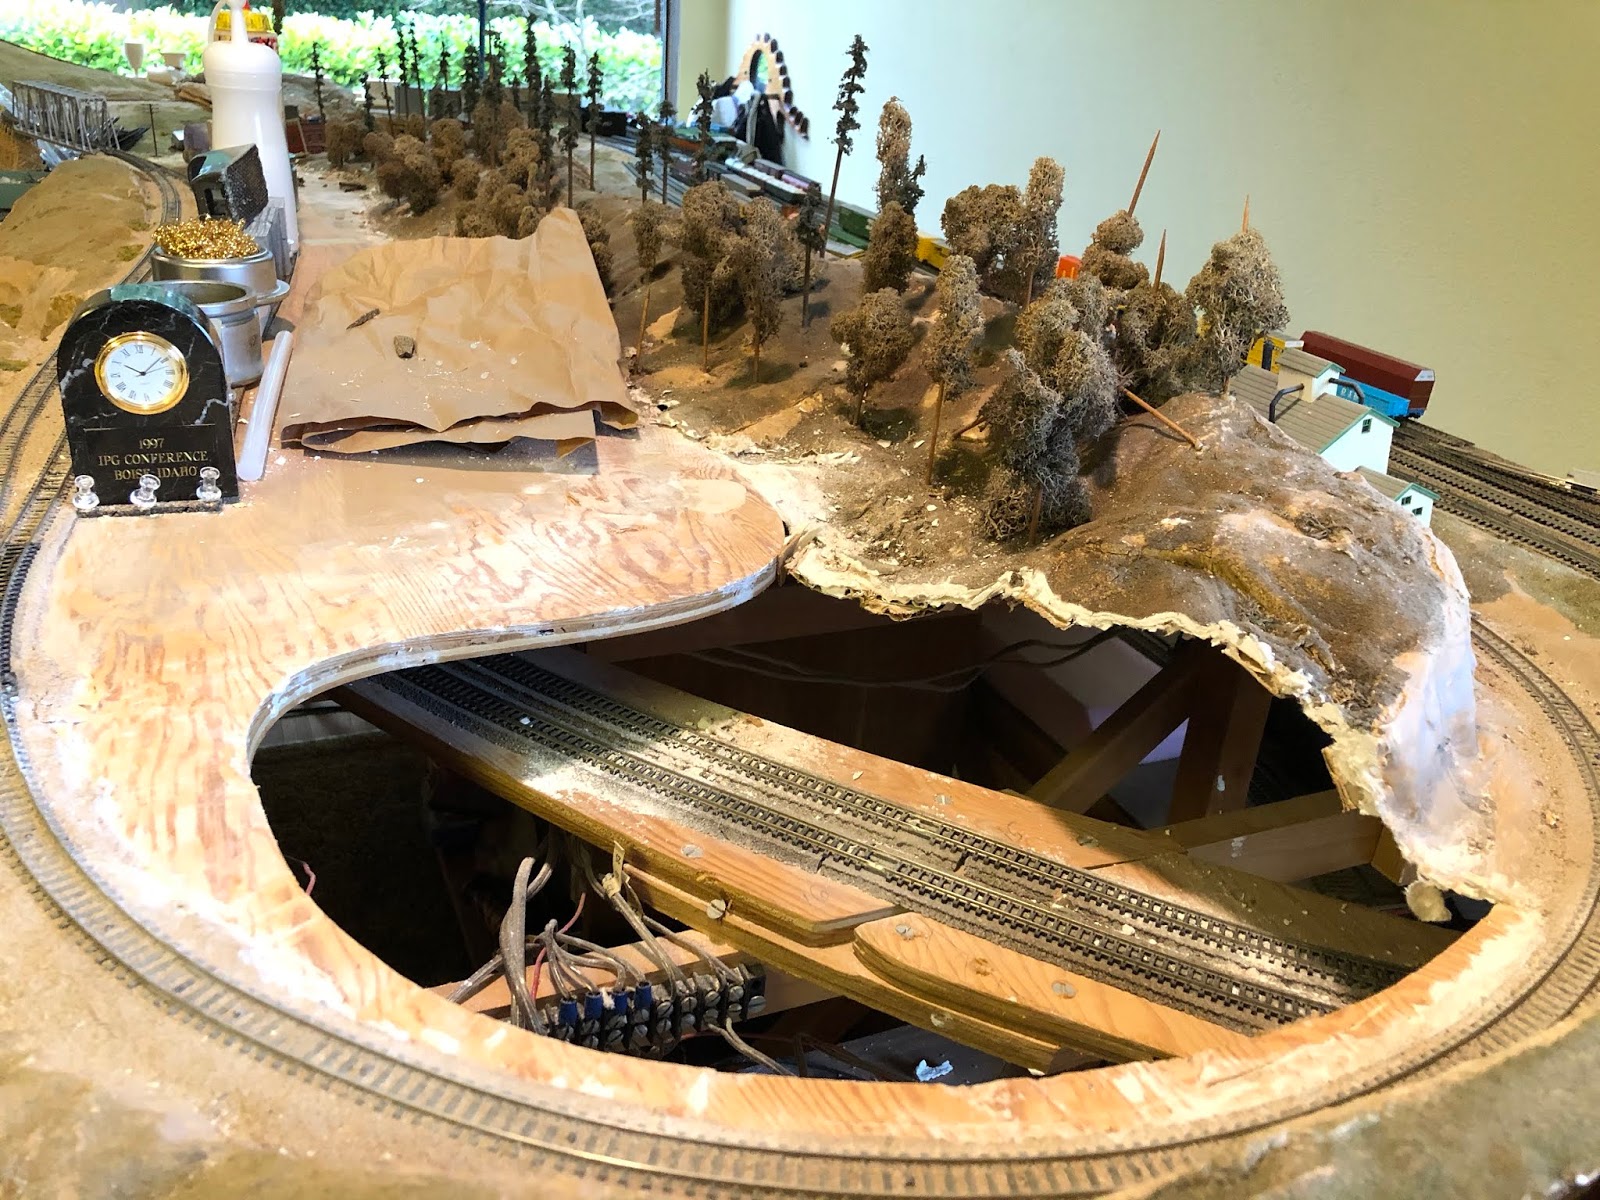
The Covid-induced staying at home creates a lot of stress as well as opportunity to work on trains. In my case, I wanted to stay upstairs as much as possible to "help around the house," but I also noticed the N scale layout in our living room that has been begging to be worked on for decades. Having been inspired by (1) Mark Dance's amazing N scale pulp and paper mill, and (2) the Nucor steel mill in West Seattle that we toured last summer, I decided to create additional developable land on the N scale layout. This meant demolishing some ancient plaster-on-cardboard strips scenery and installing new pieces of (hopefully level) plywood sub-roadbed. What follows are some photos of the demolition.

This is a partial shot of demolition of the southwest corner of the layout, south of the main Seattle yard, in preparation for adding a shelf to house, among other things, some tracks to represent the Nucor steel mill in West Seattle.

And here's the shelf in place temporarily before final roadbed and track in that area.


Here are two shots of a huge hole in the old scenery, created with a loud and dusty application of a Dremel reciprocating tool, kind of like a miniature "Sawzall". You can see the resulting debris on the tracks below.

Before long there should be sufficient real estate available to build a convincing pulp and paper mill. Looking forward to it! Where would we be without saber saws and plywood?

Monday, March 16, 2020

operating session #24


The 24th operating session on the Burrlington Northern was held on March 13, 2020. Some video clips of the action are posted on YouTube here. We had been planning to host two full-day sessions that weekend as part of the bi-annual "SoundRails" event, but it was cancelled a week earlier due to Covid-19 virus concerns. However, three of the SoundRails travelers from out of town arrived anyway, so we gathered a few other local folks and had a small (10 person) op session anyway (thanks to Bill Sornsin for arranging this!).
Dirk Warwell, here from Germany for the second time in two years, worked the Everett/Bayside yardmaster job, while David Doiron from Phoenix was the Stacy St. yardmaster and David Cook and Dave Enger split the Interbay/Balmer yardmaster duties. Gordon Bliss from Houston worked locals all day, Tim Taylor ran Delta yard, Jim Betz from Burlington ran (appropriately) the Burlington yard, and Lee Marsh and Don Miholovich handled all the mainline traffic. Andy Dupree held down the fort as our dispatcher while I paced around looking quasi-managerial.

There were a number of improvements since the previous op sessions in December, all of which tested out fine (and most are covered in previous blog posts). The new phones were used frequently for communicating between yardmasters and between crews and the dispatcher, which cut down on congestion in the aisles. I had recently worked up a revised master train lineup, which reduced the total number of trains and modified the schedules so that the traffic flow in and out of the staging yards and between the operating yards was more even and predictable. The dispatcher's desk now included a laptop with crude JMRI panels, giving Andy the ability to line key switches for mainline moves. The locomotives had all been re-programmed to a maximum speed of 30mph, and lightly weathered, which gave all of us more time for railfanning between stations. And finally, for the first time, the Woodinville local was able to run correctly by starting in Everett and running to Woodinville and back, instead of the other way around.

The diagram below shows how we adapted to having fewer than normal operators for the session. The stations marked with an X we didn't staff or run, we just pretended they weren't there and/or ran through them. It seems that as long as we have at least a couple of yardmasters at work, we can have a good session.
Here are a few more photos of the action:

Andy hard at work at the dispatcher's desk

One of the new Walthers Proto switchers shoving one of my favorite shorty tank cars.
Dirk said that the momentum and braking settings on it were "perfect"!

Here you can see the advantage of 4-foot aisles.

And here you can see everyone practicing "social distancing"


And finally, David Doiron brought us a gift of this new 1 1/2 door boxcar he painted and lettered for his home road in Phoenix, called the "Lost Duchman". We put it in service right away, seen here headed south, passing through Interbay/Balmer yard. A real beauty!


Saturday, March 7, 2020

new uncoupling pick holders

How's this for an arcane topic?: When you're at an operating session and need to uncouple a car, the last thing you need is to run around creation looking for an uncoupling pick. But the darn things are six inches long, so you don't really want them loose on the layout surface, or sticking up from car card boxes into the view of the layout. The solution (I think I read about it in one of the recent OPSIG issues of "The Dispatcher's Office" magazine) is a small tube with a fixed bottom, mounted to the layout low enough on the fascia that the picks inside won't stick up into the view of the layout. I was so excited about the upcoming operating sessions here as part of "SoundRails 2020" (cancelled now due to Coronavirus, oh, well) that I bit the bullet yesterday and built some and installed them on the layout. Will look forward to putting them to the test.


They're easy to build. I took some Evergreen Styrene 1/2" tube stock ($3.70), used a mitre box to cut them into equal lengths of about 3 1/2", cemented a piece of flat styrene on one end, trimmed it flush with a disc sander (carefully so as not to melt the plastic!), drilled a large hole in one side opposite a smaller hole in the other, and then attached them to the layout fascia with some #6 screws. (About two hours total for 8 holders, for a total cost of between 46 cents and 46 dollars, per holder, depending on what you consider the value of my time.) The important thing was mounting them low enough that the uncoupling picks don't stick up above the top of the layout fascia.

The question of "what's the best tool for uncoupling HO cars" is a good one. First of all is the debate about whether to use magnets (either fixed or movable or electromagnetic) between the rails or below the ties, in places where uncoupling is frequent, or whether uncoupling by hand is "more realistic" since that's the way railroaders do it in the field. A matter of personal preference (and the patience to install fixed uncouplers on your layout). Then, if you decide to uncouple by hand, what tool to use? I was happily using barbecue skewers like everyone else, until someplace I saw someone using a dental flossing brush, which seemed to work better - so I went out and bought a few dozen of them, drilled holes in the sides of my car card boxes to hold them in, and tried them out for a few op sessions. I liked the ergonomic feel of them in my fingers. But I noticed most people still liked using wooden picks, so I also made those available, and people would store them in the car card boxes, sticking up above the height of the layout and snagging on arms, clothes, etc.


Recently, I've noticed that the very slippery graphite surface of a sharp pencil makes a pretty good uncoupling tool, too. But one disadvantage of it is that the larger width of the pencil makes it more likely that you will damage car end details on your way down to reach the couplers, as you can see happening in the photo below (to the great concern of the conductor):


Some have said that if you put a flat chisel edge on the tip of the pick, a quick twist will improve its effectiveness during uncoupling. (Rix also makes a plastic tool like this, small enough for N scale) I'll try this, but have nothing to report on it so far. So, for the moment, we are sticking with good old barbecue skewers, and they now have a home at eight locations around the railroad. I thought about painting the holders green to match the fascia, but I think the visibility of the unpainted white tube may make them easier to find. You can decide what you think, from the photos below.


As you can see from these pictures, I seem to have issues with other sorts of detritus sticking up above the top of the fascia, but that's another subject for another time. The bottom line is, if you forget to bring a pick to the next op session here, now you won't have to look far for one!


Friday, February 28, 2020

MILW car barge & tug takes shape


Our neighbor Bob Wickham is a skilled ship model builder, and he recently volunteered to assemble the Walthers tugboat kit and customize it for the MILW tug that once plied the waters of Puget Sound. I had already built the car float kit many years ago, although it's not an exact replica of the ones the MILW used in Seattle, and as you can see it is too long for the "water" available for it. As you can see, he did a great job on the tug, adding a steam engine style stack and building brass hand rails to replace the silly-looking square plastic handrails that come with kits like that. We haven't gotten it tied up to either the apron (built by Dave Enger a few months ago (just in time!)) or the car barge, but as you can see from the ropes draped on the aft deck, it won't be long.

While he was at it, he also painted the barge a dark grey, and then I put some pan pastel on the rails and vents, and some yellow Floquil on the cleats and bollards. It's amazing how much better it looks now than the original bare plastic did!


As you can see from the second photo, I didn't have room for the Walthers apron (which was based on a NYC prototype anyway), so I built a flexible section of track and attached it to an O scale Caboose Industries ground throw, which has enough movement to switch between tracks left and center. But one of these days I'll rip that out and install switchpoints instead, a much more prototypical and elegant solution. This was just easier and quicker. The famous wooden overhead infrastructure of the MILW slip at Pier 27 would be cool to have here, too, but I don't see where I have room for it, so far. Maybe some year someone will 3D print this and I'll figure a way to modify the front fascia to make room for it.

The capacity of this car float is something like 16 cars, practically a full trainload, but so far in op sessions we've only managed to move half that amount back and forth to the pier. Partly there aren't  enough waybills sending cars to Port Angeles, and partly the layout is mainly a BN affair, so getting someone to operate the MILW switcher is sometimes a low priority if we don't have enough operators. Also, my model of Argo yard is so small that 16 car would overwhelm it anyways.

The next phase of the car barge project will be building another, shorter, float to carry cars to Victoria BC, something that the MILW also did from Seattle. Cal Sexsmith wrote a wonderful article about this in one of last year's OPSIG "The Dispatcher's Office" journals, and I am really looking forward to figuring out how to integrate that into our operations. Argo's small size notwithstanding.

Here's another overview shot of the scene so far. Notice how well the see-through water effect in front of the tug works, and this is even before I try coloring or texturing it. The bronze propellor load was also contributed by neighbor Bob - he didn't need these props, so he put them on a surplus flat car with some tie down chains, and voila!:

This post would not be complete without a peek underwater. Eric Vannice recently completed installing a mermaid down there, guarding a couple of large treasure chests from some interested divers groping around between some derelict cars that had fallen off the barge. It's hard to see in the dark, but it's there...

Friday, February 21, 2020

the locomotive braking saga continues

In earlier posts I've described how, about 18 months ago, I took delivery of my first ProtoThrottle and found out that in order to use it, I would have to re-program all 100 of my operating locomotives to activate their braking function(s). After that, it took me a surprising six months to get it accomplished, at the expense of most other progress on the railroad. This post is about how it's been going since then, and what I've learned that caused me to head into yet again re-programming the fleet to improve operations.

Here's the situation the Burrlington Northern finds itself in. When we last discussed this, I had (finally) learned how to adjust the braking rate on Tsunami decoders by setting CV 117 to a value (which is almost impossible to describe how to figure out what it should be) of 169, which gives a braking rate of full speed to zero in about 15 seconds. On the ESU Loksound decoders, I used a LokProgrammer and the PC (not Mac, so I have to run it on a PC emulator on my Mac) software to discover that a setting of CV179=60 provided the same 15 second braking rate as the Tsunami's CV177=169. We adjusted the full speeds to about 50 scale miles per hour, the settings for which varied with each locomotive type.

Momentum matters too, so after some experiments we decided on a coasting deceleration rate of full speed to zero in 54 seconds, which equates to CV4=60 in Tsunami's and CV4=215 in ESU's. This was a deliberate compromise between maximum momentum versus slowing down at a rate that would allow a beginning operator to manage their train even if they forgot about the braking feature.

So, after reprogramming all the locos accordingly, we had a few operating sessions. In general, people seemed to like the braking feature, and felt that it added realism. We standardized on using F9 on all the NCE throttles to activate the brake, and put a "brake" label next to F9 on each throttle, so people seemed to learn it pretty quickly. One problem we found is that the ESU Select and V4 decoders will not brake unless the throttle is turned to zero, whereas the Tsunami's will brake even with the throttle turned up. Once people learned this, it was ok, but this discrepancy between the braking behavior of ESU's and Tsunami's is irritating. The Tsunami's behavior is prototypically correct, and ESU has recently fixed this defect in its new V5 decoders.

Then, I operated a few times on Joe Green's excellent layout in Sequim, WA. He had all his locomotives set to a maximum full speed of 30 scale miles per hour. The effect was great. It made the layout seem larger, the trains seem heavier, and the engine sounds changed more as you increased speed. On my layout I had found that I almost never ran faster than speed step 12 (out of 28), while on his layout I used the full throttle range, depending on the situation.

So, I made the dubious decision to reprogram all the locos again, this time to reduce the max speed to 30 scale miles per hour. Groan. But to make sure, I just reprogrammed one and played with it for a while. You can already guess what I found out. The brake settings no longer made sense at the slower max speed. Taking 15 seconds to slow down from 50 to 0 MPH is one thing, but taking 15 seconds to slow down from 30 to 0 MPH is an eternity. On a model railroad, at least.

After testing a while, I decided that a 10 second max to zero braking rate is just about right. (Ironically, this is the value that ESU puts in their braking rate by default, before I started this whole mess!) So the new CV values are, for Tsunami's CV117=175 and for ESU's CV179=40. Now I'm off to the basement to reprogram the rest of the fleet.

One footnote to all this - I found out from Doug Paasch that in fact some of the QSI decoders also have a programmable braking function. I had taken the QSI's off the layout, but as soon as I figure out how to get them adjusted to a 10 second braking rate (and re-mapped to have F9 trigger the brakes, if possible), I will bring them back on the layout.

A second footnote - to keep things simple I've just set up one function key to control one braking rate. A real locomotive has three types of brakes: train brake, independent brake and (sometimes) dynamic brake. Tsunami has CV's for all three of these, and if there were enough digits between 0 and 9 (an no other functions you cared about) you could have function keys for all of them all on the face of your NCE throttles. But it's complicated enough to get people to use a single brake without bogging down in multiple brake types. I want my layout to be easily accessible for people with varying levels of knowledge about railroads. So I'm just sticking to one brake for now. Who knows what will happen in the future?

A third footnote - I didn't change the CV4 (deceleration) values. I think this will be ok, but it's true that, relatively speaking, the deceleration will now seem slower that it did before. This of course makes the brake more important and more fun! (Another way to look at this is, with 30 as a maximum speed, you won't be in the next town by the time your deceleration finishes, even if you forget to use the brake.)

Friday, February 14, 2020

hand laid dual gage turnouts

The Weyerhaeuser Mill B complex in Everett on the Burrlington Northern is now served by both narrow and standard gage spurs, thanks to some recently-completed partial-dual-gage hand laid turnouts. A standard gage Micro-Engineering #6 turnout is visible below the three new turnouts, for comparison:

It always sounded scary to me to hand lay dual gage turnouts, so for decades I made do with buying the old Shinohara dual gage turnouts and using them. But there was an area on the Burrlington Northern, called Weyerhaeuser Mill B that "needed" both standard and narrow gage service, and the only way to get to it would be for the dual gage track in Delta yard to cross the (curved) mainline on a hand-made standard/dual gage diamond crossing. I thought about this for about 15 years, and then several months ago bit the bullet and constructed it. It wasn't as difficult as I thought it would be, as covered in an earlier blog post.

So, suddenly the Mill B area was opened up to dual gage service. Since it's a freelanced railroad, and I was still afraid of making a fully dual-gage turnout, I decided to peel off the narrow and standard gage tracks in separate turnouts, so we would be able to spot and pick up cars using the appropriate gage locomotives. This seems easier to build than a full-on dual gage turnout, so that's what I did. The photo above shows the three partial dual gage turnouts - two with the narrow gage peeling off to the left, and one with the standard gage peeling off to the left. The dual gage branch line is still available through the complex, and (sometime) in the future I plan to run it around to Bayside yard to provide service to the freight house, the ice house, and a produce company. We all need someplace to spot those nice new Blackstone reefers, right? :)

Here's a shot of one of the partial turnouts under construction:

You start by building a regular narrow gage turnout, and then add the standard gage rail on the side. For peeling off the standard gage track, it's little more complicated, because of needing a second frog, 
so here's a shot of that one under construction:

Then, you cut gaps in the printed circuit board ties, wire the now-isolated frogs up to "frog juicers", paint the ties and rail, install ground throws, polish the rail and vacuum the whole mess, test it one more time, and voila:

I couldn't be more proud of this, since these are the first track switches I've ever scratch-built. The nominal minimum radius of the curve is 20", but with the frogs it seems sharper than that in spots. So far, though, the Blackstone K-27's make it through the complex without derailing, as well as a 60' standard gage flat car that I tested. I haven't tried an Alco C-636 yet, and am not optimistic, but fortunately this is not mainline track and there would be no reason to put a six-axle diesel in there.

Here's an overview of the track complex from the other side, and how the dual gage crosses over the standard gage BN mainline. Those Thrall-door boxcars on the siding are just itching to get spotted at the mill!:


Now all we need is ballast, ground cover and roads, and the scene will be complete. Not to mention replacing the "stand-in" Mill B building with something that looks more like the real thing. Another time - the important thing is that now Mill B can supply the narrow gage mines with timber, as well as receive logs from the narrow gage logging camps! Let the fun begin! Let's not wait another 15 years! :(

Monday, February 10, 2020

the telephones are in!

The installation of wired telephones for communications between the dispatcher and all the main yards and OS points is now completed. I guess it took about 20 hours. The most difficult part was reading and understand the manuals that came with the PBX and the phones. I was finally able to reset the addresses of the phones so that a single digit press will give you any of the 7 "phone booths" on the layout.

It ends up to be pretty simple. The PBX is a box with 8 sockets for phone lines (about $70). The phones are simple AT&T "Trimline" push-button phones (about $14 apiece new). I put the PBX in the middle of the room underneath the Everett peninsula, and then ran telephone cables underneath the floor in every direction (easy to do, since the floor is covered with sectional foam squares that are easy to pull up.). The phones are mounted to short pieces of 4" wide 3/8" plywood attached to L brackets behind the front fascia in the best spots for them. It will be fun to see how this improves future operating sessions. I suspect it will. Here are some photos:

The PBX box with all the phone cables plugged in:

A typical installation, this one at Argo Yard at the approach to South Staging (note the rotary switch for setting which track in the staging yard you are going into or out of):


A close-up of the directory of phone numbers:

And, finally, shots of the mounting setups, at Stacy, followed by two views of the phone serving both Skykomish (East Staging) on the upper level, and the Shoreline between Ballard and Mukilteo on the lower level: