Saturday, October 17, 2020

the new Athearn Genesis F7's arrive

The best thing about modeling the 1973 era on the Burlington Northern is that it took them about seven years to repaint all the legacy locomotives into the BN Green paint scheme. This means that my locomotive roster is a rainbow of colors with interesting histories. In this case, Athearn recently released the F7's in the original NP diesel paint scheme lettered for #6015A and 6015B. All I did was to remove that lettering and the front NP herald on the A unit (using MicroSet and a sharpened toothpick) and apply Microscale decals to the sides and number boards per prototype photos. The most time-consuming part of the project was researching which locomotive numbers would be seen in the Seattle area in 1973, and hadn't been repainted to BN green yet. I ended up deciding on FA#720 and FB#753, which were both based in Auburn, WA and were repainted later than 1973.

The final part of the project was to apply pan pastel weathering to bring out the detail, and to adjust decoder settings to get the performance from the locos that match my existing fleet. This includes setting the maximum speed to 30 miles per hour and mapping the brake function to F9.

The photo above shows the units parked on the mainline in Bayside Yard in Everett, WA, waiting for their first assignment.

Friday, September 18, 2020

The profound difference between a Timetable and an Operating Plan


I just found out something truly profound from ex-BN employee Bob Stafford (and after digesting articles in the OPSIG magazine “the Dispatcher’s Office”). The official Timetables only contained the official “schedules” that could be used by dispatchers to reduce the number of train orders that needed to be written, to improve safety, in the days before radios were widely used. There weren’t very many schedules listed in the timetables, by my modeled era of the early 1970's. But there were lots of (extra) trains that ran at the same time, with the same purpose, each day. Each train had a “Train Brief (TB)” - a document that listed which blocks of cars would be switched in and/or out at each station along the route, and the estimated time at each station. This TB was followed every day that train was run, until it was changed. All of the TB’s together constituted the “Operating Plan” (OP), which was distributed to all stations in the district, and available to operators, yardmasters, etc. to know what to plan for all day. (on the Santa Fe the OP was called the Train Service Plan (TSP)). In my era, every 4 hours the dispatcher, after consulting with the train master, would issue updates to the OP to each station operator, who would make up, or revise, the “lineups” to give to the yardmasters, engine foremen, etc.


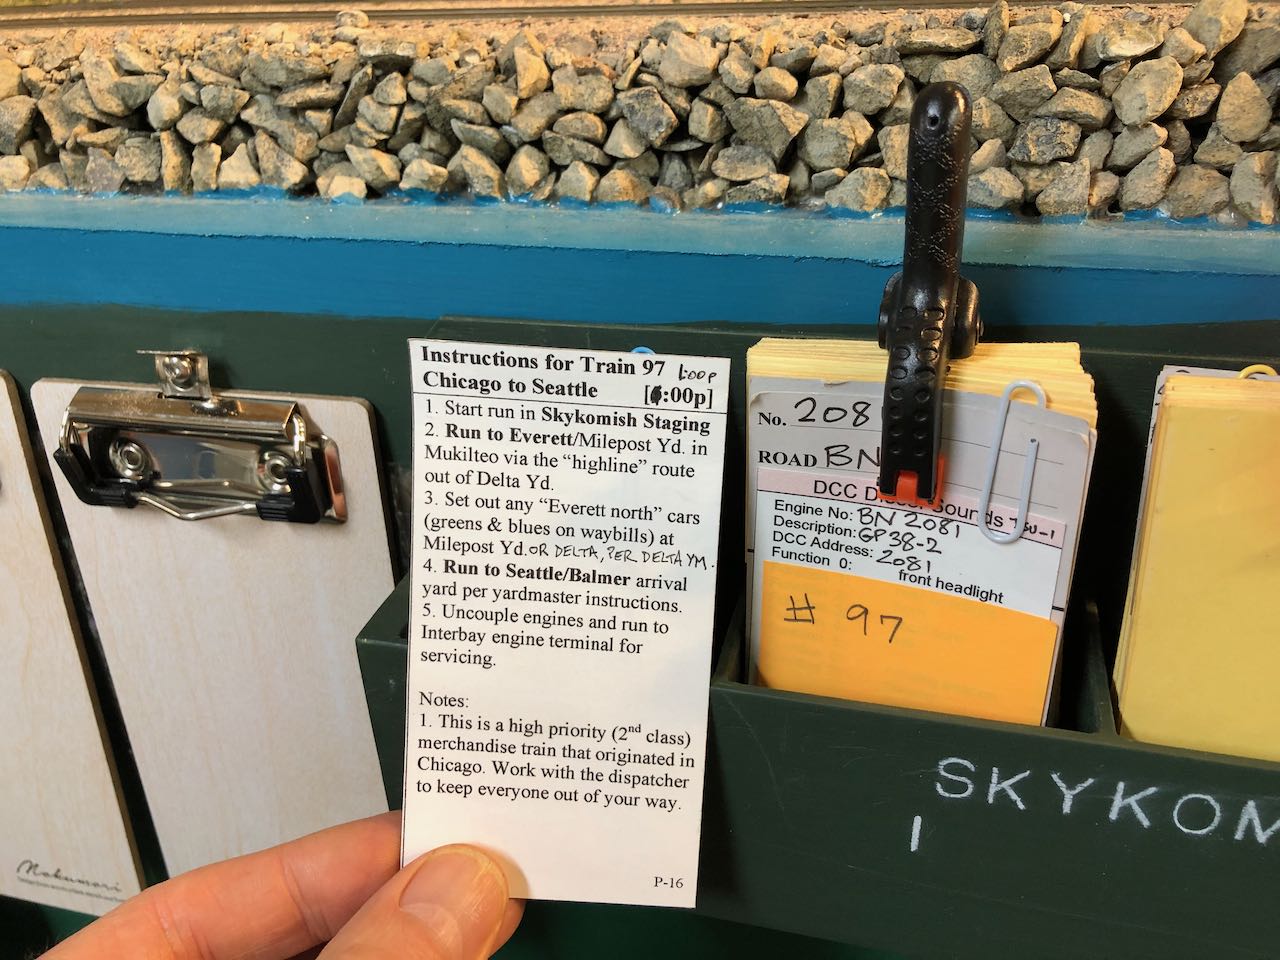
The reason this is profound, is because it makes clear that, for yardmasters at least, the “Timetable” is actually a document of secondary importance to the OP. What I call “train instruction cards” on my layout (see photo shown above) are actually summaries of a more detailed Train Brief, and what I call a “lineup of trains” is actually more of a sequential list of trains I would like to run, but mostly without meaningful departure or arrival times, or blocking information. I don’t even bother with a “Timetable”, because only the passenger trains used it, by 1973, so I just put their official times in their train instruction cards. But I am sadly missing the entire point, which is to have a master Operating Plan, which lists which trains are going to set out which blocks, where and when. Without this, it is basically chaos. It doesn’t matter if on a particular day the blocks themselves are 10 cars long or empty. The point is that everyone knows what time to expect what to happen, whether or not (mostly not) a train will use a particular "schedule" in the official "Timetable." If a train is “late”, it usually is in reference to the OP, not the Timetable, unless that train is using a schedule listed on the Timetable.

The larger context of Bob’s comments to me about my Interbay Switching video, is that in a real yard, the yardmaster can plan ahead for many hours which track he is going to use for which blocks. On a model yard, without an OP and/or lineup, along with copies of the Train Briefs, the yardmaster is just dealing with one emergency after another.

The following diagram is a graphic that the late Doug Walters designed for my layout to help yardmasters figure out which blocks could be placed on which trains. Now I can see that this information should also be part of my "train instruction form", and should be available to the dispatcher in some form as well, as part of a coherent "Operating Plan". Almost regardless of whatever schedules are shown on the official "Timetable".


Monday, September 14, 2020

More thoughts on car cards, switchlists, and computer-based car forwarding


Here's a summary of my current thinking about freight car routing on model railroads, in case it’s useful:

Using the 4 cycle waybills, as I do, I came to realize that there really are only two ways to use all 4 cycles that make sense: 

Variation one: Cycle 1 - car arrives from staging loaded for an online destination; Cycle 2 - unloaded mty car moves to a nearby yard’s “mty track”; Cycle 3 - mty car moves to an online shipper to be loaded, and; Cycle 4 - loaded car moves from online shipper to staging. In staging, flip the waybill back to Cycle 1 or remove it and replace with another waybill, and replace the open load if appropriate. 

Variation two: Cycle 1 - car arrives from staging mty and goes to an online shipper; Cycle 2 - car moves loaded to staging; Cycle 3 - mty car returns from staging to a different or same online shipper; Cycle 4 - loaded car moves from online shipper to staging. In other words, with outbound loads, you can have two per waybill card because the mty car processing is being done offline, but for inbound loads you can only get one trip to/from staging for each waybill card.

Another way to put this is, for outbound loads you can have two trips to staging per waybill card, but for inbound loads you are stuck messing around with the mty car, so you can get only one trip to staging per waybill card. On my layout I have a lot of 2 cycle waybill cards for “captive loads” such as specialized tank cars or cement hoppers, and also a number of 3 cycle waybill cards that just come in loaded to one shipper, go over mty to another shipper, and then out to staging loaded, skipping the mty track in the yard. That’s mainly because I don’t have much space in any of my yards for mty cars to sit around, but on a larger layout you can, of course, provide for that, as well as clean-out tracks.

But the next level down from the above, is what I have heard called “car card inserts” placed in front of the waybill. You could have a special insert for weighing the car. Another one for inspecting an mty that was just unloaded. Another one for holding on the mty track for an upcoming move. Another one for icing the reefer. Another one for deep cleaning a box or tank car. You could run around between sessions and randomly insert these cards into appropriate cars and then let the yardmasters deal with it.

The next level down is what Mark Dance does on his (amazing) N scale layout. He has some car tabs with numbers on them indicating which part of the hour the car can be released (actually, he uses them for locomotive servicing, but it’s the same idea for car cleaning, etc.) You put a car on the cleaning track, look at the clock, and then put a tab on the car indicating which part of the hour it will be when the cleaning is finished. (his tabs say :15, :30, :45, and :00, but you could use other divisions) This way the yardmaster has to wait a certain amount of time before moving the car, creating some additional play value.

I use a computer program called “Waybills” by Shenware to generate my 4 (or less) cycle waybills, which I like because (1) it has the OPSIG database of shippers built into it for picking offline origins/destinations, and (2) it can generate various reports so you can see how many waybills are going to which shippers with which loads on which cycles, for example. But the rest of it I’m keeping manual. If I want a switchlist, I would do like a conductor or clerk, and take my stack of car cards and write out a switchlist with that information. This is what Joe Green does in Sequim, and it works well.

I’ve been fooling around with JMRI ops on my N scale railroad, and have operated recently on layouts in this area that use the “RROPS” free switchlist generating program or JMRI ops, and, while they have some good features, I’m skeptical that they would be worth using for a large layout. You would spend all your time, as you said, reconciling actual car locations with what the computer thinks is going on. Using paper waybills and car card boxes (1) is something like how the real clerks did it, and (2) keeps everything visible on the layout in front of you, and not hidden somewhere in a computer chip. I may be wrong. It’s possible that graduating to a computer switchlist system is inevitable “progress”, but I’m not there yet. And at this point, based on what I’ve experienced elsewhere, I don’t want to go there. We’ll see what happens.

One last point. I’ve heard people say they “don’t like handling a stack of waybills” and would “rather run trains”. As is often said, we are cramming 5 or 10 employee jobs into a single model railroad “operator”. If they don’t like handling a stack of waybills, let them be the engineer of a two-person crew, working with someone like me who does enjoy handling a stack of waybills and figuring things out. There’s plenty of room on a large layout for differing operator job preferences.


Monday, August 31, 2020

How to avoid building a basement layout altogether

I recommend watching the YouTube video George Sinos' presentation to the OPSIG which he gave yesterday. The link to it is here. The short story is, he built a switching layout in N scale on a shelf in the family room that ended up about 11 feet long, and it is so fun to operate, taking 2 people about an hour, that he's seriously considering canceling his plans to build a large basement layout downstairs. Here is what his track plan looks like:


He has a collection of about 400 freight cars that he rotates on and off the layout between groups of four op sessions, and uses a 4:1 fast clock, so that in four op sessions he covers about 16 hours of switching jobs to the various factories on the layout. He uses two ProtoThrottles for realistic engine control and JMRI PanelPro for a touchscreen to control the turnouts. I won't go on - you can watch the video for yourself.

His presentation reminds me of something I've often said to visitors to my layout - after 20 years of effort building the mainline from Seattle to Bellingham, I finally got around to building the Burlington, WA yard, and found it so fun to operate that I wondered why I didn't just start with that and not build the previous 20 year's worth of layout! I say it as a joke, but every joke has some truth to it.


Monday, August 24, 2020

Victoria BC in N with colored and numbered dots


Never one to miss an opportunity to add complexity where none is needed, I tried dividing the three N scale industry tracks described in my previous post into two or three industry spots, and then put small numbers inside the colored dots. Then I set up the spots as separate "tracks" in JMRI ops, and added them in a "pool" for each track. Now, instead of getting a switchlist from JMRI ops with four different destinations for cars, there are now eight. Without making any changes to the track!


The diagram above shows the new named spots on each track, with the spot number in parentheses, and the dot colors for each track. I'm trying to represent downtown Victoria BC, based on an article in Layout Design Journal #62 (3rd Quarter 2018) by Cal Sexmith, so I picked industry names from the article and placed them on the three tracks in a quasi-logical order based on the order they might have been switched in real life. Then I placed colored 3x5 cards next to the track where the buildings might be, just to define the locations of the spots for now.

This photo shows the cars resting in their correct spots after the first (20 minute) operating session using the new scheme. It's amazing to me how fun it is to switch a small simple layout like this. I don't like the clunky layout of the JMRI ops switchlist, and haven't figured out how to improve it, so I spend a few minutes reading the switchlist and putting corresponding colored (and now numbered) dots on the cars. This is similar to a yard crew putting chalk marks on the side of cars. Then, I grab the throttle and enjoy about 20 minutes of switching fun.

The total investment in this particular N scale train layout so far: 30 min to paint the board, 30 minutes to prepare the switches and flextrack, 30 minutes to glue the track down to the board and connect wires to the NCE PowerCab, and 90 minutes to enter the track and cars into JMRI ops. - 3 hours total. $150 for the NCE DCC PowerCab, $50 for track, $300 for cars and locomotive - $500 total.

Sure, there's no backdrop, scenery or buildings, the rolling stock and track aren't weathered, etc. But the operation itself, switching cars around, is already very satisfying. That's all I'm sayin'.


Thursday, August 20, 2020

using colored dot (car tabs) to improve JMRI ops

If you've been struggling with using JMRI ops switchlists, try using color-coded stick-on "dots" stuck to the car tops to help you keep track of which car is supposed to end up on which track. It's not exactly prototypical to switch colored dots around, but it does make the whole thing easier and more fun. I've been experimenting with a Lance Mindheim style of "two turnout" switching layout, and the colored dots have really improved my enjoyment (and efficiency) of the switching moves.


In the past year, I've been learning how to use JMRI ops to generate switch lists for my N scale railroad, as a way to "dip my toe in the water" before trying to implement it on my basement HO layout, which currently uses car cards and waybills for car routing. The JMRI computer program has a lot of complexity to learn, but it doesn't take that much effort to enter in, say 100 cars and then have it generate switchlists. But there are two things about it that have been bothering me. One is that the moves are generated by random number generators, so unless you tweak the program a lot, you end up with illogical moves. The other thing is that it doesn't help the yardmaster block cars in the yard for the next train. Here's what a typical switchlist looks like:


I found out from Cal Sexsmith's article in the LDSIG Journal last year that Victoria had some interesting switching areas, and several car barge services to Seattle. So I decided to try doing some switching in Victoria. I put two turnouts on a plank (previously used only as a test track) with 5 pieces of N scale flex track and hooked it up to my NCE PowerCab and voila! Victoria!


Obviously the scenery leaves much to be desired, but it wasn't too hard to add these four tracks into JMRI ops, so I started generating switchlists and trying to use them. The switching was very tedious. Some of the cars needed to be moved, and some didn't. Some were moving offline, and some were moving between spurs. It was hard to remember what I was doing from one move to the next, and the N scale reporting marks are very small and it was hard to read them over and over again while constantly consulting the switchlist. The switchlist itself was formatted in a way that made it hard to keep track of the moves on. (I need to look into switchlist formatting options). Then I remembered I had seen a local N scale modular club using small colored dots as car tabs, so I pulled some out and tried using them to keep track of which cars were supposed to go where, according to the switchlist. It worked well! I could go through the switchlist only once, reading the reporting marks on each car and matching it to the switchlist, and placing the corresponding car tab on top of the car. That done, the actual switching was relatively easy, and fun! I've heard that some people "don't like switching colored dots around", but I'm wondering how different it is from switching cars based on chalk marks on the side of the car, like many prototype railroads would have used for switching. (Before computers, at least).

This operation, with only two turnouts and ten cars, is much more fun to operate than I was expecting! It takes me about 20 minutes to complete the work, long enough to make for an enjoyable break from routine daily activities without requiring a major time commitment. And if I want to make it more "meaningful," I could always generate a ferry run to Seattle and hand carry some of the cars back and forth to the main N scale layout. The only problem I see is that it is completely distracting me from all the other aspects of model railroading that I had been thinking were more important. Oh, well!

Monday, August 17, 2020

Progress towards remote ops


Above is a screen shot of a Zoom meeting set up with six live video views of the layout, suggesting that we are moving closer to being able to try doing a remote op session. I feel like I know just enough about all this to be dangerous, but not enough to make good decisions. Also, I keep thinking that if I can pull off a remote ops session in HO, so can you! :) 

Anyway, what I’ve done so far is to set up 5 older iPhones on tripods around the layout, and log them all into a Zoom meeting as if they were individual participants. I also bought a cheap ($28) wide-angle (90 degrees) webcam and mounted it on the ceiling and plugged it in to my laptop serving as the Zoom “host”. This means that my internet router is pumping all that video up to the cloud. I tried connecting them all up to Zoom last night and it seemed to work with all six channels active, but I need to try it again with JMRI running its web server and real people looking at it from outside. I also suppressed audio from these cameras, to reduce bandwidth load, but I don’t really like that, because it would be fun if people could hear the engine sounds as their train moves past an area.

One of the old iPhones is pointed at the TV monitor that displays a live video feed from my one camera train. Crude, but it works. The camera train video output is three RCA plugs - one for composite video and two for right and left audio. I would like to plug this into my computer but don’t know how of if it is possible with some sort of converter. I also have an old video camera that probably still works, and has a similar output to the camera train. It’s too big to put on a flatcar, but I could use it to show a portion of the railroad.

But now that brings up the issue of how to bring multiple video feeds into a single computer, and then have that composite video be displayed on Zoom. I’ve gotten the impression from OPSIG meetings that a program called OBS is the only way to do that, and I’ve also heard that only the PC version, not the Mac version, will work with Zoom. I’ve been doing everything lately from a Mac, but have some old PC’s sitting around, so I might update them and see if I could combine a couple of video feeds on OBS and have them join the Zoom meeting as well. I have a security camera from DLink looking at my Tacoma staging yard, and would like to make that visible to my dispatcher online as well. All this seems like a lot of work. It might be easier to just find another used iPhone and point it at the monitor that we already use to watch the staging yard:


But the best thing of all for remote ops would be to have more than one live camera train. Some of the OPSIG guys have been mounting Arduinos (or was it a Raspberry Pi) and corresponding tiny cameras in well cars, having the Arduino broadcast the video stream over wifi to a computer with OBS. A technically simpler approach might be to set up a couple of mirrors and set an old iPhone sideways in a well car with the mirrors pointing forward. I know I've seen pictures of somebody doing a 3D printed holder for the phone and mirrors, but don't remember where. Getting the optics right might be tricky.

But switching is what I really enjoy. Switching is going to be very limited in a remote ops session. I’m thinking of just having one or two block exchanges per train, and not even bothering with individual cars. That way, I can do whatever uncoupling is needed on the physical layout without getting overloaded with requests. The only good part of this is that I have a lot of unit trains and special trains that we never have time to run during regular op sessions, because we’re always so busy switching. The remote ops can exercise those trains instead.

Can a first try at a remote op session be far off? Stay tuned!