Thursday, June 24, 2021

Removable scenery and B's Cafe


I'm a big proponent of removable scenery, and have many examples on my layout that are vital to its long-term success. For example, it's great to be able to take the top off a mountain if you need to clean the track inside a tunnel. This week, my example is a shelf above the narrow gage staging yard in Everett. I wanted to have a four-track staging yard to store narrow gage trains, but the area above it also needed to represent the Cascade Copper Co. mine, at the end of a narrow gage branchline. If there were derailments inside the staging yard, I needed to be able to get at it, but otherwise the space above it was perfectly good "real estate" ready to be developed. 

After several years of staring at an odd-shaped piece of foam only partially covering the staging yard, I asked my friend Eric Vannice for his thoughts. The next thing you know, he had crafted a detailed piece of scenery designed to fit over the staging yard. Here he is proudly standing next to his masterpiece:


One of the challenges with removing removable scenery is what to grab onto to remove it without damaging the scenery. Eric thought of making a small, vital, solid wood structure, screwed into the base, so you could grab the scenery by the building! Here's a picture of the screw holding the building firmly into the underside of the scenery base:


I won't be able to add a detailed interior to this particular building, but it looks great as it is! My wife and I both have names starting with "B", so this is arguably the obvious choice for this establishment, which will be well patronized by the miners at the nearby Cascade Copper Co. mine. I'll plant some HO scale picnic tables out in front of it and see how fast those hungry miners show up.

You'll also notice (above in the picture with Eric) that the rock molds in the removable scenery match the nearby rocks. Many years ago, when Eric was making the original scenery to the right of this removable piece, he suggested we cast some extra plaster rocks from the same molds we were using "just in case". I kept them in a drawer under the layout all this time, and now here we were with a perfect use for them. It turns out that being a model railroad pack rat sometimes pays off!

Below is a final (for the moment!) shot of this shoehorned piece of real estate next to a locomotive. Another thing that worked out well is placing the building in front of the shadow line. Right where the shadow line is I plan to put a gravel road and a few period vehicles, to further distract the viewer from the shadow of the deck above. Not to mention install some more of those rocks below the track where the locomotive is standing. And a few trees in the back. Perhaps if the trees in the back of the insert are a lighter color, it will dilute the visual effect of the shadow. A model railroad is a never-ending quest!

This blog post inspired me to do a YouTube video about removable scenery, which you can enjoy here.




Sunday, June 13, 2021

A little construction progress


 We started slowly back to having "Train Days" on Tuesdays, mostly work parties with breaks for random fun with train running. Tim applied some Automatic Car Identification (ACI) labels to cars and locomotives, to help establish our time frame of about 1973. Above, you can see one of the newly-arrived Athearn Genesis GP-18 locomotives with the ACI label underneath the "F" in "PACIFIC". This locomotive clearly fits in that time frame, having been renumbered for the BN after the merger in 1970, but not having been repainted BN green, which would have happened well before 1977. In this case, we put the ACI labels on both sides of the engine, but with freight cars we're only applying it to one side, in case some day we want to run trains in the eras either before or after the ACI craze.

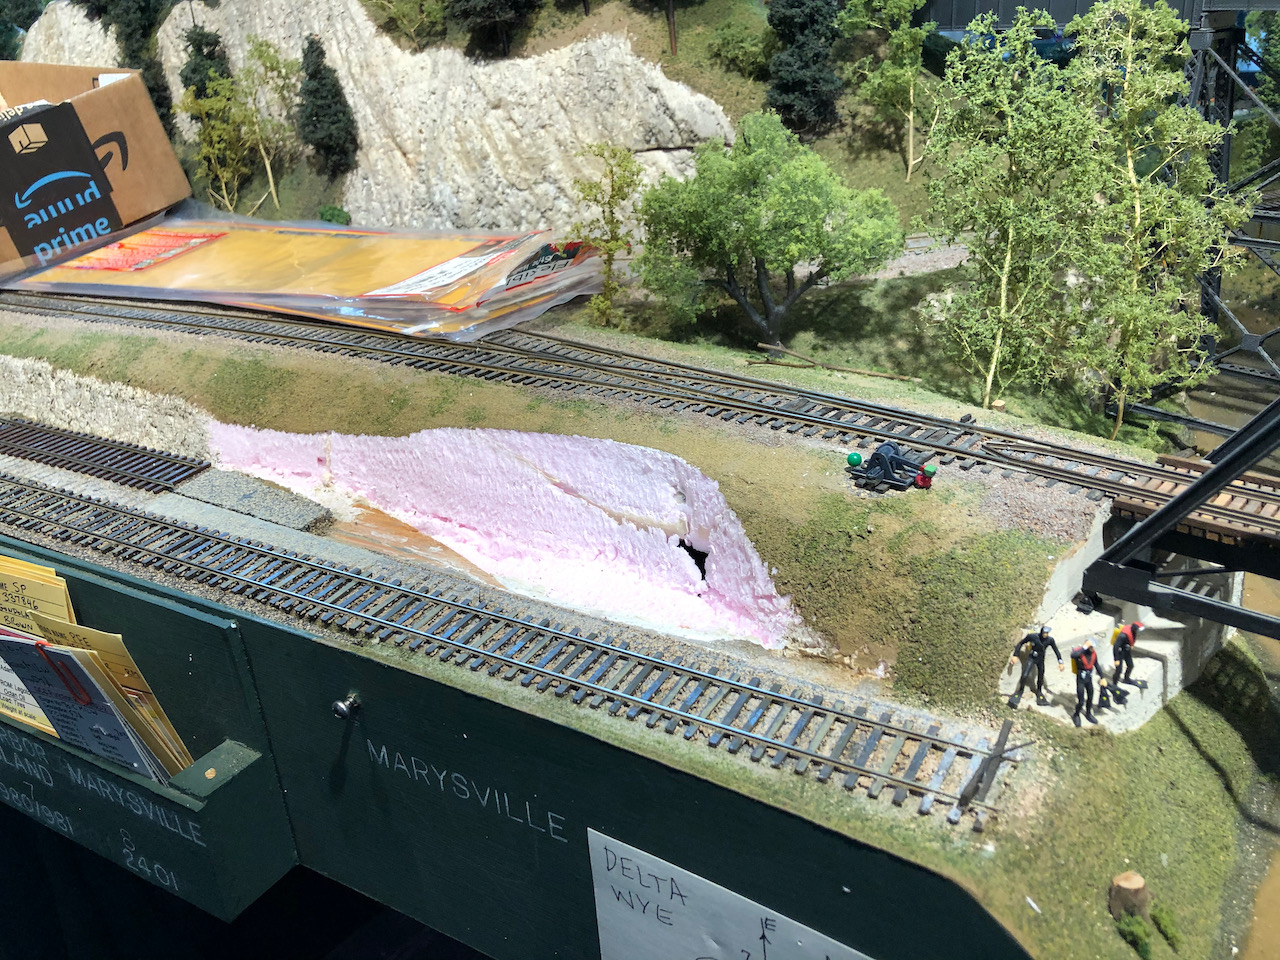
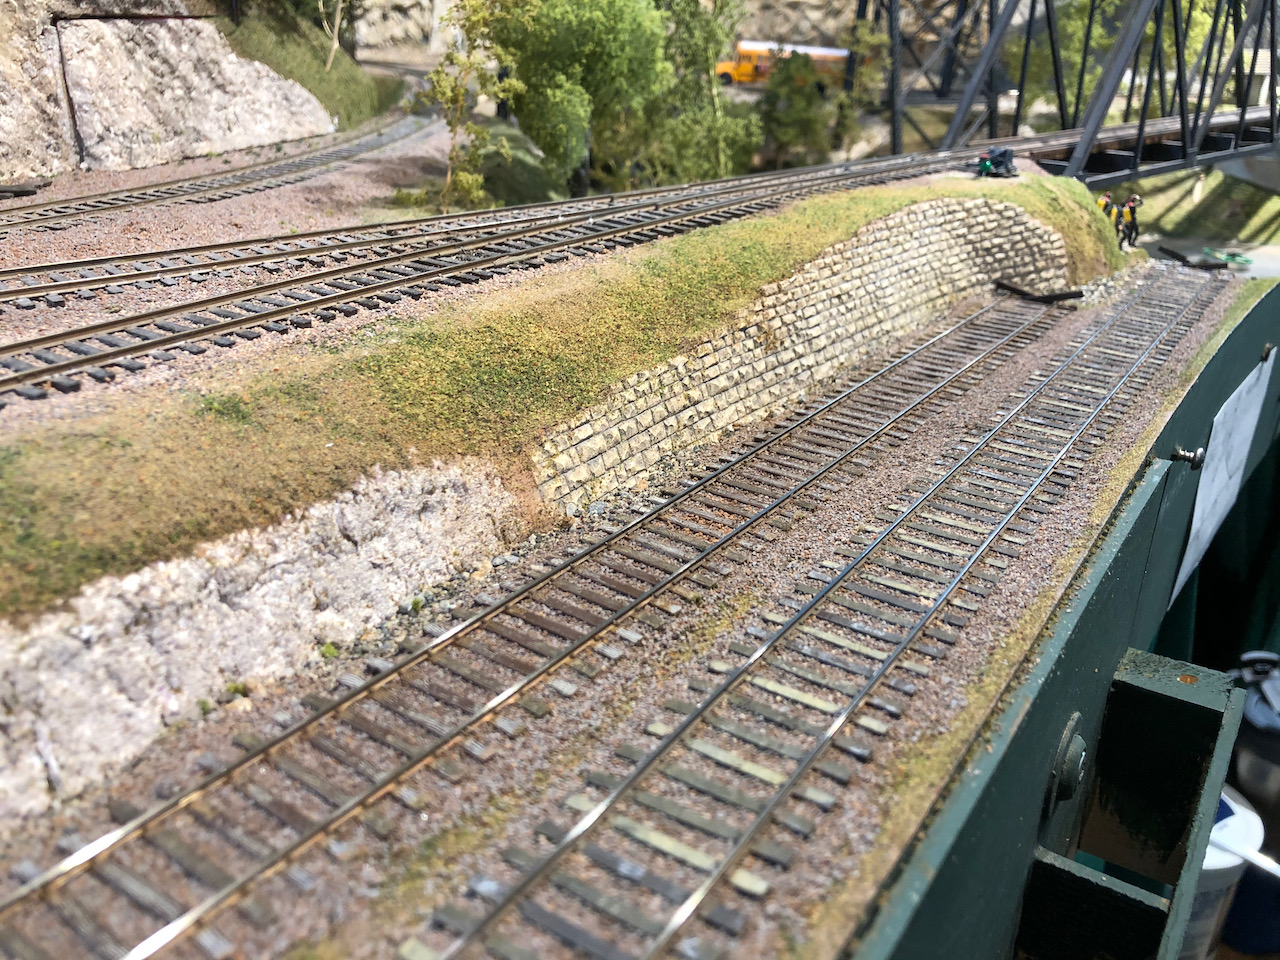
Dave, on the other hand, has carried out a couple of track and scenery improvements. The first was to lengthen the "Marysville" spur, which we use as a staging track to represent industries in Marysville, just north of, and across the river from, the main yards in Everett. There is no end to the effort that model railroaders will put into adding additional track capacity, and this was no exception. We carved up a perfectly good sloping hill and replaced it with a Chooch retaining wall in order to lengthen the track by about ten inches. Before and after photos shown below:


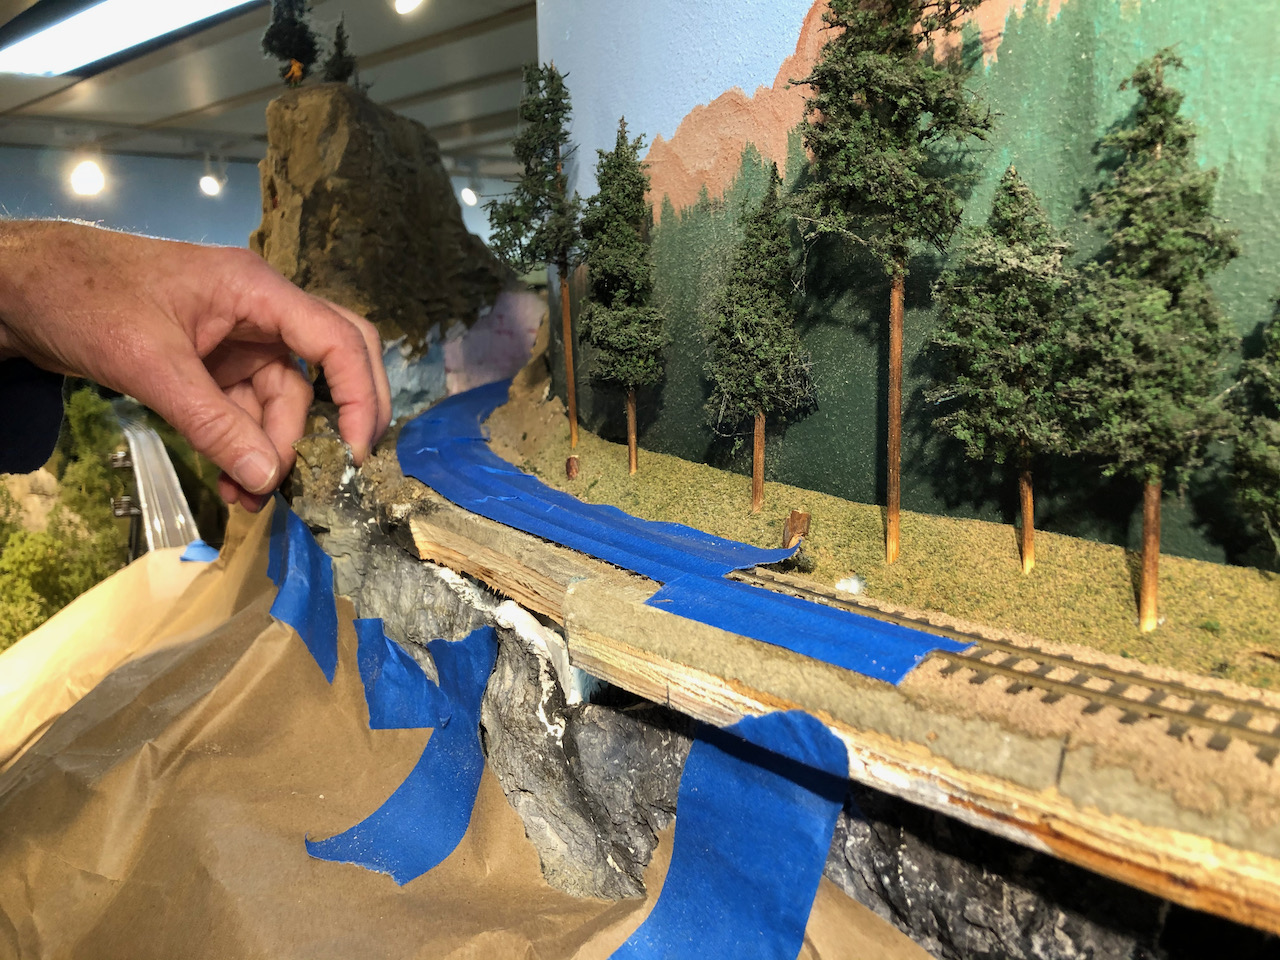
Along the narrow gage line, there was a curve behind the "Needles" rock outcropping that was bare blue and pink foam, ever since I reworked the grade in that area (5 years ago?) to clear double-stack trains in the standard gage tunnel below. Dave carved Sculptamold to match the cast plaster rocks above, and then colored it with acrylic washes. Then I came in with dirt and scree along the side of the tracks, glueing it down with diluted liquid latex on the ballast and diluted white glue on the scree. Mission accomplished!


Thursday, April 29, 2021

Fun with MILW trackage rights on my BN Seattle Region HO layout

You bring the MILW coast train down to Seattle from Bellingham on BN trackage rights, interchanging with BN at Everett and again at Argo in South Seattle, and head into "Tacoma Tideflats" staging. Then you take a MILW switcher and sort out everything you have in Argo yard (including interchanging cars with UP, which also uses Argo). Then you take a cut up to the Pt. Townsend car barge slip near Stacy St. yard and unload/load the car barge, returning to Argo to sort it all out. Then you take any cars up and back from the MILW freight terminal east of Stacy St. yard against the backdrop and the aforementioned auto loading tracks at P90/91 on the west side of Interbay yard, and return to Argo yard again, and make up a cut for the northbound MILW coast train. You then park the switcher for the day, and bring in a northbound MILW coast train from staging (perhaps the same one you started with, which you might have turned and backed into staging earlier). Pick up your northbound cars from Argo, head to Everett, do another interchange move if needed, and run to Bellingham staging. Oh, and did I mention that while switching Argo you do an interchange transfer run to/from the BN at Stacy St. yard? Or that you do all this while staying out of the way of all BN operations? Whew - that's a long (and interesting, in my opinion!) day!!


Wednesday, March 24, 2021

Are my SPINS diagrams overkill?


Are you familiar with the prototype SPINS documents? I think they've been uploaded to the Pacific Northwest Rail Archive, although I haven't actually looked for them there yet. The FOBNR website may have them too. What I did was to find the diagrams (and shipper names) for the areas of the railroad that I model on my layout, and then re-draw them (in a PowerPoint document) so they used a similar layout and numbering system, but were correct track diagrams for my actual layout. I printed them all out into a booklet for operators, and then I took one of the booklets and cut the maps only out and pasted them on the front fascia. Whenever I make a track change, I'll edit the PowerPoint file, update the operator handbook, and paste up a new map on the fascia. Sometimes this also involves making some new waybills to reflect the new SPINS codes I've added. 

Are you a member of the OPSIG? The April 2021 issue of their (excellent) magazine has an interesting article about using car tabs instead of waybills, and of particular interest is his suggestion to simplify ops by using just a two digit code for each unique spot - the first digit being the town and the second digit being the industry. In (perhaps foolish) contrast, by carefully copying the prototype SPINS setup, I am using a six digit code: two digits for the "zone", two digits for the "track" and two digits for the "spot" on that track. I believe the prototype may have had two more digits at the beginning of the code for the "region", for a total of eight digits, but since all of my railroad is in the Seattle Region I decided to leave those first two digits out of the system altogether (even though the prototype would have used all eight in their documents). I put these six digit SPINS codes on all my waybills, so an operator can simply sort the car cards by SPINS number and the train is automatically blocked. A cool idea, but only a couple of operators have actually figured out and used this method in the five years since I've been using it.

I think what I'm trying to say is that copying the prototype SPINS diagram on the fascial looks cool in a magazine, but may be overkill in practice on a real model railroad. The more I try to carefully copy the prototype, the more I run into situations where I need to back off and do what makes it the most fun for operators. Another example of this is weighing cars - I built track scales in Interbay and Stacy St. yards in Seattle, but yardmasters almost never use them because there is always too much more important work to do. They just park cars on the scale tracks like any other yard track, because there are never enough yard tracks!

That said, I'm very proud of my faux-SPINS diagrams and they do give a slightly more prototypical feel to the operation. The feedback I've gotten from operators is that they would like me to put building outlines and labels in the diagrams so it was easier to find something like "Scott Paper" without having to look it up in the handbook and find the number on the map. My plan is to do a major revision of the whole thing with shipper names on the maps instead of just the SPINS numbers. Then the SPINS diagrams won't look as realistic, but they'll be easier to use. Also, the switch numbers and the track numbers are redundant, so I might pick one or the other and eliminate 50% of the visual clutter in the maps. 

Here's a picture of the SPINS diagram mounted on the front fascia of the layout, at Burlington. It really does seem like it would be better if the names of industries were shown on the diagrams, instead of just all those numbers!


I mentioned that I left off the first two digits representing the division, but the more I think about waybills and ops, it sort of bothers me that I don't have an easy way to code for, say Kansas City vs. say Minneapolis. I used to think that heading east over Stevens Pass was all I needed to know about a car or a train, because my layout only goes as far east as Skykomish, but now I'm realizing that they had Laurel blocks and Minot blocks, and these were combined at Hillyard in Spokane with similar blocks from Portland to make the through trains complete. So even though I have Zone 54 set up as Skykomish, I'm thinking about adding some additional Zones to represent the through blocks that would have been set up by the yardmasters in Interbay. That would work, but, again, would my yardmasters pay any attention to it whatsoever, when they're slammed already just trying to get the eastbound cars out of their yard? Probably not. So it's probably not worth it. I'm just thinking about it. The good news is that having a two digit code for zones gives me a lot of flexibility compared with a one digit code.

Sunday, February 28, 2021

Computer technology overhead


This blog post is just a rant about the fact that any human activity involves a certain amount of "overhead", like it or not. For example, I resent the fact that I have to spend up to a third of my life sleeping when I could be doing something productive during those nighttime hours. Also, who likes to pay taxes, but in fact a well-functioning society needs things like courts, legislatures, fire departments, etc. in order to function well, and the cost of these services is another type of "overhead" for collectively enjoying a good life. Get over it. Pay your taxes and get some sleep.

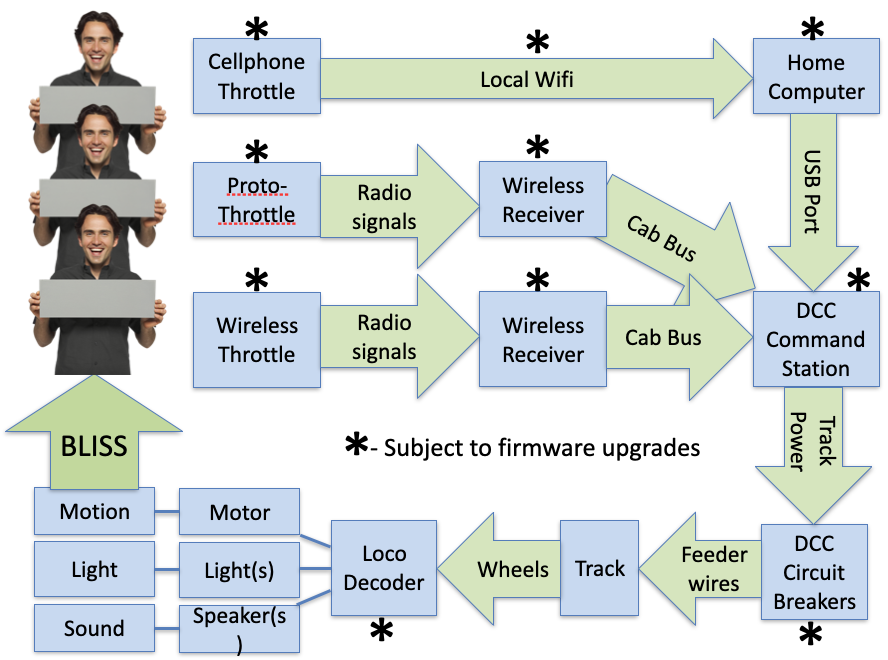
I also resent the amount of time I spend with overhead in the hobby of model railroading. I developed the diagram shown above to illustrate a clinic on how to set up and use the braking features of modern locomotive decoders. I wanted to be clear how complex a simple DCC system can get, pretty quickly. All the operator wants is to experience is a train with realistic motion, lights and sound. but the experience provider (aka. layout owner and the various product manufacturers) will have a considerable overhead to maintain, both in designing the system and, per the asterisks in the diagram above, keeping up with "firmware upgrades." (I should have just said "software and hardware upgrades," but I wanted to sound fancy. For example, do you remember to replace the coin battery inside your NCE Powerhouse Pro every 5 years? I've been doing this religiously for almost 20 years now, and writing the date when I do it on the bottom of the unit on a sticky label I put there just for that purpose. You could call that a "hardware upgrade," but really it's just maintenance.).

Let's pick on one item for a minute - loco decoders. I am operating a layout with a combination of Tsunami and LokSound decoders in a fleet of over 80 locomotives. I generally use JMRI DecoderPro and NCE "Programming on the Main" (POM) to make adjustments in the Tsunami's, but one of the "advantages" of the ESU LokSound decoders is that, if you use their proprietary "LokProgrammer" hardware and software, you can "upgrade" the "firmware" in the decoders over time. In fact, I usually find when I unpack a new ESU-equipped loco from the store and hook it up to the LokProgrammer, the first thing it notices is the need for updated firmware to be loaded onto the "brand-new" locomotive.

But the LokProgrammer "free" software only runs on a PC platform, and I'm running a MacBook Pro (new in 2013 - uh-oh!). This means I need a $60 software called "Parallels Desktop" to create an artificial PC environment running inside my Mac, in order to download and operate the LokProgrammer. Which I only do occasionally. If you're familiar with the PC environment, you know that Windows is constantly uploading software upgrades and security patches, what seems like every few days. Go for two months without opening it, and you are in for a long process of downloading and installing these upgrades retroactively, often involving restarting the computer several times. When all I wanted to do was adjust some CV settings in a single locomotive.

It gets worse. Apple keeps upgrading its operating systems as well, and Parallels Desktop has to upgrade to keep up with that, while Microsoft has to continue to keep the Windows environment working. The end result is that, in anticipation of receiving my long awaited ESU-equipped ScaleTrains BN SD45's (which I'm sure are going to be super cool and fun)(which, by coincidence, are going to be arriving on my birthday, tomorrow!), I tried firing up my LokProgrammer yesterday to make sure everything is ready for those new 3600 horsepower monsters.

Forget about LokProgrammer - Parallels Desktop itself wouldn't open. I restarted this and that, re-downloaded and installed the program, and it still wouldn't open. I finally found a YouTube video with a guy in broken English telling me about a couple of lines of code to type into the "terminal" of the Mac (kind of like the inner control room of a nuclear power plant). Which I did, and then Parallels Desktop miraculously opened. Yay! Then, of course I had to restart the computer several more times for Windows to complete installing its latest security upgrades etc. Then, after at least 4 hours (or more) of time focused on nothing but computer overhead), the LokProgrammer software opened. But, of course, ESU recently released an upgrade, so I needed to download and install that, too. That task only took, say, 10 minutes, for which I was grateful and relieved. Just to make sure, I restarted the computer and started everything up again (another 10 minutes), and yes, it seems like I'm now, finally, ready to take in the new SD45's tomorrow. Happy Birthday!

"There has never been a better time to be a model railroader" is a true statement. We have an array of products, services, communication tools, research resources and inspiration that is unprecedented and worldwide. But it still has some overhead costs, just like everything else. I don't have to like them, but I have to pay them.


Tuesday, February 16, 2021

More on 1970's grain handling


Building on my previous post, there are two interesting aspects of grain handling I've been thinking about:

(1) For the empties, they weren't sent to a specific elevator, just "up the branch" (see previous post). The conductor would just take a string up there and spot the right number of cars. Which car number didn't matter at all. So having a specific destination on a waybill for an empty doesn't make sense to do on the model railroad, either. I guess I could just put "Mansfield Branch" on my waybills and accomplish the same thing, since I don't have enough room to model branchlines east of Stevens Pass.

(2) For the loads, Bob Stafford and Ray Wheeler have told me that each car's load had a specific moisture content and protein content, as measured at the originating elevator, and so they would spot the loaded cars at Cargill (Seattle's 4 million bushel Export Grain Terminal at Pier 86) in very specific order on specific tracks, by car number. Switching Cargill was a huge switching project. I was just thinking "shove them all in there and forget it!" How wrong! They would store the cars both next to the export grain terminal and in Balmer, and (sometimes) call for them to be unloaded by specific car number. I could simulate this by making up a switch list for the grain terminal switcher, but I'm also thinking that I could put moisture and protein attributes on the waybill itself, and then give the switcher instructions on which attributes go to which track, possibly in which order, and let them figure out how to switch it. In addition, the unit trains of covered hoppers were also switched out this way, after they terminated in Balmer yard (Interbay). The 40' boxcars from the light branchlines came in to Balmer yard (Interbay) too, but on regular manifest trains, not in the unit trains.

The bottom line is that, when I get the paperwork straightened out, someone is going to have a lot of fun taking several hours to work Pier 86. I was mistaken, thinking it was a trivial job!

Empty Grain Box (XGB)


Here's a random 40' boxcar sitting in my HO model of Stacy St. yard in South Seattle set in 1973. It needs to be weathered more, but that's another subject. Add ACI labels, take off roofwalks - also other subjects. But for today, have you seen the 2020 print edition of "Great Model Railroads" by Kalmbach Media? The first featured layout, by Clark Propst, has a really interesting sidebar about how he made his car card and waybill system more realistic by letting his conductors decide which empty boxcars to spot at which grain elevators along his modeled midwestern railroad (M&SL) branchline. Since you're reading this, you're as addicted as I am to over-thinking model railroad operations, so bear with me.

All he did was write "XGB" on the car card behind the waybill pocket. And, to quote him, "Instead of getting a sleeve for every empty boxcar, trains are issued a single sleeve with a slip that tells the conductor how many empties are to be dropped at each elevator on the branch. This is more prototypical than forcing the crew to spot a specific car." He uses plastic "sleeves" to hold both the "car card" information, and, inserted on top of that, the single waybills that he uses. So, if a conductor receives a sleeve with instructions to spot 3 mty cars here and 5 mty cars there, he finds 8 mty (XGB) cars in the yard and puts them in his train. He doesn't care which ones, and nobody else does either. When his run is finished, the grain elevators now have mty cars to load, and their car cards are sitting in the respective car card box on the front of the layout. In between sessions, he can insert waybills showing where the now loaded car needs to be shipped next.

Since I use the preprinted MicroMark car cards, the "X" seems a bit redundant with the "EMPTY CAR" already printed on the car card, visible when there is no waybill present. Now, what if I simply crossed out "RETURN TO" and replaced it with a list of viable uses for car. I could write "Available for:" and then list out "grain, lumber". The conductor of a local would get a "train brief" in a plastic sleeve, with the number of mty grain and lumber cars needed that day at various spots, make up his train as needed, and go. Better yet, if the yard had a yardmaster on duty, the yardmaster could make up the train using that train brief, and then give the train brief with car cards to the conductor. Along the line, the conductor could make his/her own decisions about which mty cars to spot at which spots. If either one of them wanted to write up a switch list, I suppose they could, but I'm not sure why it's needed, since they already have the train brief and the car cards in hand.

I'm liking the flexibility of this idea. The train brief could also have information on any other blocks of cars that would be included in that train, such as loads billed for specific towns and spots. Presumably the yardmaster would have those blocks ready to go by train time, which the train brief would help guide. In the past I have relied on a "train instruction card" which said simply "pick up cars destined for x, y and z." Now I'm thinking of turning the train instruction card into a sleeve like a car card, with the standard blocking instructions for loads and specialized empties, and the ability to hold additional slips of paper indicating the empty car orders for generalized empties, such as grain and lumber. If there were too many, or not enough empties available during an op session, well, that sounds like a real railroad, doesn't it?

What do you think of this idea? Here's a photo of my "variation" on Clark's brilliant idea: