Sunday, February 28, 2021

Computer technology overhead


This blog post is just a rant about the fact that any human activity involves a certain amount of "overhead", like it or not. For example, I resent the fact that I have to spend up to a third of my life sleeping when I could be doing something productive during those nighttime hours. Also, who likes to pay taxes, but in fact a well-functioning society needs things like courts, legislatures, fire departments, etc. in order to function well, and the cost of these services is another type of "overhead" for collectively enjoying a good life. Get over it. Pay your taxes and get some sleep.

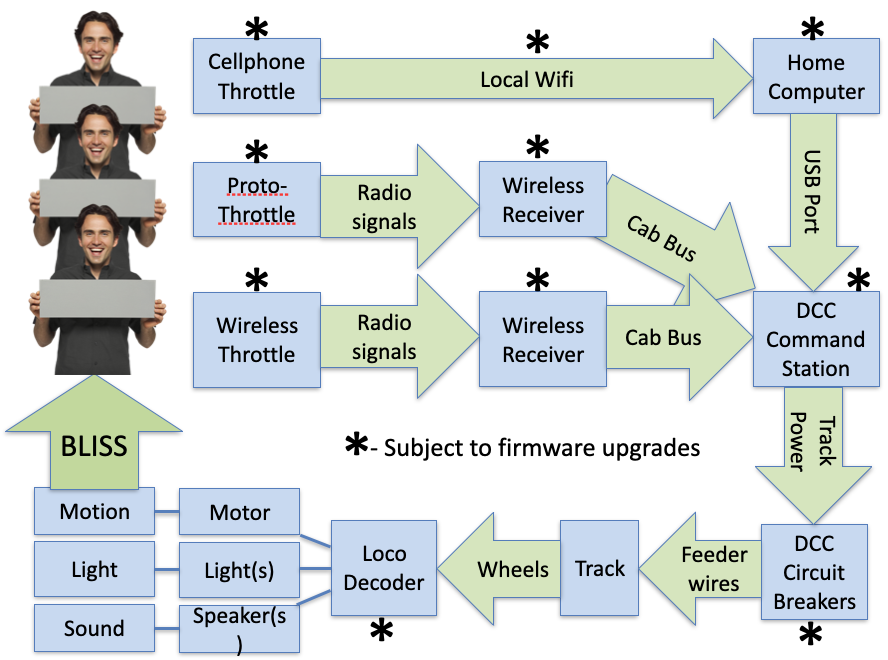
I also resent the amount of time I spend with overhead in the hobby of model railroading. I developed the diagram shown above to illustrate a clinic on how to set up and use the braking features of modern locomotive decoders. I wanted to be clear how complex a simple DCC system can get, pretty quickly. All the operator wants is to experience is a train with realistic motion, lights and sound. but the experience provider (aka. layout owner and the various product manufacturers) will have a considerable overhead to maintain, both in designing the system and, per the asterisks in the diagram above, keeping up with "firmware upgrades." (I should have just said "software and hardware upgrades," but I wanted to sound fancy. For example, do you remember to replace the coin battery inside your NCE Powerhouse Pro every 5 years? I've been doing this religiously for almost 20 years now, and writing the date when I do it on the bottom of the unit on a sticky label I put there just for that purpose. You could call that a "hardware upgrade," but really it's just maintenance.).

Let's pick on one item for a minute - loco decoders. I am operating a layout with a combination of Tsunami and LokSound decoders in a fleet of over 80 locomotives. I generally use JMRI DecoderPro and NCE "Programming on the Main" (POM) to make adjustments in the Tsunami's, but one of the "advantages" of the ESU LokSound decoders is that, if you use their proprietary "LokProgrammer" hardware and software, you can "upgrade" the "firmware" in the decoders over time. In fact, I usually find when I unpack a new ESU-equipped loco from the store and hook it up to the LokProgrammer, the first thing it notices is the need for updated firmware to be loaded onto the "brand-new" locomotive.

But the LokProgrammer "free" software only runs on a PC platform, and I'm running a MacBook Pro (new in 2013 - uh-oh!). This means I need a $60 software called "Parallels Desktop" to create an artificial PC environment running inside my Mac, in order to download and operate the LokProgrammer. Which I only do occasionally. If you're familiar with the PC environment, you know that Windows is constantly uploading software upgrades and security patches, what seems like every few days. Go for two months without opening it, and you are in for a long process of downloading and installing these upgrades retroactively, often involving restarting the computer several times. When all I wanted to do was adjust some CV settings in a single locomotive.

It gets worse. Apple keeps upgrading its operating systems as well, and Parallels Desktop has to upgrade to keep up with that, while Microsoft has to continue to keep the Windows environment working. The end result is that, in anticipation of receiving my long awaited ESU-equipped ScaleTrains BN SD45's (which I'm sure are going to be super cool and fun)(which, by coincidence, are going to be arriving on my birthday, tomorrow!), I tried firing up my LokProgrammer yesterday to make sure everything is ready for those new 3600 horsepower monsters.

Forget about LokProgrammer - Parallels Desktop itself wouldn't open. I restarted this and that, re-downloaded and installed the program, and it still wouldn't open. I finally found a YouTube video with a guy in broken English telling me about a couple of lines of code to type into the "terminal" of the Mac (kind of like the inner control room of a nuclear power plant). Which I did, and then Parallels Desktop miraculously opened. Yay! Then, of course I had to restart the computer several more times for Windows to complete installing its latest security upgrades etc. Then, after at least 4 hours (or more) of time focused on nothing but computer overhead), the LokProgrammer software opened. But, of course, ESU recently released an upgrade, so I needed to download and install that, too. That task only took, say, 10 minutes, for which I was grateful and relieved. Just to make sure, I restarted the computer and started everything up again (another 10 minutes), and yes, it seems like I'm now, finally, ready to take in the new SD45's tomorrow. Happy Birthday!

"There has never been a better time to be a model railroader" is a true statement. We have an array of products, services, communication tools, research resources and inspiration that is unprecedented and worldwide. But it still has some overhead costs, just like everything else. I don't have to like them, but I have to pay them.


Tuesday, February 16, 2021

More on 1970's grain handling


Building on my previous post, there are two interesting aspects of grain handling I've been thinking about:

(1) For the empties, they weren't sent to a specific elevator, just "up the branch" (see previous post). The conductor would just take a string up there and spot the right number of cars. Which car number didn't matter at all. So having a specific destination on a waybill for an empty doesn't make sense to do on the model railroad, either. I guess I could just put "Mansfield Branch" on my waybills and accomplish the same thing, since I don't have enough room to model branchlines east of Stevens Pass.

(2) For the loads, Bob Stafford and Ray Wheeler have told me that each car's load had a specific moisture content and protein content, as measured at the originating elevator, and so they would spot the loaded cars at Cargill (Seattle's 4 million bushel Export Grain Terminal at Pier 86) in very specific order on specific tracks, by car number. Switching Cargill was a huge switching project. I was just thinking "shove them all in there and forget it!" How wrong! They would store the cars both next to the export grain terminal and in Balmer, and (sometimes) call for them to be unloaded by specific car number. I could simulate this by making up a switch list for the grain terminal switcher, but I'm also thinking that I could put moisture and protein attributes on the waybill itself, and then give the switcher instructions on which attributes go to which track, possibly in which order, and let them figure out how to switch it. In addition, the unit trains of covered hoppers were also switched out this way, after they terminated in Balmer yard (Interbay). The 40' boxcars from the light branchlines came in to Balmer yard (Interbay) too, but on regular manifest trains, not in the unit trains.

The bottom line is that, when I get the paperwork straightened out, someone is going to have a lot of fun taking several hours to work Pier 86. I was mistaken, thinking it was a trivial job!

Empty Grain Box (XGB)


Here's a random 40' boxcar sitting in my HO model of Stacy St. yard in South Seattle set in 1973. It needs to be weathered more, but that's another subject. Add ACI labels, take off roofwalks - also other subjects. But for today, have you seen the 2020 print edition of "Great Model Railroads" by Kalmbach Media? The first featured layout, by Clark Propst, has a really interesting sidebar about how he made his car card and waybill system more realistic by letting his conductors decide which empty boxcars to spot at which grain elevators along his modeled midwestern railroad (M&SL) branchline. Since you're reading this, you're as addicted as I am to over-thinking model railroad operations, so bear with me.

All he did was write "XGB" on the car card behind the waybill pocket. And, to quote him, "Instead of getting a sleeve for every empty boxcar, trains are issued a single sleeve with a slip that tells the conductor how many empties are to be dropped at each elevator on the branch. This is more prototypical than forcing the crew to spot a specific car." He uses plastic "sleeves" to hold both the "car card" information, and, inserted on top of that, the single waybills that he uses. So, if a conductor receives a sleeve with instructions to spot 3 mty cars here and 5 mty cars there, he finds 8 mty (XGB) cars in the yard and puts them in his train. He doesn't care which ones, and nobody else does either. When his run is finished, the grain elevators now have mty cars to load, and their car cards are sitting in the respective car card box on the front of the layout. In between sessions, he can insert waybills showing where the now loaded car needs to be shipped next.

Since I use the preprinted MicroMark car cards, the "X" seems a bit redundant with the "EMPTY CAR" already printed on the car card, visible when there is no waybill present. Now, what if I simply crossed out "RETURN TO" and replaced it with a list of viable uses for car. I could write "Available for:" and then list out "grain, lumber". The conductor of a local would get a "train brief" in a plastic sleeve, with the number of mty grain and lumber cars needed that day at various spots, make up his train as needed, and go. Better yet, if the yard had a yardmaster on duty, the yardmaster could make up the train using that train brief, and then give the train brief with car cards to the conductor. Along the line, the conductor could make his/her own decisions about which mty cars to spot at which spots. If either one of them wanted to write up a switch list, I suppose they could, but I'm not sure why it's needed, since they already have the train brief and the car cards in hand.

I'm liking the flexibility of this idea. The train brief could also have information on any other blocks of cars that would be included in that train, such as loads billed for specific towns and spots. Presumably the yardmaster would have those blocks ready to go by train time, which the train brief would help guide. In the past I have relied on a "train instruction card" which said simply "pick up cars destined for x, y and z." Now I'm thinking of turning the train instruction card into a sleeve like a car card, with the standard blocking instructions for loads and specialized empties, and the ability to hold additional slips of paper indicating the empty car orders for generalized empties, such as grain and lumber. If there were too many, or not enough empties available during an op session, well, that sounds like a real railroad, doesn't it?

What do you think of this idea? Here's a photo of my "variation" on Clark's brilliant idea:


Tuesday, February 9, 2021

Playing at the turntable


A picture is worth a thousand words, right? The turntable in Everett needs to be ballasted and weathered, but what the heck, I spent an hour today just playing with it. Putting away a few locomotives that were blocking the turntable lead track, and such. The stock Walthers motorized turntable worked flawlessly. Once it was done, I had to take this picture. You'll notice that everything is in focus - this is the result of a software program called Helicon Focus, which merges multiple images of the same scene with different parts of the scene in focus, into one image, such as you see here. It's quite quick and easy to do. I propped up my iPhone on a nearby steady surface and focused on each engine in turn, taking 7 photos altogether. This is the resulting merged photo.

Of course, a "real" turntable would have some empty tracks ready for the next inbound engine, right? Also, since I'm supposed to be modeling the BN in about 1973 after the merger, can you see which engine is not supposed to be there? Only the hard core railfans will be able to tell. And I'm not talking about the two GN GP's that haven't been renumbered yet, either (911 and 710). I'll get to that eventually.

Anyway, I hope you enjoy looking at this picture as much as I do! :) Model railroading, at its deepest down core, is about locomotion. Serious locomotion.


Monday, January 25, 2021

Video shots with side-arm tripod and OSMO gimbal cellphone holder

There's a lot to unpack in today's blog title. Here's a video about it. I've been doing a lot of video editing and photography lately, so it's on my mind. Last week I watched a clinic presented by Craig Symington, a beloved columnist for the Narrow Gage and Short Line Gazette, and he shared that he used two side-arm tripods to get his camera deep into his layout, and to get lights where he needed them. I went and bought one, which is actually called an "Impact LS-CB6 Combo Boom Stand", and tried it out. I like it. It allows me to position a camera or light fixture right over the layout, and as low as needed to get to eye-level view without touching the actual surface of the layout.

For model railroad videos, you often want to pan the shot to follow a locomotive. This can be awkward while reaching over the layout, so I decided to try my OSMO Mobile 3 gimbal cellphone mount's auto-tracking feature to see how well it would automatically track a train. You can see the results on my video linked above, but the bottom line is that it didn't do too well for a quickly moving train close up, but it might be ok pulled further back, or with a slow back and forth switching activity. I've ordered a 3-axis camera mount to put on the boom stand, so I'll be able to try comparing manual tracking with the auto-tracking that the OSMO provides.

One of the challenges of the operations-oriented model railroad videos that I've been making lately is you have to simultaneously operate the locomotive, uncouple cars, fuss with car cards (in front of the camera) AND pan the camera to keep up with the train's motions. It's a bit much. I'm hoping the auto-tracking of the OSMO will give me a little relief.

Craig has said that he uses two of these side-arm tripods - one for a still camera, and one for extra lighting where needed. I don't know yet if I'll go that far. I do know that it makes sense to put one cellphone on a regular tripod in the middle of the room to shoot my overall setup, while simultaneously using the side-arm for close-up video of the train action. Stay tuned, we'll see how well it goes.

If you haven't seen my series of operations-oriented videos, watch them here.


Saturday, January 2, 2021

LCC first steps


Why turn on an LED with a simple pushbutton, when you can get a complicated computer program to "configure" a complicated LCC circuit board, so that you can turn on an LED with a pushbutton?

The simple answer is - because you want your model railroad to have working signals protecting interlockings and control points.

The photo above is just the first baby step forwards. This simple configuration of an LCC-Signal node allows me to turn on 5 different LED's with 5 different pushbuttons (on the other side of the vertical "test board" on the right). It took 15 hours or more of study and experimentation to get to this point. Hopefully the rest of the learning curve will ease up. Rest assured, if it does, you'll be hearing more about it here.

Signaling is a big subject. Bruce Chubb spent his whole life developing tools for model railroaders, and had a 13-part series of articles on it in Railroad Model Craftsman a few years ago. I skimmed them and wondered if I would ever have the guts to try doing it.

Then Seth Neumann of "Model Railroad Control Systems" gave me a "free" signal head one day in 2019. The perfect gateway drug. You can see three of them in the picture above, one all lit up. They cost just over a buck apiece. They don't look like much, as a model of a signal head, but oh, boy, when those LED's light up, you can feel your hands instinctively reaching for the locomotive controls. 30 years ago at a swap meet I had bought a kit to build a signal head, but had I built it? No.

Seth is a big proponent of Bruce's Computer Model Railroad Interface (CMRI) program, and uses it on his layout (and many others). I saw Bruce give clinics on it, and bought all three of his detailed instruction books about it, and started plowing through them. A lot to figure out, lines of computer code to write, wires to run, etc. Easy to procrastinate on this.

Meanwhile, the NMRA worked out some "industry standards" on "Layout Command Control" (LCC) and a company called "RR-Circuits" started selling components to set it up. And I watched a Zoom clinic given by Jim Betz on his new layout, and there it is, he slapped an LCC in there, just like that! If he can do it, why can't I? How hard can it be?

So I decided to try it. Here's a picture of the initial setup, that I plan to use to power some signals to improve the operation of the Delta Wye on my layout. I got some inexpensive signals from Seth, proved to myself that I can make them light up using the LCC-Signals node with a test board of pushbuttons, so I guess the project is underway. I'm still afraid, but less than I was. The important thing is, it's underway, not stalled. A few days ago when I got stuck, I posted a question on the LCC groups.io site, and within an hour six helpful people had suggested answers! What a world we live in!


From left to right, this shows the "Power Point" regulated power supply, the USB interface box for plugging it into the computer for JMRI access, and the LCC-Signal "node" board, with the "test board" sticking up with all the pushbuttons on it for testing. Pretty cool. On the layout, the test board will be replaced with a cable out to the various turnouts, so the signals will be able to give the correct indication based on actual turnout position. I'll test it all at the desk first, and then put it on the layout and wire up the turnouts, which thankfully happen to already be powered by Tortoise switch machines that have extra SPDT contacts available. Whew!

I'll believe it when I see it. But this IS a first step.


Wednesday, December 9, 2020

Wrestling with a BLI locomotive


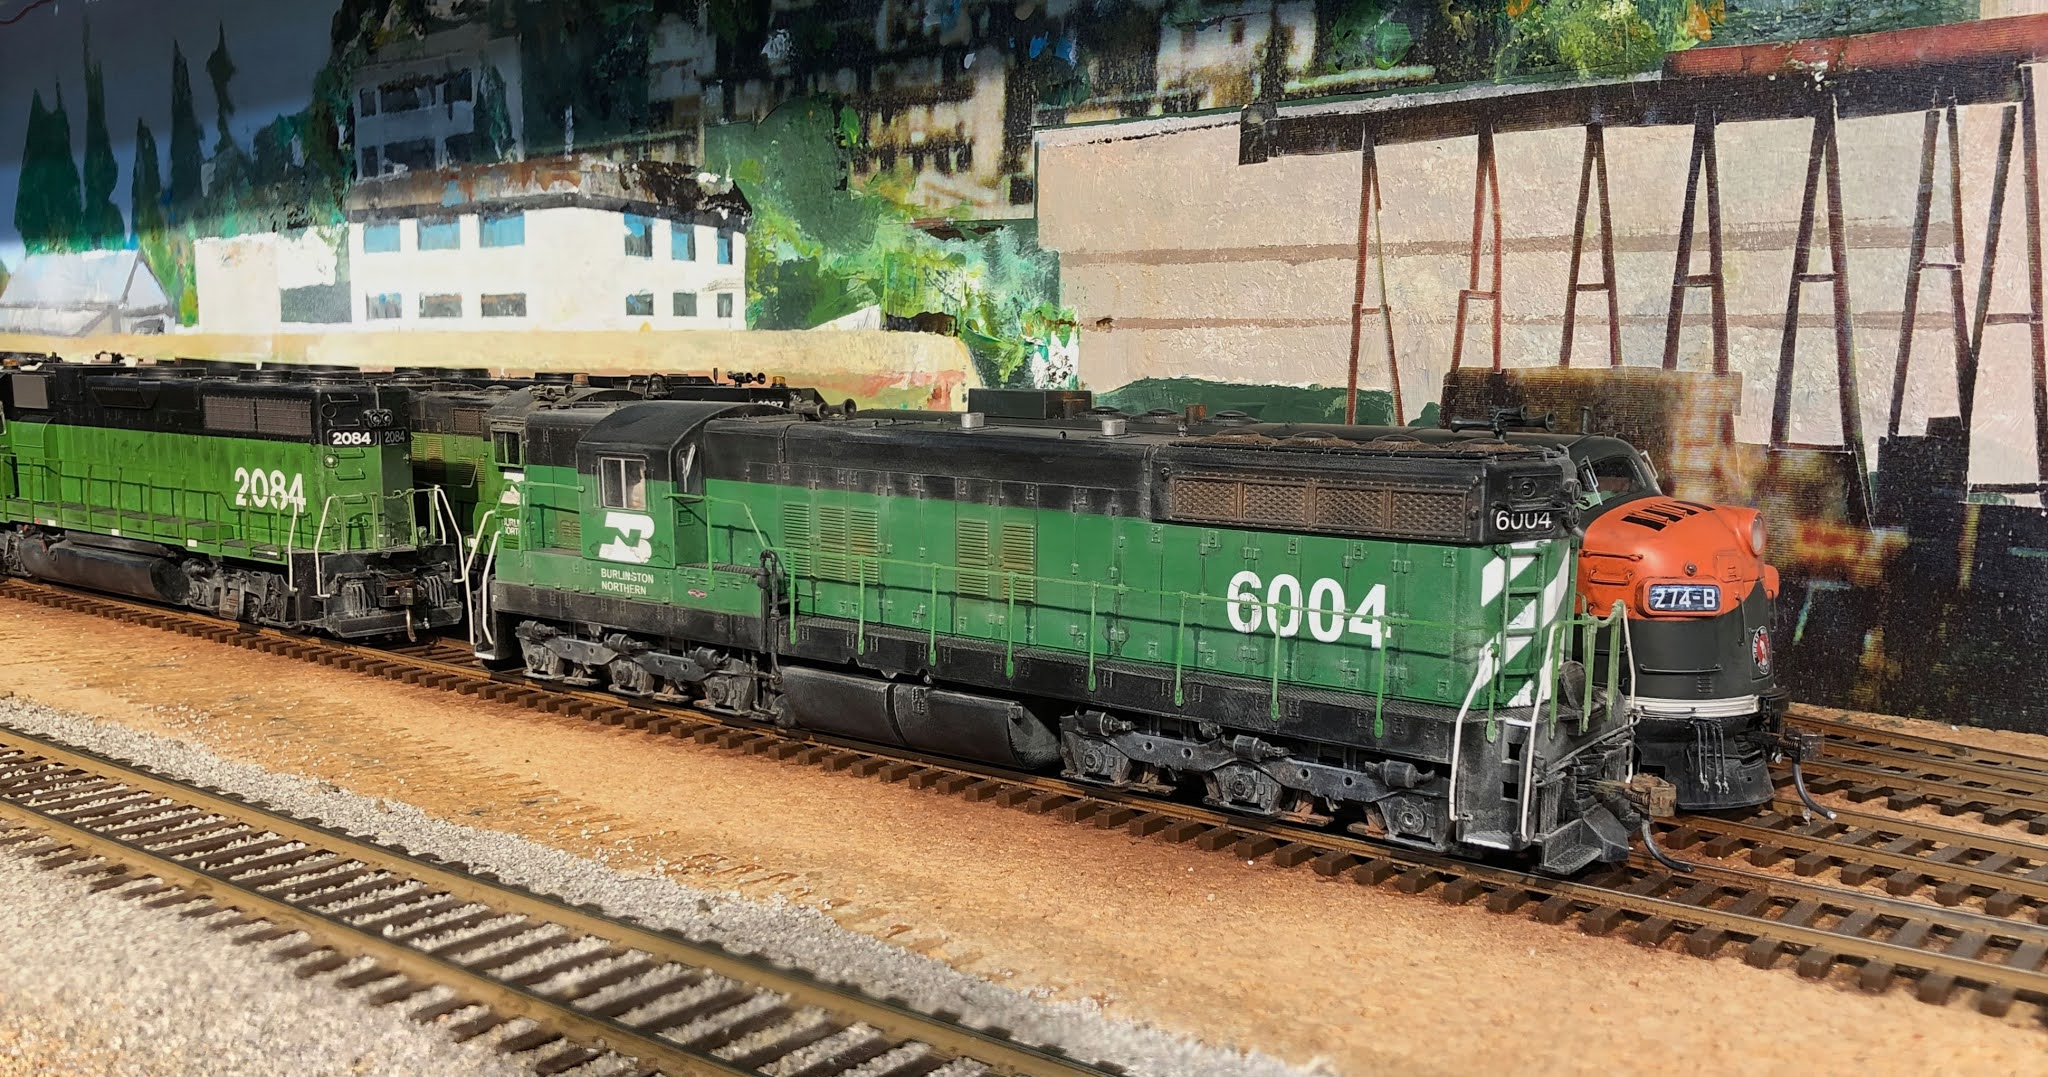
This is a fine looking SD7, sitting in Interbay, isn't it? Last week, Ray Wheeler, who used to work for the BN in the early '70's, told me SD 9 BN 6004 was often the locomotive used to switch grain covered hoppers in and out of the Cargill export grain terminal at Seattle's Pier 86. I was eager to use this information, because he (and others) had also told me that how I operated the arriving grain train on my recent YouTube video was, basically, incorrect. This was an opportunity to correct my mistakes, and improve the layout's operations to be more prototypical.

Hearing about the locomotive number BN 6004 "rang a bell," and I quickly found it in my active storage area of "excess locomotives." I had purchased it in 2016 from BLI, along with a "Rolling Thunder" sub-woofer system, to try out their innovative approach to making locomotive sounds more realistic on the low frequencies. The sub-woofer worked as advertised, amazing my friends by filling the entire house with a low-frequency rumble not unlike what you would experience standing next to an SD7, or in an earthquake. It drove my wife crazy, though, so I only use it on the rare occasions when visitors are curious and she isn't at home.

But there's another reason I had the locomotive stored off the layout ever since 2016. BLI, in what I understand was a derivative of the older QSI decoders (which I also had trouble with and eventually banned from my layout), flaunted the NMRA DCC standards and produced a DCC decoder that, in addition to transmitting low frequency sound information to the Rolling Thunder unit, has a number of divergences in its functions from what I was used to in the SoundTraxx and ESU decoders in the rest of my fleet. After I fiddled with standard CV's like 2, 3, 4, 5, and 6, it still came to a screeching stop instead of displaying momentum-like behavior, when I reduced the throttle setting quickly. There was nothing in the very sparse documentation that came with the locomotive to explain what to do, so I put it on an high shelf and never incorporated it into my operations, even though it was the perfect locomotive for my railroad and era. That was 2016. I swore to never purchase another BLI product again.

Between then and now, I invested a lot of time in learning how to set up braking functions in my Tsunami and ESU locomotives, even to the point of presenting clinics on it. This involved time spent looking up manuals online and playing with both JMRI DecoderPro and ESU LokProgrammer. I can't say I enjoyed it, but the end result is that all my (80) Tsunami and ESU locomotives are now speed matched, can be consisted together, and respond to the brake button (F9) with the same deceleration rate.

So last week, when Ray said BN 6004 was THE locomotive for switching strings of hoppers into the grain terminal at Pier 86 in Seattle, I thought I would try again to get it running better. With difficulty, I found that BLI has a couple of documents on their website for free download that list the various CV's and their nominal purpose (mostly without explanation). After trying a few things, I finally came across a CV185 called something like "brake sensitivity" (whatever that means) with a default setting of 20 and a range of 0 to 255. Using "programming on the main" (POM) with my NCE throttle, I randomly tried setting CV185 to 200 and, like magic, the problem of rapid deceleration vanished! With CV3 and 4 set to values of 12, and CV5 and 6 set to 80 and 40 respectively, the loco ran smoothly enough that I decided to call it good, slapped on some pan pastel weathering, and placed it in the engine terminal, as shown in the photo above. It will now be the main actor at Pier 86 on the Burrlington Northern.

If I wanted to spend another three (or more) hours on it (which I don't), I could probably try to study the BLI documents some more, and experiment some more, and figure out how to re-map functions so that when I pressed F9 I would get a braking deceleration different from the existing CV4 deceleration. But even then, the consisting features (like headlights and sounds) work so differently on BLI locomotives from the other locos that I wouldn't be able to use the loco in a consist anyway. So BN 6004 will remain dedicated to the grain terminal, solo, for the foreseeable future.

I have a lot of respect and gratitude for every company that invests in making products for model railroaders, and that includes BLI. My wife likes to say "people are just people." So I guess "companies are just companies." They have to decide what products will sell, at what price points, what they cost to make, whether to outsource their decoders, how much to invest in user manuals and support, and so forth. I simply get to benefit (or not) from their various decisions. There are probably modelers out there who have (doggedly) figured out how to get what they want from the BLI decoders, and don't want to deal with learning about the other brands. I'm just not one of them, that's all. I would pay more for a locomotive that I could easily then figure out how to use after I bought it. This blog is about my own personal experiences of this wonderful hobby of model railroading, not any sort of comprehensive or objective evaluation of anything. It pains me that I avoid BLI products just because I don't want to climb yet other learning curve, because they sometimes make products that would be perfect on my particular railroad (BN in the early '70's in Seattle). That's all.