
My first try at using EVA foam to model asphalt pavement between the tracks and rails in HO scale is progressing. As described in the previous post, I decided to try using black as the base color because it would take paint or pan pastels well, and any sort of unintentional blemish would not stand out like a sore thumb, like it does with plaster or other white materials. The one foot squares in the front of the photo are the 2mm thick pieces, for in between the tracks, and in the back is a roll of 1mm thick material, for fitting in between the rails. In truth, for the base layer, any material with about the same thickness as the height of the ties, such as balsa, styrene, cardstock, etc, would work - I just happened to have this material on hand and thought it would be easier to cut (which it was).
The first step was to prepare the surface between the tracks. In most cases it was bare cork ready-to-go, but along the front edges I had to use a putty knife and vacuum cleaner to remove some ballast and ground cover from next to the tracks, as shown below.


Then, I used a white chalk pencil to mark the edges of the 2mm thick black foam sheets, and a rotary knife to cut along the white pencil lines. The result was pieces of foam that fit between the track sections. I used white glue and various weights to glue these to the underlying cork roadbed:


The next layer was 1mm thick pieces to fit in between the rails. Similar process, same glue:

After removing the weights (again!) and testing the flangeways (they worked fine, thanks to the soft nature of the EVA foam), the next question was how to make it look like weathered asphalt instead of jet black foam. I decided to try blotching it with gray pan pastels using a make-up powder sponge. It turned out great!

I left the center part darker because it will be covered up by the car shops, in between the four square spacer blocks you can see glued on the foam. I thought about digging some inspection pits in there, but until I find out more prototype information about the actual building, I'm going to leave those details for a later time.
The last step (for now, anyway) was to pave the gravel areas on each side of the asphalt pavement, true to the prototype. This is the subject of a couple of YouTube videos you can watch, but in short, I applied Woodland Scenics fine grey ballast, leveled it off, cleared the flangeways, and carefully dribbled diluted white glue with an eyedropper to maintain the open flangeways while the glue dried. This also turned out pretty well, as you can see in both the above and below photos, although in retrospect I wish I had used real gravel dust instead of ballast, to get more of a variety of grain sizes in the pavement. It's certainly good enough for now. Here's the "final" product:

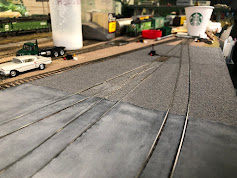
One last footnote - I noticed from Google Earth photos that the prototype kept the switchpoints clear of gravel pavement, so I did the same thing here, as you can see in the above photos and also below:

So now the car repair facility is paved! Next up will be putting all the equipment back, and possibly painting the building white like the prototype. Stay tuned, and I hope this motivates you to try some of your own paving projects.
No comments:
Post a Comment